Intro and Game 1, DE vs Empire
Game 3 vs DE
Game 4 vs Vampire Counts
Game 5 vs DE
Armies
My list:
Supreme Sorceress, level 4, Shadow Magic, Talisman of Preservation (4+), Sacrificial Dagger, Life Taker
Sorceress, level 2, Death Magic, Dark Pegasus, PoK, Tome of Furion
Death Hag, BSB, Cauldron of Blood
20 Spearmen with shields, standard, standard of discipline (level 4 bunker)
28 Corsairs, hand weapons, musician, standard, sea serpent standard
5 Dark Riders, repeating crossbows, musician
5 Harpies
18 Repeating Crossbowmen, musician
30 Witch Elves, musician, standard, banner of murder
20 Black Guard, musician, standard, banner of eternal flame
10 Cold One Knights
5 Shades, additional hand weapons
Hydra
Hydra
My opponent brought a witch cult army lead by Hellebron. I've always wanted to make one of these, but never had enough witches. Just looking at the army on the table, it wasn't very imposing as it was comprised of only 4 blocks of 20 infantry. It hit harder than it looked. It was as follows:
Crone Hellebron
Supreme Sorceress, level 4, shadow magic, book of ashur (+1 cast/dispel)
Sorceress, level 2, dark magic, not sure on magic items
Death Hag, cauldron of blood
Death Hag, cauldron of blood
Death Hag, battle standard, rune of khaine
20 Witch Elves, full command, hag has rune of khaine (Hellebron here)
20 Witch Elves, full command, hag has rune of khaine (BSB here)
20 Witch Elves, full command, hag has rune of khaine
20 Black Guard, full command (both sorceresses bunker here)
Assassin, manbane, rune of khaine, additional weapon
Assassin, manbane, rune of khaine, additional weapon
Assassin, venom blade
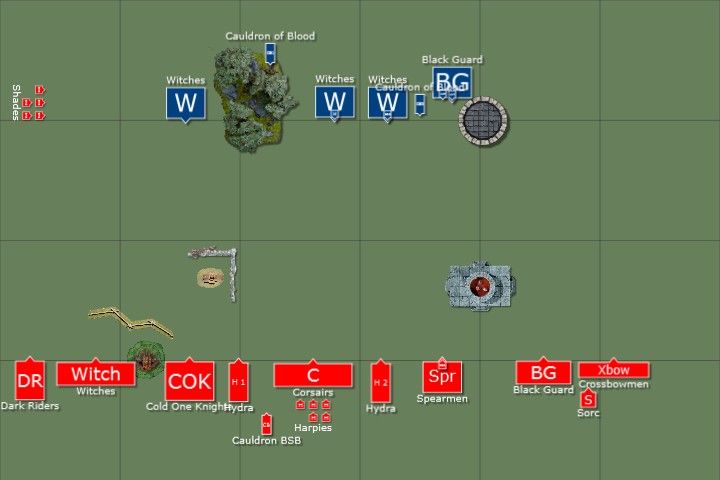
Deployment and scenario
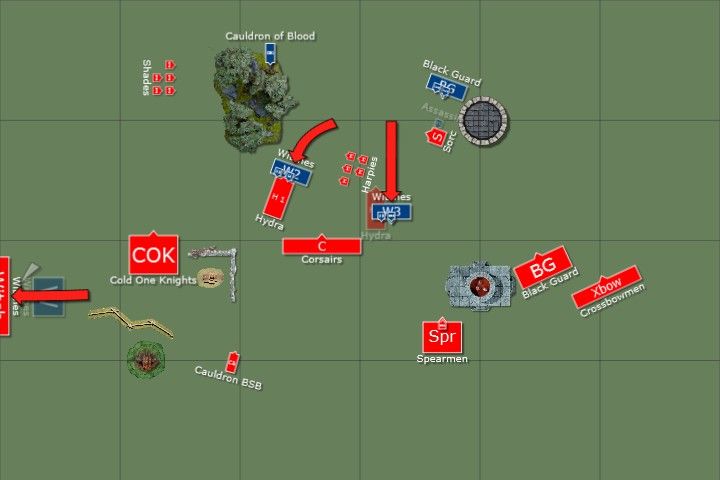
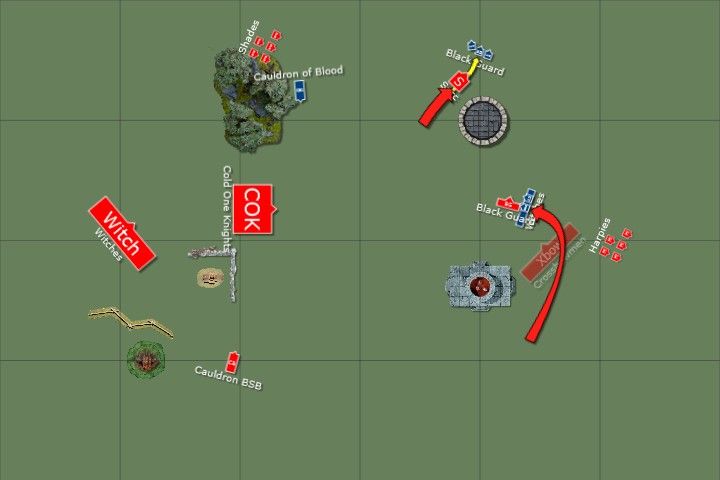
This scenario was Dawn Attack. We both brought Arcane Ruins for terrain so having to trade made no difference. They are represented by the altar and tower opposite each other. My opponent rolled to set up first and deployed with Hellebron and the BSB in the central two witch units. The Black Guard bunker stood with both sorceresses near the Arcane Ruins. One witch unit ended out on my left, away from the rest of the line.
My random deployment went fairly well, although the center was a bit light. I rolled to try and decide the first turn and came up with a 6! Hoorah! Deploying second and going first is nice.
Turn 1
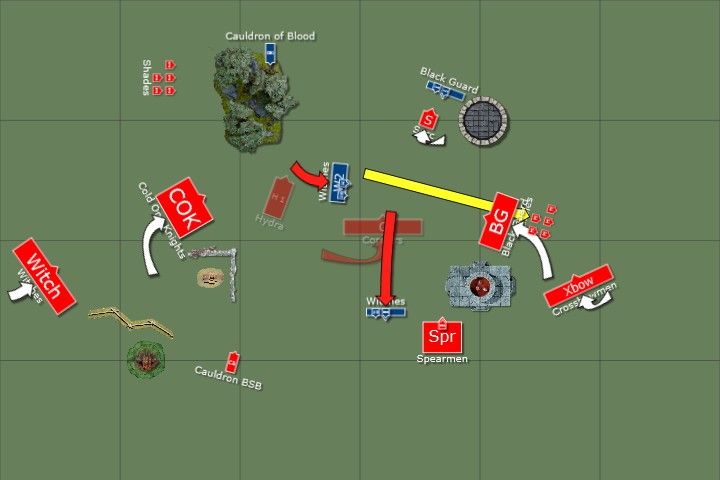
My line moves up to close with the seemingly massively outnumbered witch cult. During the magic phase, I toss the Purple Sun through one of my opponent's cauldrons, destroying it. He fails a shocking number of initiative tests on the right most witches containing the BSB and the unit loses a rank. My peg sorceress blows herself up in the process and is reduced to magic level 0. Crossbow fire picks off a few more witches across the line.
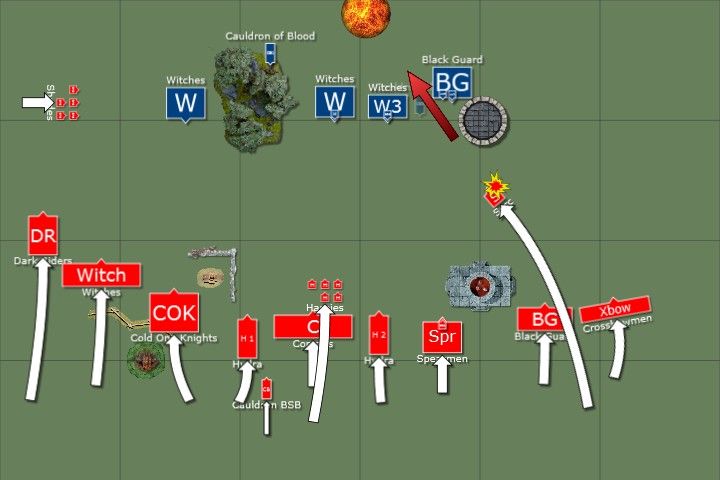
Witch cult half of turn 1. The witches on my left declare a charge on the dark riders. I hold because I would run off the board and also because I think they will fail (they were 15" away). I was wrong. The riders are chopped up and the witches overrun out of my witch horde's charge arc.
One of the sorceresses miscast and blew up 4 or 5 Black Guard, but nothing of note was accomplished.
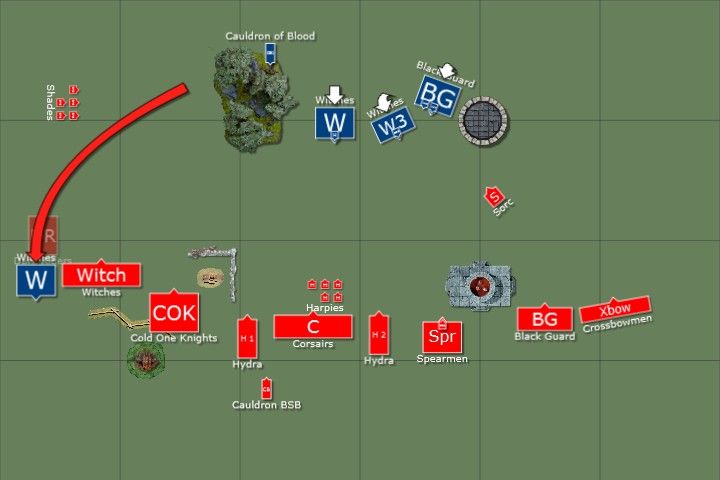
Turn 2
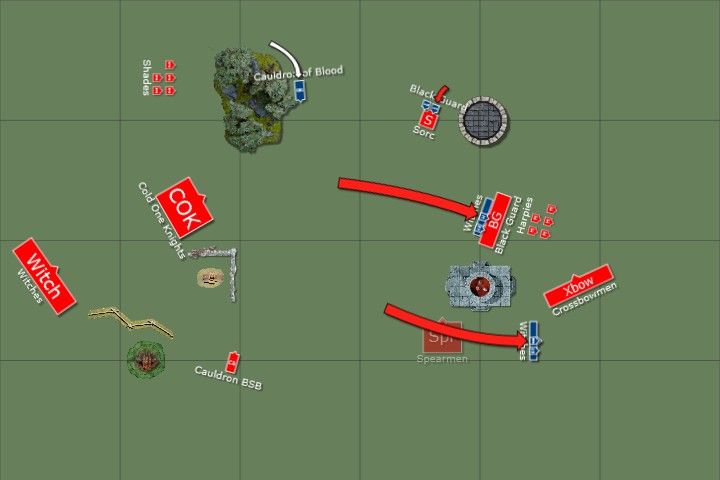
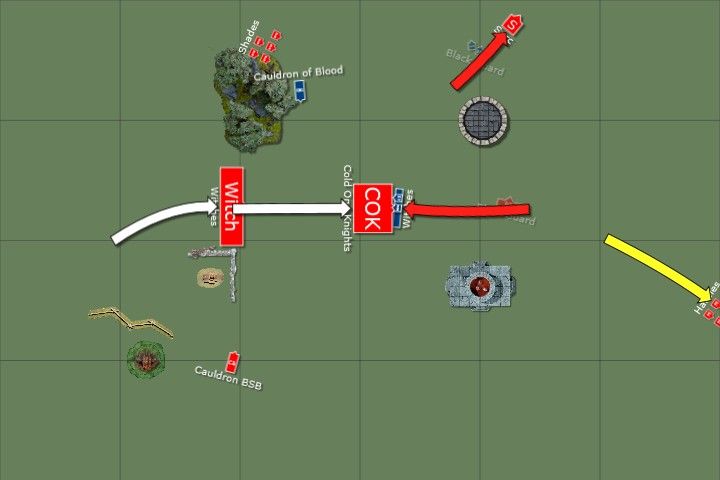
Due to the unexpected appearance of infantry in my flank, I reform my witch horde to force a fight. The Black Guard and Crossbows move toward the center in an attempt to become useful. I push the center forward, intending to burn the skinny witches with Hydra fire. I moved up the Harpies to try and block Hellebron's unit (left most of the center witches), but after I did, I noticed I didn't position them close enough and it was possible to wheel past. Fail. I dropped the peg sorceress in front of the black guard to pen them in.
My positioning of the Cold One Knights proved to be annoying at this point. The fence with the small building next to it was one terrain item that army builder didn't have a good match for. It was impassable and I had to go around.
The magic phase provided nothing useful. Both Hydras dropped flame templates on the central witch units. More than half of each unit burned up, leaving only around 6 models in the right most (BSB's) one.
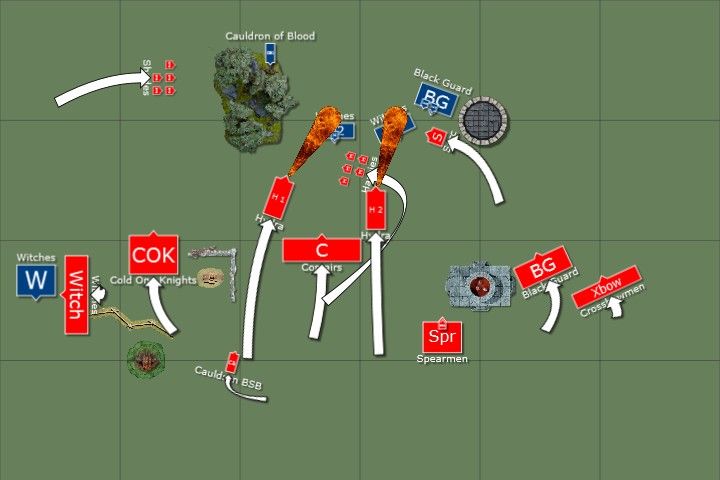
Every witch in the cult army charges into combat. Three assassins are revealed. Two are in the central witch units, armed with manbane and rune of khaine. The third charges out of the Black Guard into my peg sorceress. He has the venom blade. I think there was another miscast this round that blew up a chunk of the Black Guard unit. About half the corsairs die to the Black Horror.
Combat was nasty, as expected with two DE lists. My right side Hydra was killed before it got to attack and the witch cult's BSB unit overran. And this is the unit with only one rank of models... ouch. My other Hydra absorbs Hellebron's charge with a single wound left thanks to fantastic regeneration rolls. My witch horde bests the cult block and runs it down, traveling off the board. In an unexpected turn, the assassin attacking the peg sorceress sees his attacks rebound off the PoK and he is promptly trampled to death by her mount. This begins a trend that continues into next game of the peg sorceress becoming a close combat animal.
Turn 3
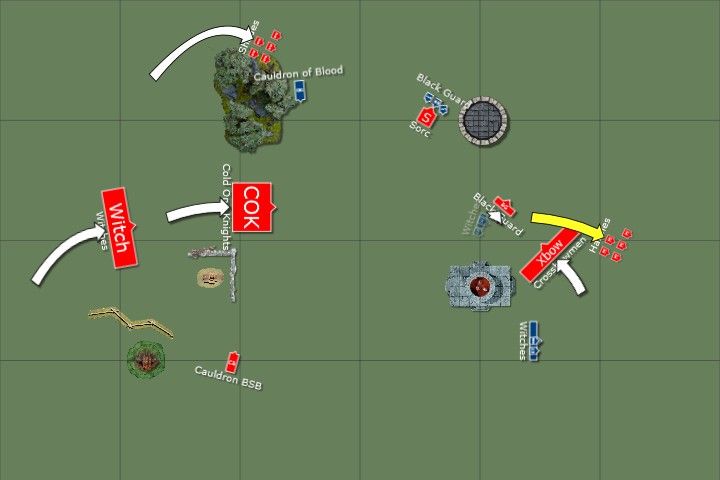
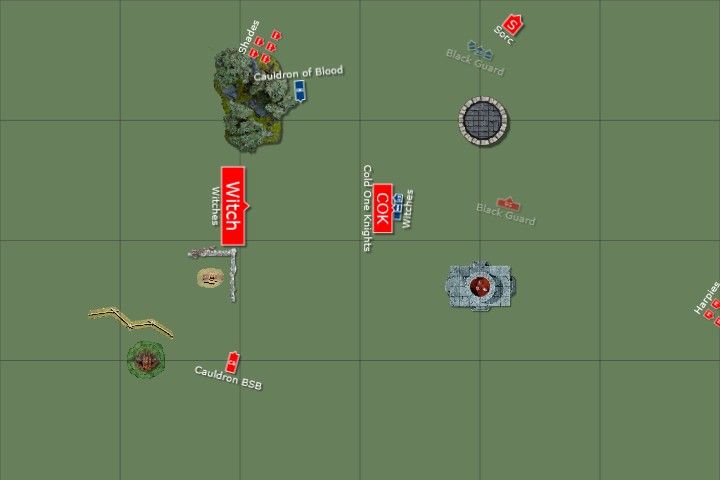
As failed turns go, this ranks up there pretty high. For some reason, I think it is a good idea to charge the flank of Hellebron's unit with harpies. I figured he'd get 1 CR for the Hydra as it has one wound left. He had no ranks. It was possible, I suppose, that my flank and maybe killing a witch or two could have won or tied. Whatever the odds of that were, it didn't work. The Hydra dies, what's left of the harpies runs away (I forgot to kill some off in the picture), and Hellebron's unit pursues and is now pointed towards the Black Guard. Neato. The corsairs charge that BSB unit and it blows right through them. This is that same unit with 6 models. Ouch again. Double ouch because they now have a flank charge on my bunker.
I face the peg sorceress toward the Black Guard bunker to continue to hold them in place. I expected them to charge and want it to hit the front.
The witch cult BSB unit charges my bunker. They are only 2 inches away, so I'm pretty confident I'll get caught if I flee. They blow through the bunker and don't even lose a model. Hellebron's unit charges into my Black Guard, killing about half. I manage to kill the accompanying assassin, put wounds on Hellebron, and reduce the unit nicely. My opponent takes his Black Guard bunker into the peg sorceress. He puts a wound on her, but loses all the remaining Black Guard except the champion.
Turn 4
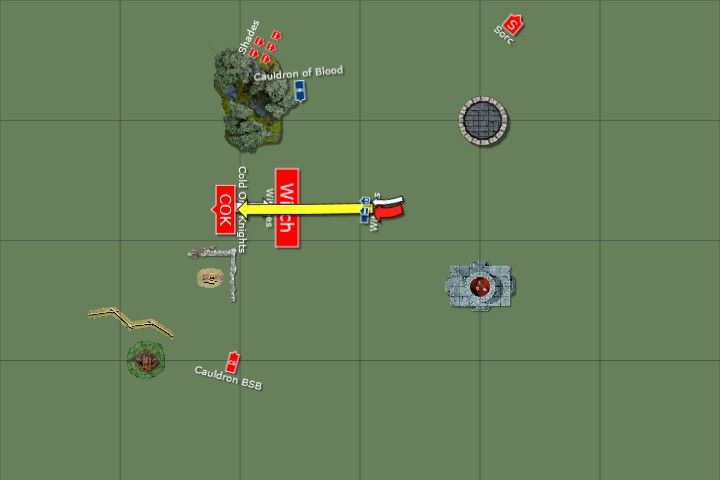
This turn is almost as bad from a manuvering stand point as turn 3. I remember looking at the crossbows, wanting to swift reform and thinking "I don't have a standard, I can't do that." Too bad that is what I took a musician for. Oh well. I ended up moving them forward and they didn't get far enough. My Black Guard finish off Hellebron and reform. Harpies keep running. Witches and Cold One Knights come towards the center to try and do something.
I get the peg sorceress in a challenge with the Black Guard champion. She takes a wound but sticks around.
The witch cult BSB unit charges into the back of the crossbows (picture is off, they could see), I flee from the meat grinder and roll double ones. They are run down, and the witches overrun right into the side of my Black Guard. I don't think that could have been set up any better if I tried. That BSB unit has now killed its way completely around the ruins, leaving about 50 infantry and a hydra dead behind them. For that, they've lost maybe one model.
High point of the turn occurs when the peg sorceress kills the Black Guard champ in the challenge. The resulting unit of my opponent's two sorceresses on foot fail their check and run. I can't catch them, but it is my turn next to charge them.
Turn 5
Harpies flee off the board. Peg sorceress catches both fleeing casters, giving me a huge chunk of points. I move up the Cold One Knights forgetting that my opponent's BSB unit counts as charging since they overran last turn. They go through the Black Guard and into the Cold One Knights. It is clear that I need this game to end because I am trying my best to lose to that one unit.
With killing blow on the witch unit, they kill a decent amount of Cold One Knights, losing a few in return. There's enough time for turn 6 so we continue.
Turn 6
The only action on my part of turn 6 is that the Cold One Knights break from combat and flee. Fortunately they bouce through my witch horde to safety.
My opponent's last go sees him break up the BSB unit that had the assassin, BSB, and one or two witches left. He moves the characters to control the terrain and goes for a table quarter with the unit.

End of game
Wow. I ended up winning this game, thanks mostly to the amazing close combat prowess of the peg sorceress who captured points for a Black Guard unit, cauldron, level 4 and level 2. My opponent made it really narrow by soaking up a bunch of secondaries on the last turn. Final score was 13-12. Clearly I have to pay attention to where I am moving my units, but my opponent built a list that hits very, very hard. This was a fun one and ended up being the closest scored game I had.
