
After around a 10 month hiatus my friend and I are playing the fifth battle of our Druchii v Asur campaign. My last WH battle was battle 4 and my friend hasn't played too many more.
Battles 1 - 3 can be found here: http://www.druchii.net/viewtopic.php?t=69734
Battle 4 can be found here: http://www.druchii.net/viewtopic.php?t=70447
To summarise the state of the campaign, my Druchii had gained ascendancy with a tight win in the 6000pt pitched battle.
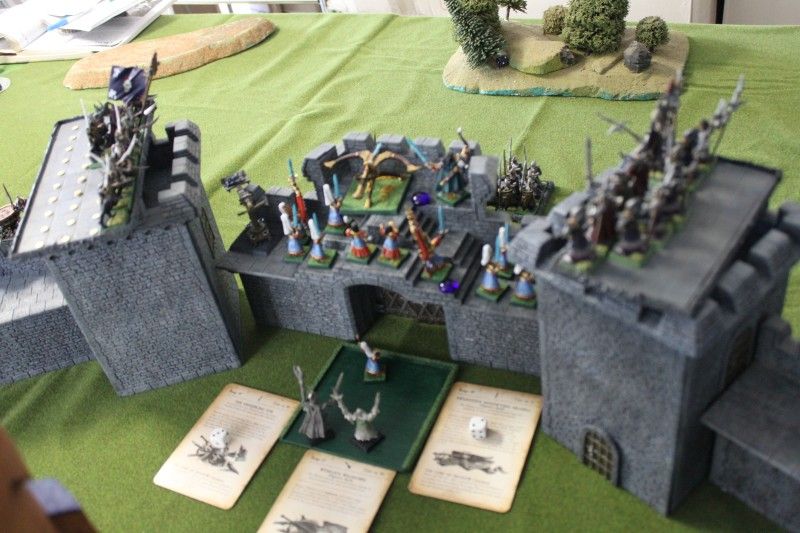
The fifth battle would be the Siege for Tor Achare at 3000pts and for this we'd have to give the siege rules a run from Blood in the Badlands. My experience of Warhammer Siege is from 5th Edition and while familiar with the new rules I haven't actually played a game under the new rules.
As there isn't much on Siege in terms of tactics on the forum, I thought I'd go through my list and reasons for taking these choices.
My 3000pt army is:
Ystvarl the Merciless (Dreadlord), Soulrender, Armour of Darkness, Dawnstone, Black Dragon Egg
Aleustra (Supreme Sorceress), Shadows, Lvl 4, Darkstar Cloak
Malus Darkblade (on foot - FREE for winning Battle 4)
Yvrael (Death Hag), BSB, Hydra Banner
Death Hag on Cauldron of Blood
30 Warriors, Full Command, Gleaming Pennant
27 Warriors, Full Command
29 Black Ark Corsairs, Full Command, Sea Serpent Standard
5 Harpies
20 Black Guard, Full Command, Whip of Agony, Banner of Hag Graef
29 Executioners, Full Command
30 Witch Elves, Full Command, Banner of Murder
War Hydra
My Siege Attacking options are:
Siege Tower x 2 (Black Guard & Witch Elves)
Battering Ram
Undermine
Monstrous Club (War Hydra)
From the Siege rules, the Druchii aren't that effective at breaching walls however seem to have the tools to clear the ramparts once in combat. Witch Elves and Corsairs seem to be ideally suited to clearing the walls of Asur while Black Guard are equally effective but lack the numbers to withstand the heavy casualties that accompany a siege.
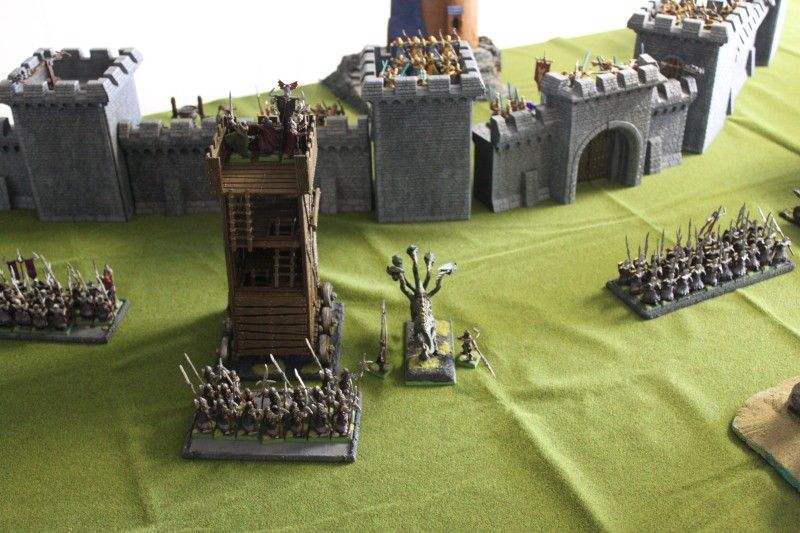
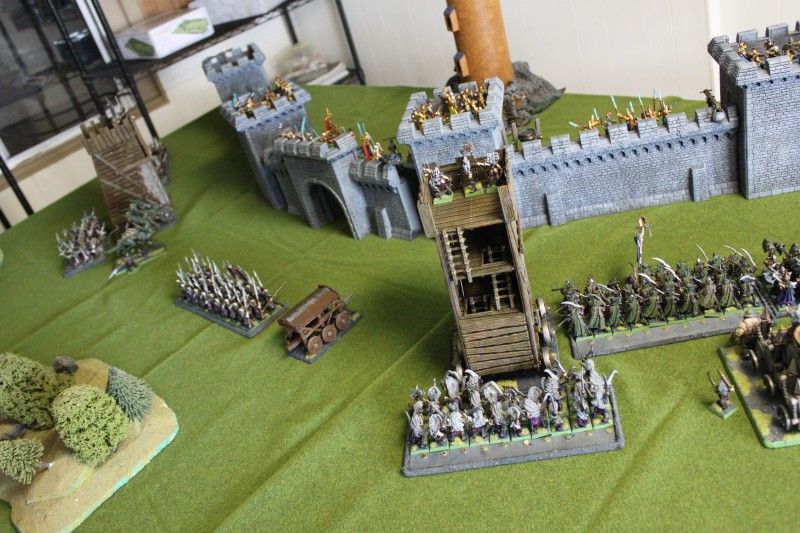
Ystvarl led the army in battle 1 and with the addition of a Black Dragon Egg and his regiment of Corsairs would be very effective at clearing the walls. The Witch Elves and Black Guard would be included for above reasons and would receive the Siege Towers to make the most of their I6 and low armour/numbers. We agreed that the Siege Towers would provide heavy cover to the units inside or pushing the towers.
The Executioners would potentially be less effective in only having 1A, however should be able to counter White Lions or Phoenix Guard that also have 1A. The addition of Yvrael and the Hydra Banner was based on the fact that it is likely there'll be lots of first round combats and that I can overcome her fragility by not including her in the 10 models assaulting a fortress section.
The larger unit of Warriors was to assault the gate and soak up the inevitable casualties of a Hell Gate / Boiling Oil or try to wear down some Swordmasters. The smaller unit of Warriors was just to escort the Sorceress and capture and hold any poorly protected objectives.
I had some doubts about including the Cauldron as there are so many ways to put down a war machine in a Siege Battle (Sally Forth, Flaming Ammunition etc).
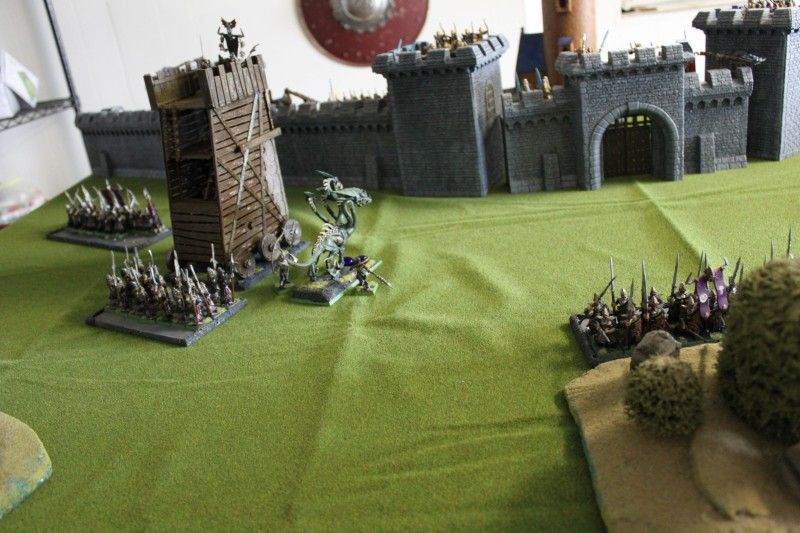
The War Hydra would be used to smash down walls with the Monstrous Club upgrade or used to assault fortress sections if required. It would also be handy to counter any relief force if I can resist assaulting the walls with it. Harpies are always useful.
Malus Darkblade was my reward for winning the Pitched Battle and is fresh from the bottom of the frozen river in battle 3. Spite hasn't returned but I picture Malus as something like Angry Anderson's character in Mad Max, he should be dead but just keeps coming back for more. I am using the Avatars of War Dark Elf Prince to represent Malus on foot.
I left the Crossbowmen at home as would be struggling to deal with the heavy cover and the Bolt Throwers really don't add any value in the attacking fire phase with each of the 2 dice only having a 1/12 chance of destroying a war machine.
For the Siege Attackers options, the Siege Towers are overpriced at 1000pts but from a visual perspective they have to be included. We agreed that Siege Towers couldn't charge in turn 1 as can only move 8" and the attackers are situated more than 8" from the wall. I included a Battering Ram and Undermine to try to get a breach while the Monstrous Club would allow the Hydra to support.
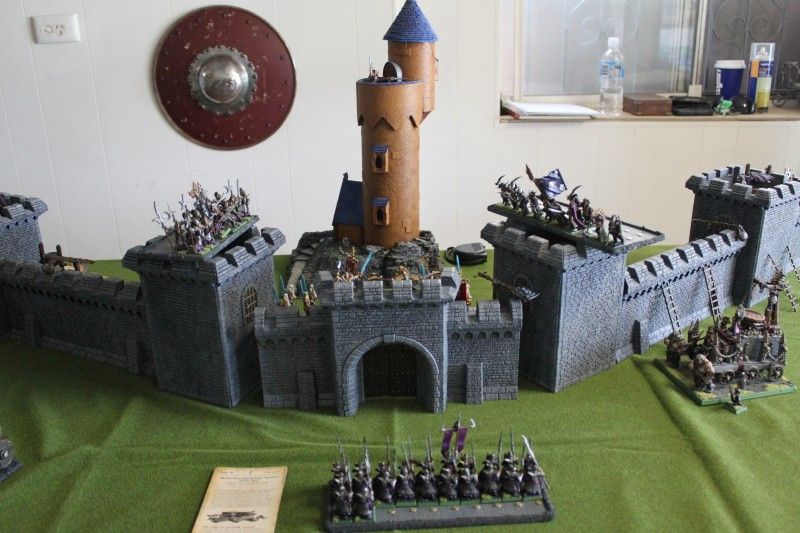
My expectations of the High Elf army are an army heavy on elites, with Phoenix Guard, White Lions and Swordmasters all proving hard to dislodge. Spearmen don't seem to add a lot of value so there would likely be some Archers or Sea Guard to fill the core slots and add some firepower. The Boiling Oil and Hell Gate are certainties while Sally Forth will no doubt knock down some of my war machines prior to the assault. He is going to have a lot of Fortress to defend as we specified that Tor Achare should have extensive walls as is a major city.
Battle report to follow soon.
Invasion of Chrace Battle 5 - Siege of Tor Achare
Moderator: The Dread Knights
Re: Invasion of Chrace Battle 5 - Siege of Tor Achare PIC HE
The Asur army was a fair bit different to what I was expecting with relatively few elite infantry to hold the walls of the fortress.
The army was:
(AA) Alith Anar
(AM) Archmage, Lvl 3, Beasts
(BSB) Noble BSB, Heavy, Shield, Battle Banner
(M1) Mage, Lvl 1, Beasts, Power Stone
(M2) Mage, Lvl 1, Beasts, Feedback Scroll
(A1) 14 Archers
(A2) 14 Archers
(A3) 14 Archers
(A4) 14 Archers
(A5) 13 Archers
(SM) 30 Sword Masters, Full Command, Standard of Balance
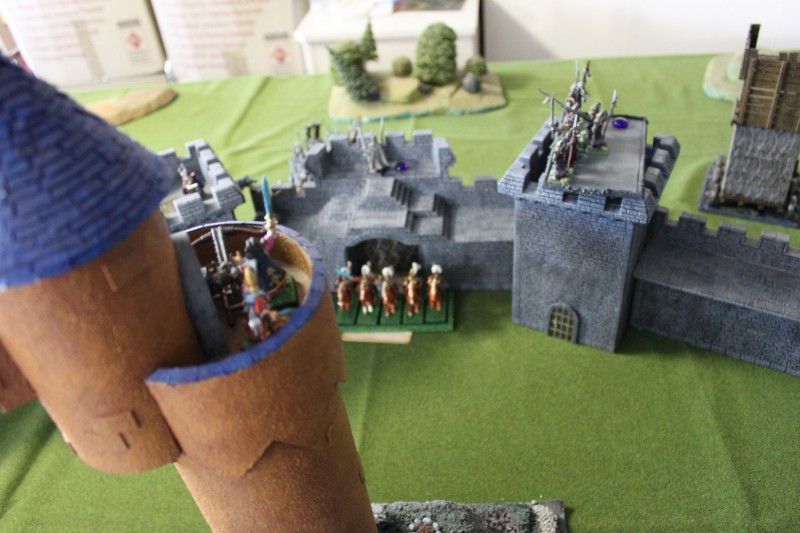
(SH) 5 Silver Helms, Shields
(ER1) 5 Reavers
(ER2) 5 Reavers
(BT1) Repeater Bolt Thrower
(BT2) Repeater Bolt Thrower
(BT3) Repeater Bolt Thrower
(BT4) Repeater Bolt Thrower
The Siege points were spent on:
Dwarf Brewhouse
Hellgate
5 x Boiling Oil
5 x Flaming Ammunition
2 x Sally Forth
Deployment
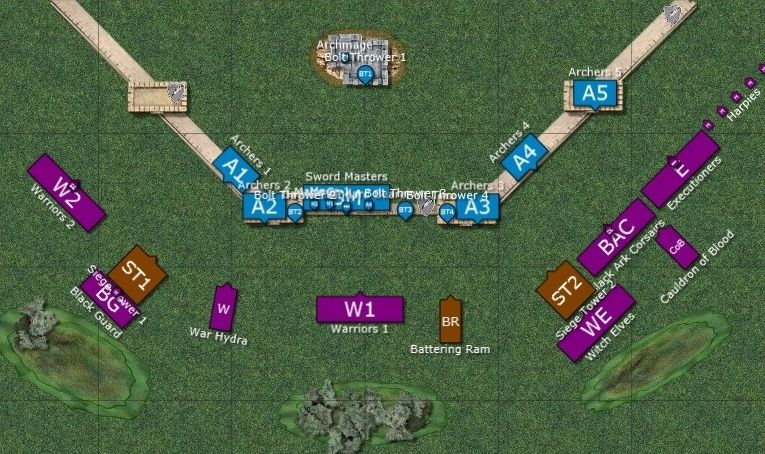
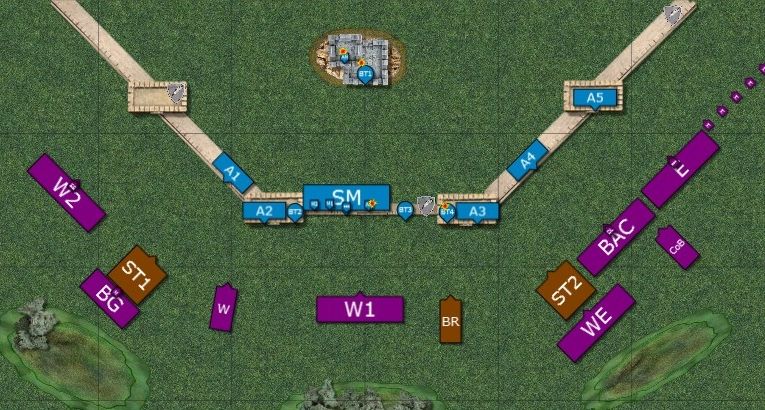
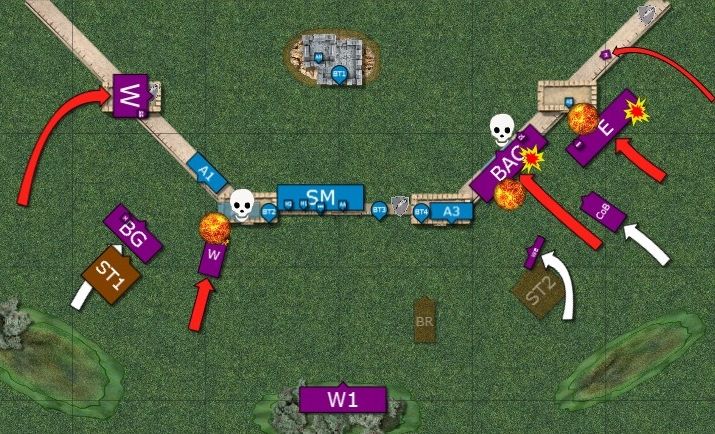
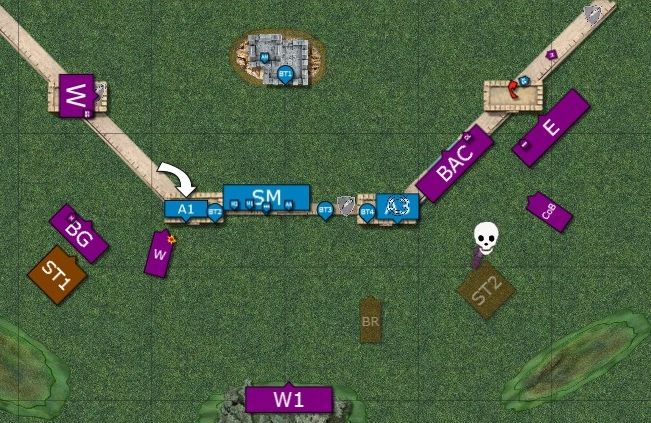
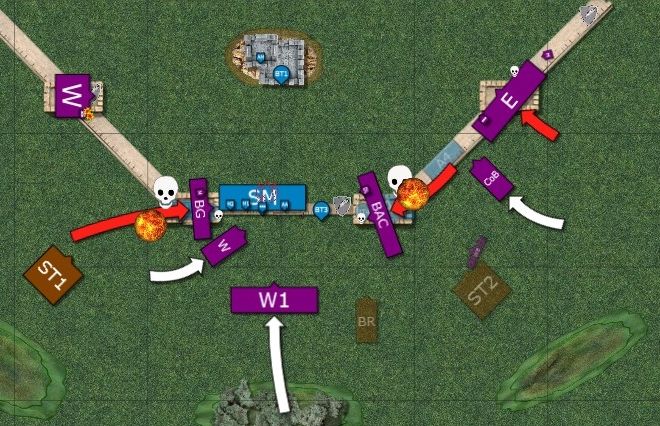
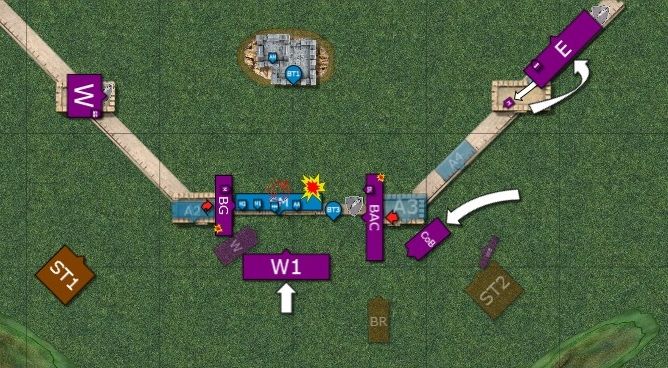
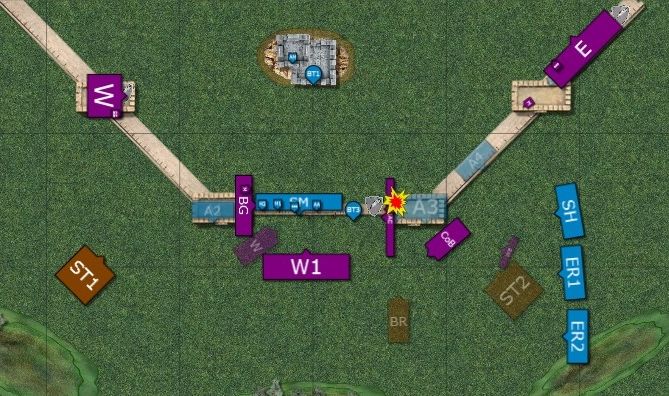
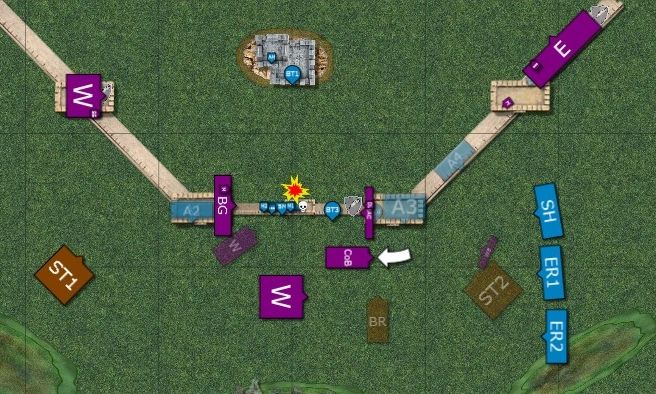
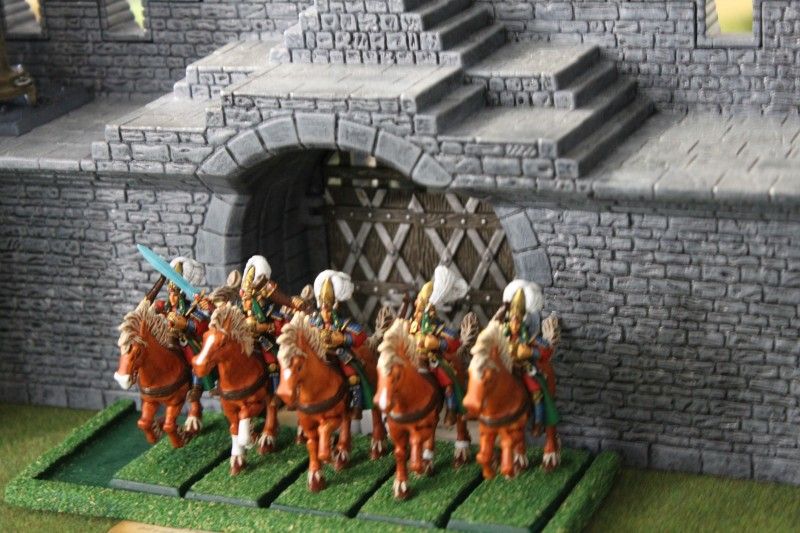
I commenced placing objectives and put the first objective on the wall on the far right in an attempt to split the Asur forces. The second objective was placed by the Asur on the far left tower with the final objective placed on the gate. The objectives are shown by the Battle Chronicler logo on the diagrams.
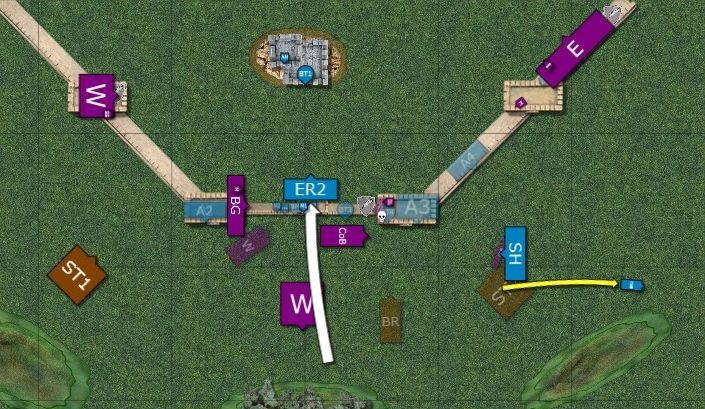
The Archmage unleashed his shiny toy and Fozzrik’s Folding Fortress came into existence behind the walls of the fortress, thus providing the Asur with a second line to their defences. The Archmage rolled up Wyssan’s Wild Form, Curse of Anraheir and Transformation of Kadon while both low level mages took Wyssan’s Wild Form. Aleustra did well and rolled up Miasma, Withering, Enfeebling and Okkam’s Mindrazor.
The Asur ignored the two outer objectives and deployed around the gate with the Sword Masters holding the gate and accompanied by the two low level mages, the BSB and Alith Anar. The Archer units were split with two units on the left hand side of the gate and three units on the right hand side. Three bolt throwers were deployed on the gate and the two towers on either side while the final bolt thrower deployed in Fozzrik’s Fortress with the Archmage. The Reavers and Silver Helms would make up the relief force.
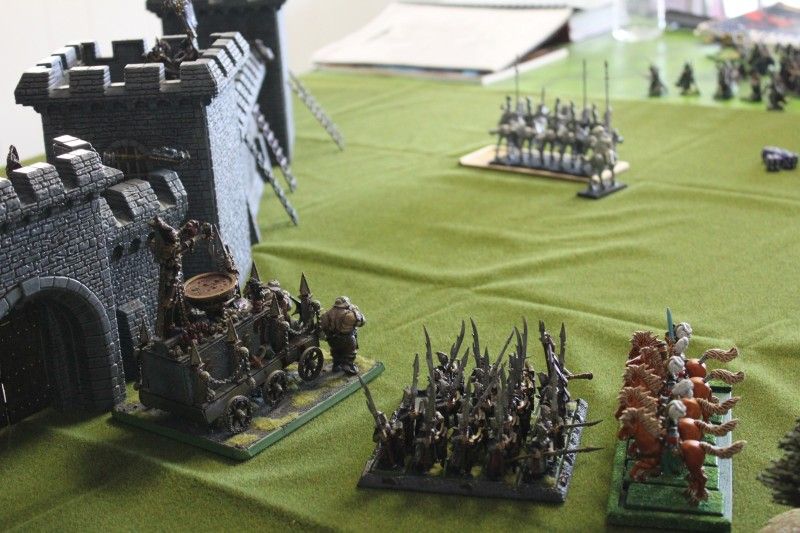
The smaller unit of Warriors (with Aleustra) would target the left objective while the Harpies were assigned to capture right objective. The bulk of my force was deployed on the right hand side with the Corsairs supported by both the Witch Elves and the Executioners. The Black Guard and Hydra would attack from the left hand side while the large unit of Warriors would assault the gate.
The plan was to feint at the gate with the larger unit of Warriors and use the powerful Witch Elves, Corsairs and Executioners to attack the right side while the Black Guard would assault the gate from the left. The Hydra and battering ram would seek to breach the gate.
Pre-Battle Phase
Starvation removed twenty archers, 9 sword masters and 2 bolt thrower crew. Clearly the nobility were far too generous in sharing out their food rations as Alith Anar, the Archmage and the BSB all sustained a wound due to hunger.
With all of those archers I was expecting a brutal pre-battle phase and was not to be disappointed. My undermine attempts on the gate failed dismally as I had hoped to breach this section to deny the Sword Masters the protection of the walls. The Asur Sally Forth was very successful as they managed to destroy both the Battering Ram and the Witch Elves Siege Tower. We played a house rule where the players have to assign dice to various fortress sections/war machines prior to rolling to see if they are destroyed. Any overkill would be ignored. Fortunately my Cauldron of Blood emerged unscathed.
The Witch Elves were suddenly very vulnerable without their Siege Tower and lost 26 to the hail of bowfire directed towards them. A single Harpy was left alive from that unit while the War Hydra sustained two wounds to bolt throwers. 11 Warriors were killed from the left hand unit while the central Warriors lost 8 and decided to panic and flee into the forest (despite their Gleaming Pennant).
The number 9 had come up a few times in the course of rolling thus far so we decided that this was the battle for Gate 9 of Tor Achare.

Druchii Turn 1 - Battle for Gate 9
So before turn 1 my Witch Elves had been neutralised, my Warriors tasked with assaulting the gate were fleeing and the Battering Ram that was supposed to breach the gate had been destroyed so not the best start.
I was more than a bit concerned about the sheer number of cauldrons of boiling oil sitting on the walls so I gave the 5+ ward from the Cauldron to the Executioners. The turn began with Aleustra’s Warriors and the lone Harpy capturing the vacant tower and wall sections holding objectives. The War Hydra assaulted the inner left tower and sustained a wound from the shooting and boiling oil poured on it but in response wiped out the unit of Archers. The Executioners drew the same treatment however their 5+ ward held firm and they only lost 3 models while slaughtering all but one of the Archers. Ystvarl and the Corsairs charged yet another unit of Archers holding a wall and lost 8 to the arrows and oil before wiping out the Asur. The Siege Tower holding the Black Guard lost a wheel and Malus made the executive decision that it was unbecoming for the Black Guard to change a wheel during a battle so they got out and walked. Clearly the quality of slave labour just isn’t what it should be with all three pieces of siege equipment proving to be useless. The Witch Elves wouldn’t have survived a stand and shoot response so simply moved to their right to look for an unlikely way to assist in this battle. The fleeing Warriors rallied while the magic phase was a waste of time as I failed to roll enough to cast Withering on four dice.
Asur Turn 1 – Battle for Gate 9
The Asur had been heavily depleted in the first turn and this would likely be the last opportunity to cripple the Druchii with shooting. The left hand Archers unit moved to the inner tower recently vacated by the Hydra. The lone remaining Archer decided to assault the Harpy but both the Archer and the Harpy failed to wound. The Dwarf Brewhouse on the inner right tower returned 3 Archers and a bolt thrower crewman to life but both units would now be subject to Stupidity. Several attempts were made to cast Wyssan’s Wild Form on the Archers occupying the right tower and one was successful. Curse of Anraheir was dispelled by the Druchii. The shooting phase was successful with the Witch Elves wiped out and the Hydra left on a single wound remaining however the attempts with flaming ammunition to destroy the Cauldron of Blood proved unsuccessful.
Druchii Turn 2 – Battle for Gate 9
The Cauldron commenced the turn by adding an extra attack to the Corsairs in preparation for their assault on the wild form Archers. The Executioner finished off the lone Archer and finally captured the tower they had assaulted in the previous turn. Both the Harpy and smaller unit of Warriors continued to hold their objectives while Malus called upon Tza’arkan as the Black Guard braved the arrows and boiling oil and assaulted the tower. The War Hydra attempted a breach on the gate with its club but failed and the central Warriors recommenced their march on the gate. I was confident that both the Black Guard and Corsairs would break through their Archer opponents but was a little concerned then that the Sword Masters would assault one of these units, so I cast Enfeeble on the Sword Masters with 5 power dice. The Asur let this through but out came the Feedback Scroll and inflicted 2 wounds on Aleustra, she would have to be careful about miscasting from now on. My confidence in the Black Guard was well founded and despite losing 8 (including the Champion) they were able to butcher the Archers and crew thus capturing the tower. Ystvarl and the Corsairs were similarly successful although lost 6 including their champion to the boiling oil and attacks of the Archers. Suffice to say that I was fairly happy that was the last of the boiling oil.
Asur Turn 2 – Battle for Gate 9
There wasn’t much left of the Asur to mount a defence and this was compounded when the relief force failed to show. The Sword Masters and their host of accompanying characters were the recipient of Wyssan’s Wild Form while Curse of Anraheir again was dispelled. The two remaining Bolt Throwers targeted the Corsairs felling 3 while Alith Anar dropped the War Hydra with his Moonbow.
Druchii Turn 3 – Battle for Gate 9
The Cauldron continued its blessing on the Corsairs and added an extra attack to this unit. I was a bit concerned with the ability of the lone Harpy to hold the objective so decided to move the Executioners to hold this objective. A combined assault by the Corsairs and Black Guard was the way to go and this was supported by Aleustra, who put a boosted Miasma (-2) and Enfeeble (-3S) on the Sword Masters to counter the Wyssan’s Wild Form already on them. Ystvarl consumed his Black Dragon Egg and the slaughter commenced with 12 Sword Masters falling to the assaulting Druchii. The Standard of Balance was instrumental in reducing the carnage as the Corsairs in particular were blunted losing both their Hatred and Frenzy. Only one Black Guard fell to the return attacks.
Asur Turn 3 – Battle for Gate 9
The relief force finally arrived and moved into position to face off against the Cauldron and Warriors outside the walls. Once again the focus of the bolt throwers was the Corsairs with 3 more falling to the heavy bolts. Wyssan’s Wild Form again boosted the strength and toughness of the Sword Masters for the impending combat. The Power Stone was used by the Asur Mage but failed to produce enough power for a successful casting.
Druchii Turn 4 – Battle for Gate 9
The arrival of the relief force led to a reform of the Warriors and the Cauldron to face the new threat. This time the Cauldron’s blessing was placed on Malus Darkblade and the Black Guard. Aleustra again cast a boosted Miasma (-1) and Enfeeble (-3S) on the Sword Masters to counter the Wild Form. In the assault the Sword Masters cut down 3 of the Corsairs but in response the Black Guard and Corsairs chopped down 7 of the Sword Masters. Malus Darkblade did me proud and ran through the so called Shadow King with his deadly blade. I would now finally have access to all of the characters hiding within the ranks of the Sword Masters.
Asur Turn 4 – Battle for Gate 9
The Silver Helms and Reavers charged the Cauldron but were only able to kill one of the Hags with their charge, which embarrassingly was killed by an Elven Steed. The Death Hag and remaining Hag removed all but one of the Reavers in a flurry of attacks sending both units of Asur cavalry fleeing. Sensing that the battle was about to reach its climax, the Asur mages teamed up and put two successful castings of Wyssan’s Wild Form on the Sword Masters. One Corsair was shot down by the Bolt Throwers. The other unit of Reavers made a move towards the gate in a hopeful attempt to ride through the gate in the last turn.
Druchii Turn 5 – Battle for Gate 9
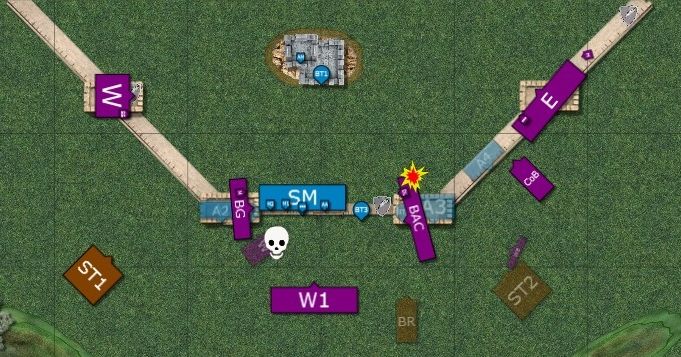
This was my last chance to capture the gate and the final objective eluding my grasp. Unfortunately this effort would be hampered by the Sword Masters having +2 Strength and Toughness. My first move was to send the Warriors in an attempt to block the Reavers making a move for the gate while the Cauldron again added an additional attack to Malus and the Black Guard. My first move of the magic phase was to cast Miasma on the Reavers and reduce their movement to prevent a move at the gate but this was dispelled by the Asur. I followed up using all my remaining dice casting Okkam’s Mindrazor on the Black Guard to trump the Sword Masters increased toughness and even escaped a miscast, keeping Aleustra alive on one wound. The combat began with the Sword Masters and Noble killing 3 more Corsairs and a single Black Guard. One of the Asur Mages issued a challenge and Ystvarl accepted but we resolved the attacks of the Black Guard first, who with Mindrazor promptly cut down everyone but the Mage in a challenge, Malus personally slicing apart the Battle Standard Bearer. The Mage had one attack against Ystvarl, who with a rerollable 1+ armour save was not worried about his opponents augmented S5. Somehow the attack managed to wound the Dreadlord however I was confident that there was no way the Mage could survive 4 attacks at S6. All of my attacks hit and needing 3s to wound, I promptly rolled a 5,2,2 ,1 and the Mage had survived with a single wound remaining to potentially control the gate. A successfully passed break test kept the gate under Asur control and I was suddenly in a bit of trouble as the Reavers were within range and only needed to pass a leadership test and would be able to march within the gate and win the siege for the Asur.

Asur Turn 5 – Battle for Gate 9
The Silver Helms rallied yet the lone Reaver from the first unit failed his leadership test and continued to flee towards the edge of the board. We decided to resolve the leadership test last as this would decide the result of the battle, if the Reavers passed then it would come down to victory points as I was holding 2 objectives. Considering that the Asur only had a handful of models remaining on the battlefield then it was easy to determine who would win if they didn’t get inside the gate. The Bolt Thrower fired again on the Corsairs and finally finished off this unit. Then came the all important leadership test, which the Reavers passed on a 6 and marched around the Druchii Warriors, through the Asur controlled gate and won the battle for the Asur.
Post-Game
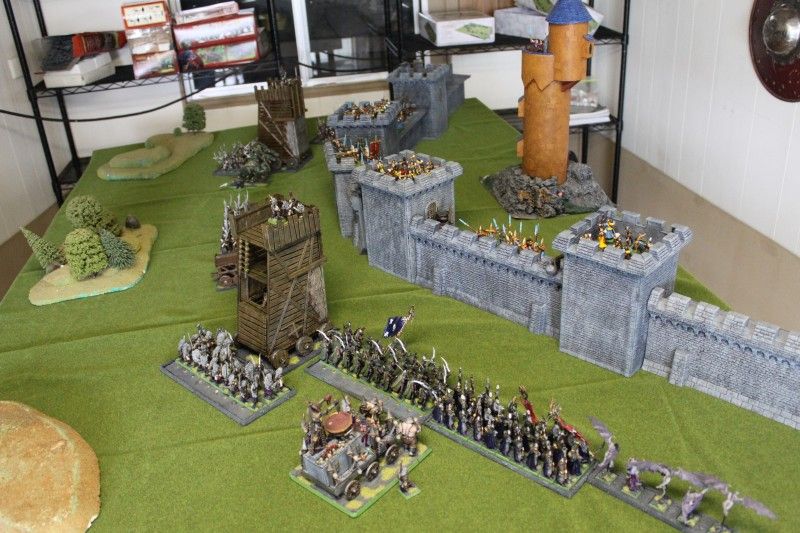
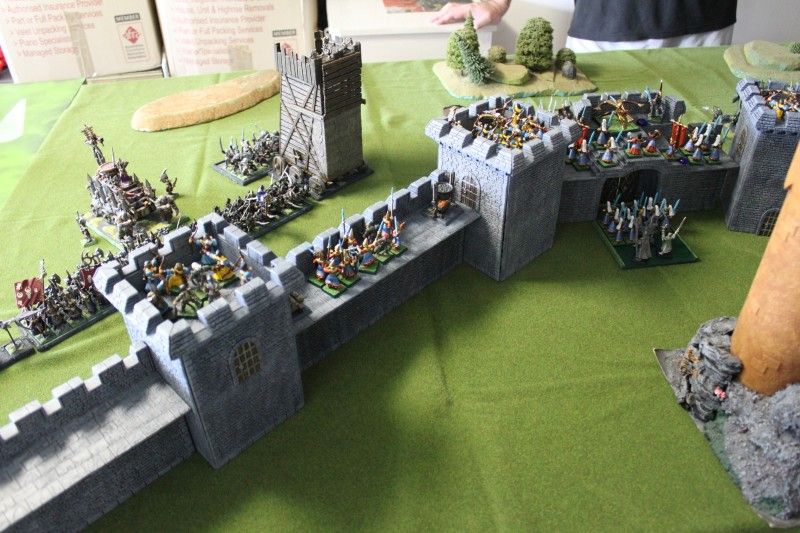
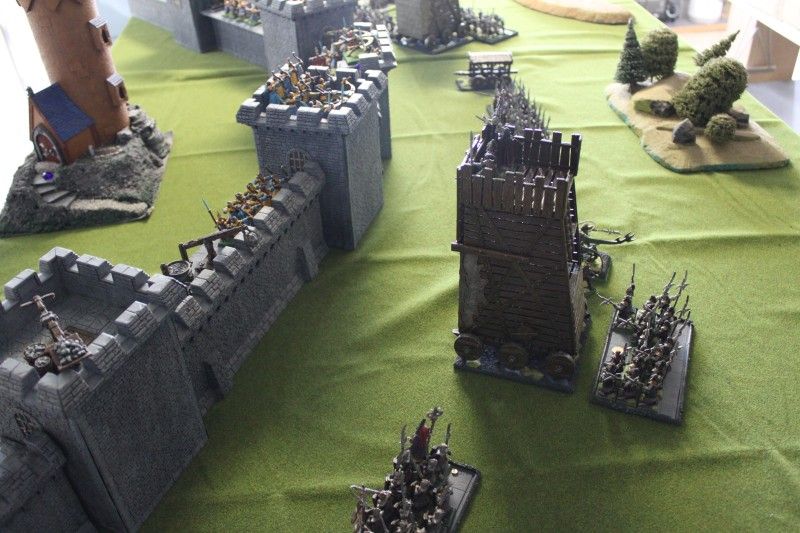
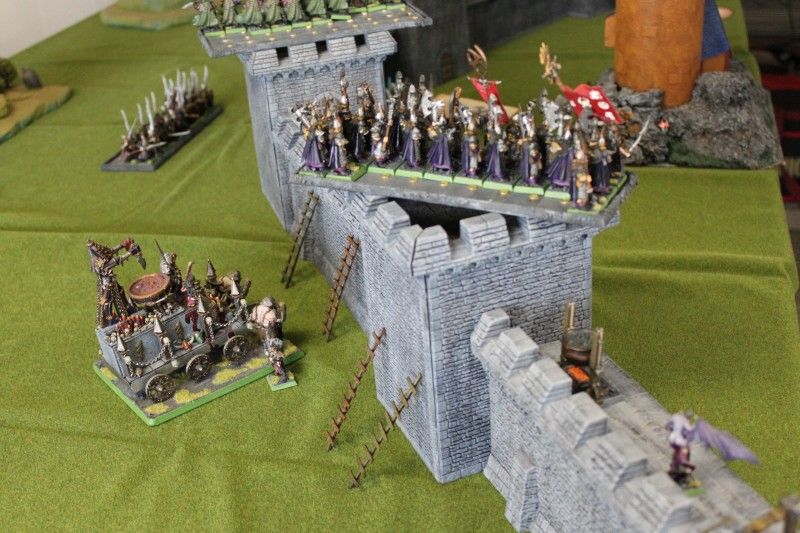
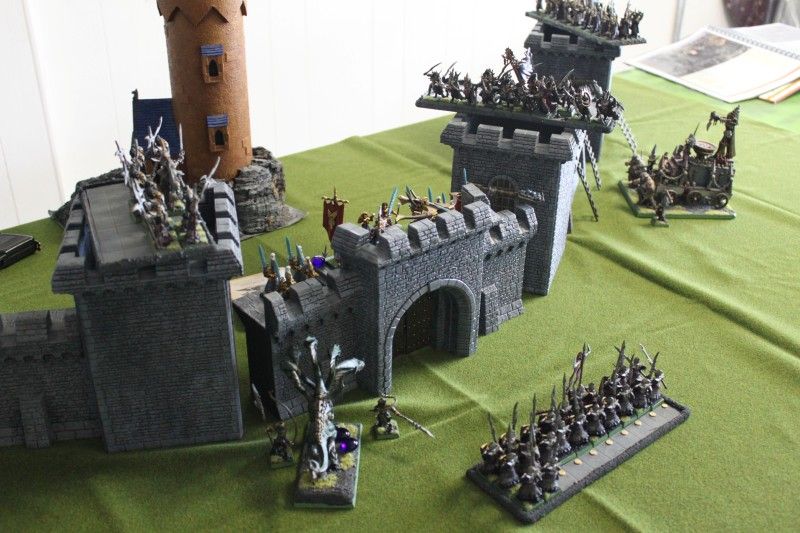
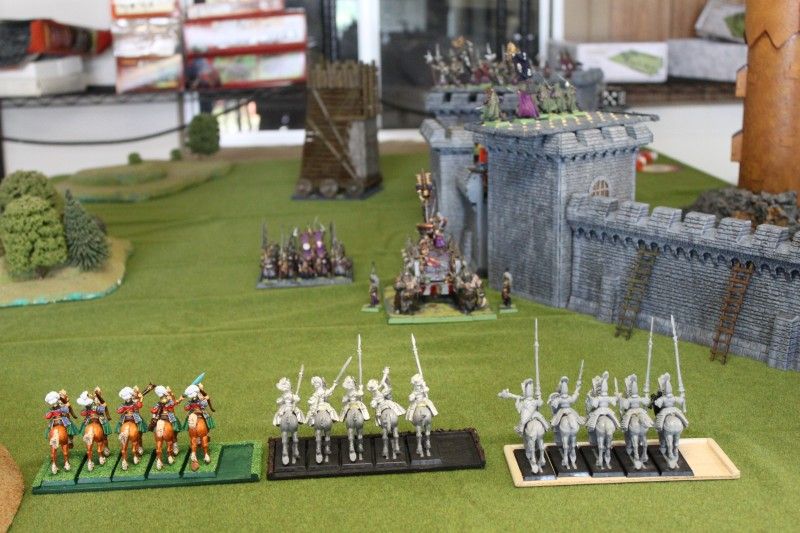
In hindsight I thought I played this game pretty well although I didn’t see the likelihood of the Reavers entering the gate until far too late. I probably should’ve moved the lone Harpy out to block the relief force around turn 3 or 4 but was confident that the assault on the gate would be successful. I had planned to assault any section containing an Archmage prior to the battle but Fozzrik’s Folding Fortress made any attempt to do this impossible and was a cunning ploy to keep his Archmage alive for the duration of the battle. This being my first game of Siege, I probably now recognise the need to have more supporting units, those that can hold objectives while the hammer units continue their advance. The Executioners were clearly under-utilised but I needed to hold that objective and couldn’t rely on the Harpy to do this. Some shooting may have also been beneficial in reducing the relief force units to under 5 models and therefore unable to win the battle by entering the gate. The Siege war machines that I used were an absolute disaster but they looked really good on the table as I hope you’ve seen from the photos.
I’m not sure about the use of the Beasts lore on all of the Asur mages but my opponent wanted to try something different and felt that having a signature augment spell would be very useful in this battle. I personally would’ve included some Phoenix Guard as they are tough and resistant to starvation but the Archers were devastating in the pre-battle phase as seen by what happened to the Witch Elves. Finally I’m not sure how there weren’t any White Lions participating in the defence of their city from the invaders but we’ll rationalise this by saying that they were defending the other gates.
We decided post-game that after the result of this battle we would complete one more battle within the walls of the fortress as per our original plan. While the Asur had won the Siege, the Druchii had almost wiped out their foes and would proceed within the city. The Asur would certainly benefit from some form of bonus in the final battle. Hopefully the ever annoying Alith Anar wouldn’t be there to greet me inside the city.
In the meantime, as you can see from the photos I better start ironing that battle mat.
The army was:
(AA) Alith Anar
(AM) Archmage, Lvl 3, Beasts
(BSB) Noble BSB, Heavy, Shield, Battle Banner
(M1) Mage, Lvl 1, Beasts, Power Stone
(M2) Mage, Lvl 1, Beasts, Feedback Scroll
(A1) 14 Archers
(A2) 14 Archers
(A3) 14 Archers
(A4) 14 Archers
(A5) 13 Archers
(SM) 30 Sword Masters, Full Command, Standard of Balance
(SH) 5 Silver Helms, Shields
(ER1) 5 Reavers
(ER2) 5 Reavers
(BT1) Repeater Bolt Thrower
(BT2) Repeater Bolt Thrower
(BT3) Repeater Bolt Thrower
(BT4) Repeater Bolt Thrower
The Siege points were spent on:
Dwarf Brewhouse
Hellgate
5 x Boiling Oil
5 x Flaming Ammunition
2 x Sally Forth
Deployment
I commenced placing objectives and put the first objective on the wall on the far right in an attempt to split the Asur forces. The second objective was placed by the Asur on the far left tower with the final objective placed on the gate. The objectives are shown by the Battle Chronicler logo on the diagrams.
The Archmage unleashed his shiny toy and Fozzrik’s Folding Fortress came into existence behind the walls of the fortress, thus providing the Asur with a second line to their defences. The Archmage rolled up Wyssan’s Wild Form, Curse of Anraheir and Transformation of Kadon while both low level mages took Wyssan’s Wild Form. Aleustra did well and rolled up Miasma, Withering, Enfeebling and Okkam’s Mindrazor.
The Asur ignored the two outer objectives and deployed around the gate with the Sword Masters holding the gate and accompanied by the two low level mages, the BSB and Alith Anar. The Archer units were split with two units on the left hand side of the gate and three units on the right hand side. Three bolt throwers were deployed on the gate and the two towers on either side while the final bolt thrower deployed in Fozzrik’s Fortress with the Archmage. The Reavers and Silver Helms would make up the relief force.
The smaller unit of Warriors (with Aleustra) would target the left objective while the Harpies were assigned to capture right objective. The bulk of my force was deployed on the right hand side with the Corsairs supported by both the Witch Elves and the Executioners. The Black Guard and Hydra would attack from the left hand side while the large unit of Warriors would assault the gate.
The plan was to feint at the gate with the larger unit of Warriors and use the powerful Witch Elves, Corsairs and Executioners to attack the right side while the Black Guard would assault the gate from the left. The Hydra and battering ram would seek to breach the gate.
Pre-Battle Phase
Starvation removed twenty archers, 9 sword masters and 2 bolt thrower crew. Clearly the nobility were far too generous in sharing out their food rations as Alith Anar, the Archmage and the BSB all sustained a wound due to hunger.
With all of those archers I was expecting a brutal pre-battle phase and was not to be disappointed. My undermine attempts on the gate failed dismally as I had hoped to breach this section to deny the Sword Masters the protection of the walls. The Asur Sally Forth was very successful as they managed to destroy both the Battering Ram and the Witch Elves Siege Tower. We played a house rule where the players have to assign dice to various fortress sections/war machines prior to rolling to see if they are destroyed. Any overkill would be ignored. Fortunately my Cauldron of Blood emerged unscathed.
The Witch Elves were suddenly very vulnerable without their Siege Tower and lost 26 to the hail of bowfire directed towards them. A single Harpy was left alive from that unit while the War Hydra sustained two wounds to bolt throwers. 11 Warriors were killed from the left hand unit while the central Warriors lost 8 and decided to panic and flee into the forest (despite their Gleaming Pennant).
The number 9 had come up a few times in the course of rolling thus far so we decided that this was the battle for Gate 9 of Tor Achare.
Druchii Turn 1 - Battle for Gate 9
So before turn 1 my Witch Elves had been neutralised, my Warriors tasked with assaulting the gate were fleeing and the Battering Ram that was supposed to breach the gate had been destroyed so not the best start.
I was more than a bit concerned about the sheer number of cauldrons of boiling oil sitting on the walls so I gave the 5+ ward from the Cauldron to the Executioners. The turn began with Aleustra’s Warriors and the lone Harpy capturing the vacant tower and wall sections holding objectives. The War Hydra assaulted the inner left tower and sustained a wound from the shooting and boiling oil poured on it but in response wiped out the unit of Archers. The Executioners drew the same treatment however their 5+ ward held firm and they only lost 3 models while slaughtering all but one of the Archers. Ystvarl and the Corsairs charged yet another unit of Archers holding a wall and lost 8 to the arrows and oil before wiping out the Asur. The Siege Tower holding the Black Guard lost a wheel and Malus made the executive decision that it was unbecoming for the Black Guard to change a wheel during a battle so they got out and walked. Clearly the quality of slave labour just isn’t what it should be with all three pieces of siege equipment proving to be useless. The Witch Elves wouldn’t have survived a stand and shoot response so simply moved to their right to look for an unlikely way to assist in this battle. The fleeing Warriors rallied while the magic phase was a waste of time as I failed to roll enough to cast Withering on four dice.
Asur Turn 1 – Battle for Gate 9
The Asur had been heavily depleted in the first turn and this would likely be the last opportunity to cripple the Druchii with shooting. The left hand Archers unit moved to the inner tower recently vacated by the Hydra. The lone remaining Archer decided to assault the Harpy but both the Archer and the Harpy failed to wound. The Dwarf Brewhouse on the inner right tower returned 3 Archers and a bolt thrower crewman to life but both units would now be subject to Stupidity. Several attempts were made to cast Wyssan’s Wild Form on the Archers occupying the right tower and one was successful. Curse of Anraheir was dispelled by the Druchii. The shooting phase was successful with the Witch Elves wiped out and the Hydra left on a single wound remaining however the attempts with flaming ammunition to destroy the Cauldron of Blood proved unsuccessful.
Druchii Turn 2 – Battle for Gate 9
The Cauldron commenced the turn by adding an extra attack to the Corsairs in preparation for their assault on the wild form Archers. The Executioner finished off the lone Archer and finally captured the tower they had assaulted in the previous turn. Both the Harpy and smaller unit of Warriors continued to hold their objectives while Malus called upon Tza’arkan as the Black Guard braved the arrows and boiling oil and assaulted the tower. The War Hydra attempted a breach on the gate with its club but failed and the central Warriors recommenced their march on the gate. I was confident that both the Black Guard and Corsairs would break through their Archer opponents but was a little concerned then that the Sword Masters would assault one of these units, so I cast Enfeeble on the Sword Masters with 5 power dice. The Asur let this through but out came the Feedback Scroll and inflicted 2 wounds on Aleustra, she would have to be careful about miscasting from now on. My confidence in the Black Guard was well founded and despite losing 8 (including the Champion) they were able to butcher the Archers and crew thus capturing the tower. Ystvarl and the Corsairs were similarly successful although lost 6 including their champion to the boiling oil and attacks of the Archers. Suffice to say that I was fairly happy that was the last of the boiling oil.
Asur Turn 2 – Battle for Gate 9
There wasn’t much left of the Asur to mount a defence and this was compounded when the relief force failed to show. The Sword Masters and their host of accompanying characters were the recipient of Wyssan’s Wild Form while Curse of Anraheir again was dispelled. The two remaining Bolt Throwers targeted the Corsairs felling 3 while Alith Anar dropped the War Hydra with his Moonbow.
Druchii Turn 3 – Battle for Gate 9
The Cauldron continued its blessing on the Corsairs and added an extra attack to this unit. I was a bit concerned with the ability of the lone Harpy to hold the objective so decided to move the Executioners to hold this objective. A combined assault by the Corsairs and Black Guard was the way to go and this was supported by Aleustra, who put a boosted Miasma (-2) and Enfeeble (-3S) on the Sword Masters to counter the Wyssan’s Wild Form already on them. Ystvarl consumed his Black Dragon Egg and the slaughter commenced with 12 Sword Masters falling to the assaulting Druchii. The Standard of Balance was instrumental in reducing the carnage as the Corsairs in particular were blunted losing both their Hatred and Frenzy. Only one Black Guard fell to the return attacks.
Asur Turn 3 – Battle for Gate 9
The relief force finally arrived and moved into position to face off against the Cauldron and Warriors outside the walls. Once again the focus of the bolt throwers was the Corsairs with 3 more falling to the heavy bolts. Wyssan’s Wild Form again boosted the strength and toughness of the Sword Masters for the impending combat. The Power Stone was used by the Asur Mage but failed to produce enough power for a successful casting.
Druchii Turn 4 – Battle for Gate 9
The arrival of the relief force led to a reform of the Warriors and the Cauldron to face the new threat. This time the Cauldron’s blessing was placed on Malus Darkblade and the Black Guard. Aleustra again cast a boosted Miasma (-1) and Enfeeble (-3S) on the Sword Masters to counter the Wild Form. In the assault the Sword Masters cut down 3 of the Corsairs but in response the Black Guard and Corsairs chopped down 7 of the Sword Masters. Malus Darkblade did me proud and ran through the so called Shadow King with his deadly blade. I would now finally have access to all of the characters hiding within the ranks of the Sword Masters.
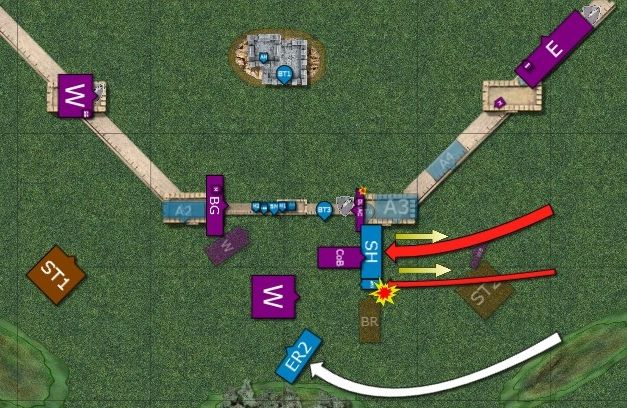
Asur Turn 4 – Battle for Gate 9
The Silver Helms and Reavers charged the Cauldron but were only able to kill one of the Hags with their charge, which embarrassingly was killed by an Elven Steed. The Death Hag and remaining Hag removed all but one of the Reavers in a flurry of attacks sending both units of Asur cavalry fleeing. Sensing that the battle was about to reach its climax, the Asur mages teamed up and put two successful castings of Wyssan’s Wild Form on the Sword Masters. One Corsair was shot down by the Bolt Throwers. The other unit of Reavers made a move towards the gate in a hopeful attempt to ride through the gate in the last turn.
Druchii Turn 5 – Battle for Gate 9
This was my last chance to capture the gate and the final objective eluding my grasp. Unfortunately this effort would be hampered by the Sword Masters having +2 Strength and Toughness. My first move was to send the Warriors in an attempt to block the Reavers making a move for the gate while the Cauldron again added an additional attack to Malus and the Black Guard. My first move of the magic phase was to cast Miasma on the Reavers and reduce their movement to prevent a move at the gate but this was dispelled by the Asur. I followed up using all my remaining dice casting Okkam’s Mindrazor on the Black Guard to trump the Sword Masters increased toughness and even escaped a miscast, keeping Aleustra alive on one wound. The combat began with the Sword Masters and Noble killing 3 more Corsairs and a single Black Guard. One of the Asur Mages issued a challenge and Ystvarl accepted but we resolved the attacks of the Black Guard first, who with Mindrazor promptly cut down everyone but the Mage in a challenge, Malus personally slicing apart the Battle Standard Bearer. The Mage had one attack against Ystvarl, who with a rerollable 1+ armour save was not worried about his opponents augmented S5. Somehow the attack managed to wound the Dreadlord however I was confident that there was no way the Mage could survive 4 attacks at S6. All of my attacks hit and needing 3s to wound, I promptly rolled a 5,2,2 ,1 and the Mage had survived with a single wound remaining to potentially control the gate. A successfully passed break test kept the gate under Asur control and I was suddenly in a bit of trouble as the Reavers were within range and only needed to pass a leadership test and would be able to march within the gate and win the siege for the Asur.
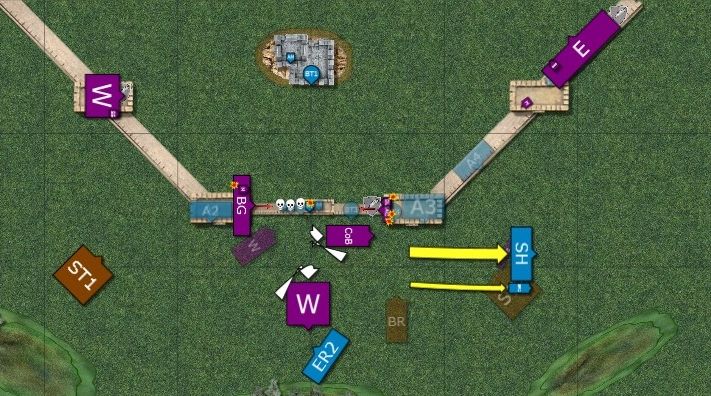
Asur Turn 5 – Battle for Gate 9
The Silver Helms rallied yet the lone Reaver from the first unit failed his leadership test and continued to flee towards the edge of the board. We decided to resolve the leadership test last as this would decide the result of the battle, if the Reavers passed then it would come down to victory points as I was holding 2 objectives. Considering that the Asur only had a handful of models remaining on the battlefield then it was easy to determine who would win if they didn’t get inside the gate. The Bolt Thrower fired again on the Corsairs and finally finished off this unit. Then came the all important leadership test, which the Reavers passed on a 6 and marched around the Druchii Warriors, through the Asur controlled gate and won the battle for the Asur.
Post-Game
In hindsight I thought I played this game pretty well although I didn’t see the likelihood of the Reavers entering the gate until far too late. I probably should’ve moved the lone Harpy out to block the relief force around turn 3 or 4 but was confident that the assault on the gate would be successful. I had planned to assault any section containing an Archmage prior to the battle but Fozzrik’s Folding Fortress made any attempt to do this impossible and was a cunning ploy to keep his Archmage alive for the duration of the battle. This being my first game of Siege, I probably now recognise the need to have more supporting units, those that can hold objectives while the hammer units continue their advance. The Executioners were clearly under-utilised but I needed to hold that objective and couldn’t rely on the Harpy to do this. Some shooting may have also been beneficial in reducing the relief force units to under 5 models and therefore unable to win the battle by entering the gate. The Siege war machines that I used were an absolute disaster but they looked really good on the table as I hope you’ve seen from the photos.
I’m not sure about the use of the Beasts lore on all of the Asur mages but my opponent wanted to try something different and felt that having a signature augment spell would be very useful in this battle. I personally would’ve included some Phoenix Guard as they are tough and resistant to starvation but the Archers were devastating in the pre-battle phase as seen by what happened to the Witch Elves. Finally I’m not sure how there weren’t any White Lions participating in the defence of their city from the invaders but we’ll rationalise this by saying that they were defending the other gates.
We decided post-game that after the result of this battle we would complete one more battle within the walls of the fortress as per our original plan. While the Asur had won the Siege, the Druchii had almost wiped out their foes and would proceed within the city. The Asur would certainly benefit from some form of bonus in the final battle. Hopefully the ever annoying Alith Anar wouldn’t be there to greet me inside the city.
In the meantime, as you can see from the photos I better start ironing that battle mat.
-
van Awful

- Highborn
- Posts: 690
- Joined: Wed Jan 11, 2006 10:23 am
- Location: Ammerzoden, metropole at the Maas
Re: Invasion of Chrace Battle 5 - Siege of Tor Achare
An excellent battle report once again. I really like the idea of a campaign like that.
Will be discussing this with my main opponenent, to bad he hasnt got any Asur. But i asume dwarfs will die just as easy.
Did you prefer the old siege rules over the rules in the new book or where the new rules to your satisfaction. We've been talking about integrating the best of rules together. For example, especially the rules for destroying wallsections/gates seemed a lot better back then.
I'm looking formard to see what your take is on urban warfare. (some sort of skirmish maybe??).
oh btw nice looking army you got there mate.
Nec spe, nec metu
I am an Extraordinary Druchii Gentleman
I am an Extraordinary Druchii Gentleman
Re: Invasion of Chrace Battle 5 - Siege of Tor Achare
In my opinion there is no comparison between the two rule sets, the old rules were just too detailed and complex. The new rules produce a game that moves pretty quickly and was surprised at how quickly we were able to get through a 3000pt game. I'd suggest you give the new rules a try and then tweak from there as they work quite well. I will acknowledge that a few rules are somewhat ambiguous but these could be resolved easily with a simple FAQ or pre-game discussion with your opponent.
There are a couple of scenarios in the General's Compendium, so we'll work from there. Don't know if it will be skirmish as such but will certainly be some form of pillaging involved.
Thanks for the army comments, there are some benefits to not playing a game for 10 months.
There are a couple of scenarios in the General's Compendium, so we'll work from there. Don't know if it will be skirmish as such but will certainly be some form of pillaging involved.
Thanks for the army comments, there are some benefits to not playing a game for 10 months.
-
Tyrannus deathbringer

- Noble
- Posts: 497
- Joined: Fri Dec 23, 2011 7:28 pm
- Location: The Black Ark Nemesis
Re: Invasion of Chrace Battle 5 - Siege of Tor Achare
Epic battle, epic army and epic scenery!
(I also thought the folding fortress was a very nice trick )
)
Very entertaining all round - and thanks for the write up
(I also thought the folding fortress was a very nice trick
Very entertaining all round - and thanks for the write up
"All who surrender will be enslaved; whoever does not surrender but opposes with struggle and dissension, shall be annihilated."
-
xFallenx

- Malekith's Best Friend
- Posts: 1255
- Joined: Fri Sep 22, 2006 1:04 am
- Location: Calgary, Alberta
- Contact:
Re: Invasion of Chrace Battle 5 - Siege of Tor Achare
That was great! Thanks for the read.
Oct 2013-Current: 3-2-0

Re: Invasion of Chrace Battle 5 - Siege of Tor Achare
Such a cool report. Too bad you didn't get the gate after ROFLstomping them into the dust. I love the pics. So epic. So so so epic.
"With hate, all things are possible." - Malus Darkblade

Re: Invasion of Chrace Battle 5 - Siege of Tor Achare
I've read through all the campaign so far, just love it. The battlereports are amazing, nice job! Hope you guys really enjoyed it! Also, I really like that you guys got more and more painting done over the course of play.
I agree with the speaker above, the new rules would make it harder to play a seige perhaps, but not to much tweaking would be required. Looking forward to the finale ;P
I agree with the speaker above, the new rules would make it harder to play a seige perhaps, but not to much tweaking would be required. Looking forward to the finale ;P