Dark Tigers - Dragonlist blog

Get critiqued on your latest army here...

Moderator: The Dread Knights

Cycloptic squirrel
Corsair
Posts: 86
Joined: Wed Sep 05, 2012 7:54 pm

Dark Tigers - Dragonlist blog

Post by Cycloptic squirrel »

Hi all!
Welcome to my thread of army lists, battlereports, and discussion of my dark elf dragonlist. I had originally set a goal to bring a dragon to a tournament and while prepping I have come to really enjoy the playstyle that such a list facilitates, so I'll keep on it.

Feel free to look around and if you have any comments or questions about the list, dragon theory, or any previous battle, please feel free to ask.


I figured for posterity's sake, I'd keep the original post of this thread.
Original Post:

I have a no comp tournament coming up in a few months and I'm determined to bring a dragon - mostly because in the few years I've been going, I've rarely see them in action. Ive already played a few times with the list below and enjoy it, but I'm throwing it up here in case anyone has any suggestions for improvement.


Dreadlord on Dragon, Pendant, The Other Trickster's Shard, Blood Armor, Soulrender, Sea Dragon Cloak
Master BSB on Dark Pegasus, Heavy Armor, Shield, Lance, Sea Dragon Cloak, Dragonhelm, Luckstone, Crown of Command
Sorceress on Dark Pegasus, level 2, Dispel Scroll, Whip of Agony [SHADOW]

27 Warriors, full command, warbannerr
10 Crossbowmen, full command, shields
5 Dark Riders, crossbows

5 Cold One Knights, Champion, Banner, Gleaming Pennant, Ring of Hotek
5 Harpies
5 Harpies
Hydra
Hydra


The idea here is to field a very mobile list supporting the dragon. The BSB can either support the dragon or hold up a weak and/or flaming unit. The Mage can fly in to take a challenge and the whip means she can still clear chaff effectively. The spears are for ranks, the xbows are mostly a distraction unit that hopefully can pick off a bit of chaff and gives me another banner. The dark riders and harpies are purely there to run interference. The knights are for dragon support, bringing in a champion for challenges, but the ring can also hopefully cause some headaches. The hydras go wherever needed, but can also pair up to form a secondary strike team.

My biggest worry here is ogres; they're pretty popular here and with 1-2 ironblasters my dragon's pretty much toast. I've wracked my brain, but can't come up with anything else to put in the list that would greatly help against ogres.

Points are pretty tight, but I'm also thinking about dropping the lance from the BSB to upgrade the knight banner to flaming so as to allow them to tackle hydras and HPAs.
Last edited by Cycloptic squirrel on Fri Jan 25, 2013 4:04 pm, edited 4 times in total.
Daredevil26
Slave (off the Altar)
Posts: 14
Joined: Thu Aug 30, 2012 12:02 am

Post by Daredevil26 »

First off, the sorceress should NEVER be planned for combat, she may get a kill or two but will be killed in the end and will lose her magic so drop the whip of Agony and possibly the pegesus and put her in a unit probably the warriors or crossbowmen
Second, the Dreadlord shouldnt be taking soulrender since theres not a huge point to the great weapon with armor piercing and because it will make him go last and if unlucky get killed before even attacking.
You should give him the whip of agony for s5 extra attack and armor piercing, stay with the Pendant, and take either the armour of darkness or the cloak of hag graef because shooting will always be a problem for you. You could take the blood armor still just have to make sure you get those wounds before taking any.
If your worried about ogres killing the lord i would give him instead the armor of eternal servitude, a sea dragon cloak, and the ring of darkness to halve their bs making you harder to hit and less wounds.
With the knights you should really consider taking banners from our own book i suggest either murder or asf banner to really pack a punch
Hope it helps
Cycloptic squirrel
Corsair
Posts: 86
Joined: Wed Sep 05, 2012 7:54 pm

Post by Cycloptic squirrel »

Weren't you advocating a sorceress with egg specifically for combat in the campaign army thread? :)
Either way, I will definitely not be throwing her into protracted combats, because as you suggested, she's very squishy. The whip is just to increase her points to the point that she can clear chaff on her own; the peg has two attacks, but the whip increases the characters attacks from 1 S3 to 2 S5; a huge difference!
That said, I will consider what you said about switching the whip to the dragon; I'm always looking for more attacks. My thought with the great weapon was that ASL would strike at the same time as the thunderstomp and give the dragon first crack at any challenges, which I thought would maximize any potential overkill.
The worry about ogres isn't so much for the lord himself as it is for the dragon underneath him. The pendant should protect me from most of it.
As for the banner on the knights, I can see the value in murder, but I've never seen ASF run on knight units numbering less than 10; do you think it'd still be worth it?
Daredevil26
Slave (off the Altar)
Posts: 14
Joined: Thu Aug 30, 2012 12:02 am

Post by Daredevil26 »

Ive tried the asf banner mainly against a high elf opponent just to annoy him with attacking at the same time but its not really that worth it.
I only suggest the egg for when she is put in a unit with the sac dag but with the peg it could be good with the sorceress for the purpose of some sort of get close for magic then fly away when the threat is close
Cycloptic squirrel
Corsair
Posts: 86
Joined: Wed Sep 05, 2012 7:54 pm

Post by Cycloptic squirrel »

Had a standard battleline with the list and thought I'd write it up to see if I could get any other suggestions (though yours were much appreciated Daredevil!).


Foray into the Gravelands


The tigers:

Dreadlord on Dragon, Pendant, The Other Trickster's Shard, Blood Armor, Soulrender, Sea Dragon Cloak
Master BSB on Dark Pegasus, Heavy Armor, Shield, Lance, Sea Dragon Cloak, Dragonhelm, Luckstone, Crown of Command
Sorceress on Dark Pegasus, level 2, Dispel Scroll, Whip of Agony [SHADOW]

26 Warriors, full command, warbannerr
10 Crossbowmen, full command, shields
5 Dark Riders, crossbows

5 Cold One Knights, Champion, Banner, Banner of Eternal Flame, Ring of Hotek
5 Harpies
5 Harpies
Hydra
Hydra

The Undead:

(I'm unsure about the exact list, especially items, but this is about what he had)
Master Necromancer, level 4, Black Periapt, 4+ ward [VAMPIRE]
Wight King BSB, great weapon, 4+ ward save heavy armor
Necromancer, level 2, dispel scroll [VAMPIRE]

~30 Zombies, banner
~35 Zombies, banner
5 Dire Wolves
~30 Ghouls, champion

~35 Grave Guard, full command
Spirit Host
Spirit Host
Mortis Engine
Terrorghiest

Prebattle, Terrain, and Deployment:

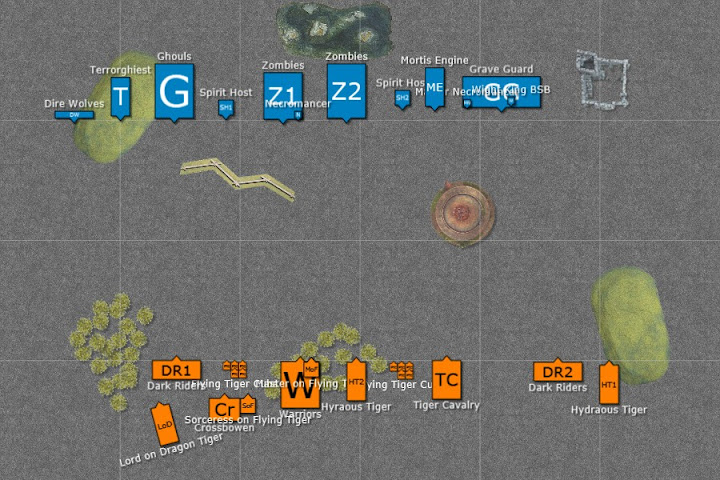
It was determined that it would be iconic to have the board be undead themed; thus we had an arcane ruins in the northeast, a sinister statue in the middle, and the barrier was a ghost fence. The middle mysterious forest turned out to be a fear forest as well.
My sorceress rolled Pit and Pendulum, the latter traded for Miasma. His master necro got Gaze, Dance, Vigor, and Invocation and his lower level had Invoke and Raise Dead.
My thoughts going into this were that I would have to be careful of the grave guard with their killing blow, and the terrorghiest could definetly cause some problems if it got behind my lines. I also realized that the spirit host could cause headaches, but I couldn't afford to be as proactive.
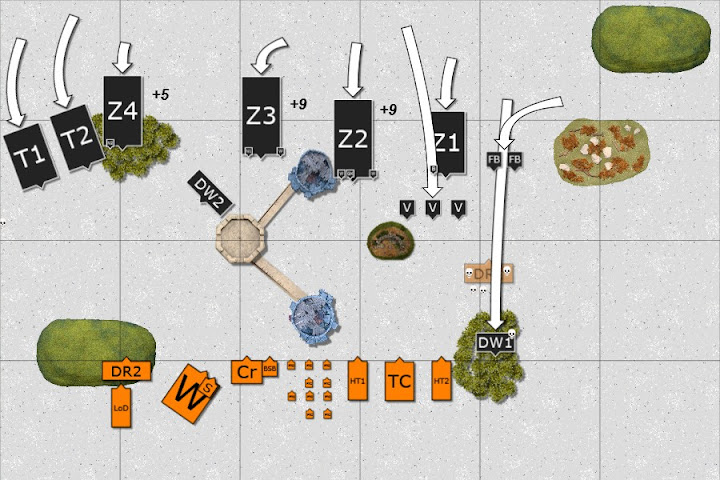
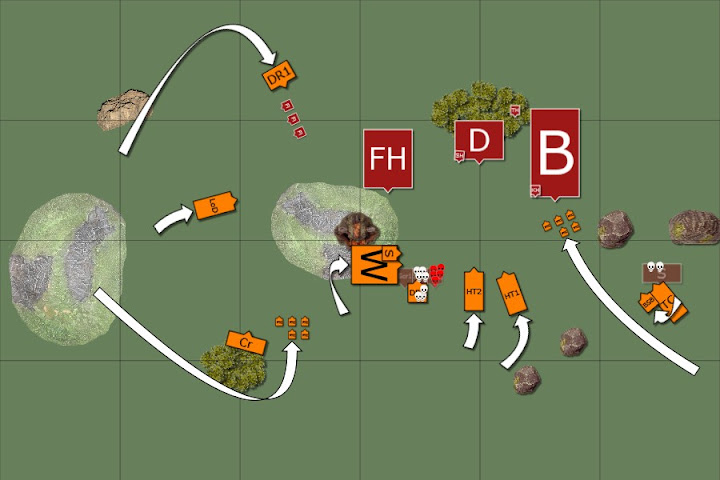
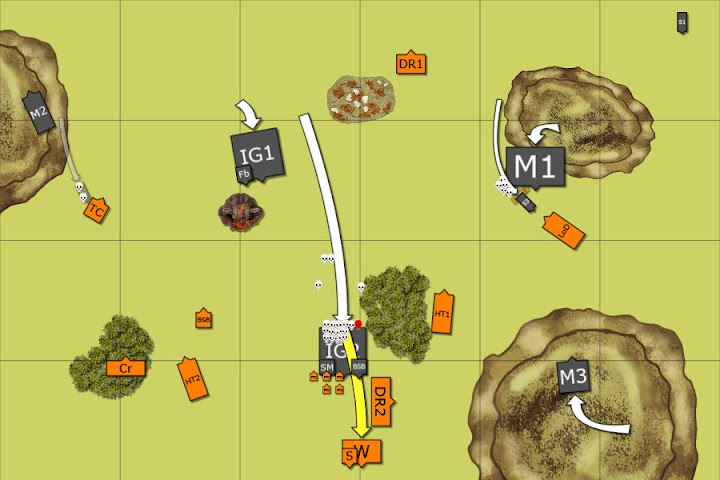
His core went in the middle, with my shooting, harpies, and hydras deploying somewhat evenly. His grave guard went next to the ruins and my cavalry went opposite. His engine was supporting the guard and my spearmen went on the opposite side. His terrorghiest went to the west and my dragon looked to counter. Overall, I was hoping to delay the grave guard enough to crush his western flank and then bring all to bear on the guard in the last turn or two.
Image

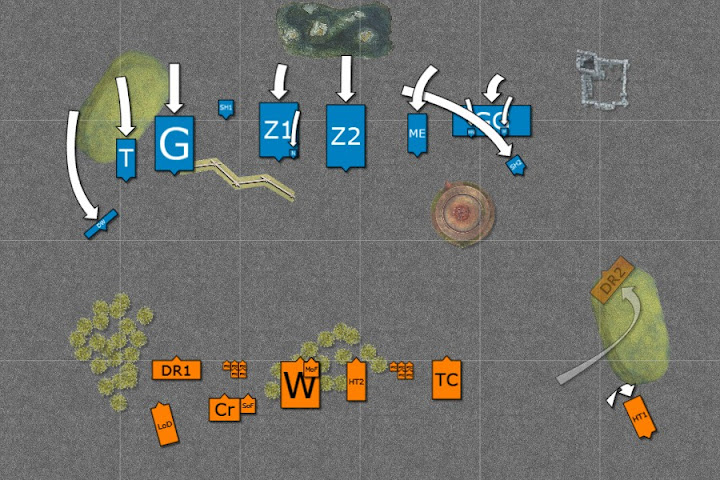
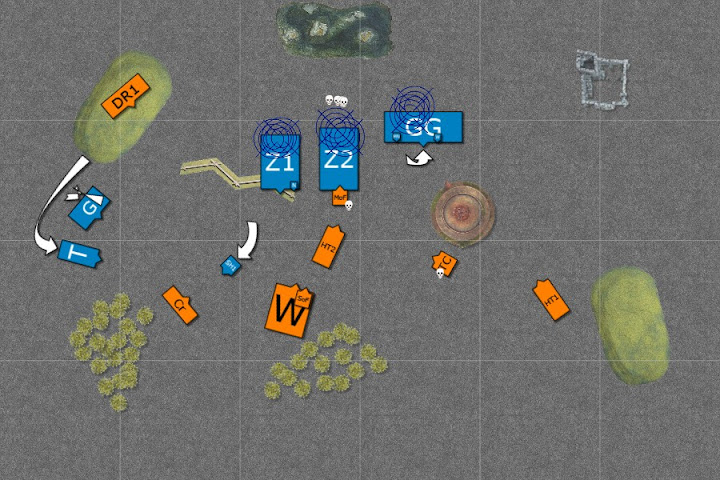
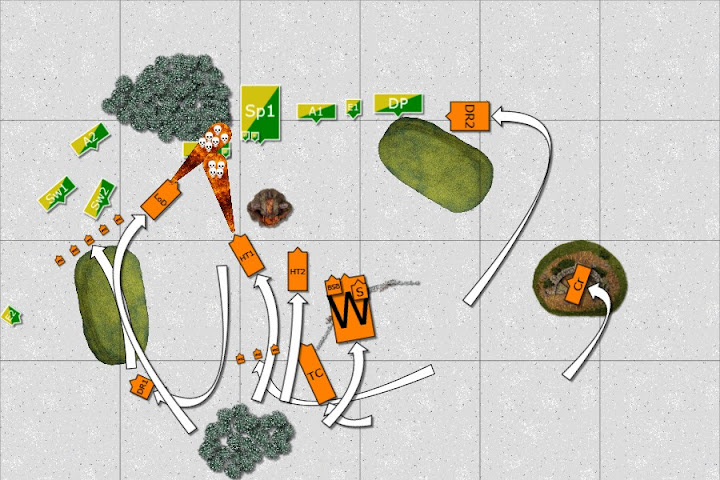
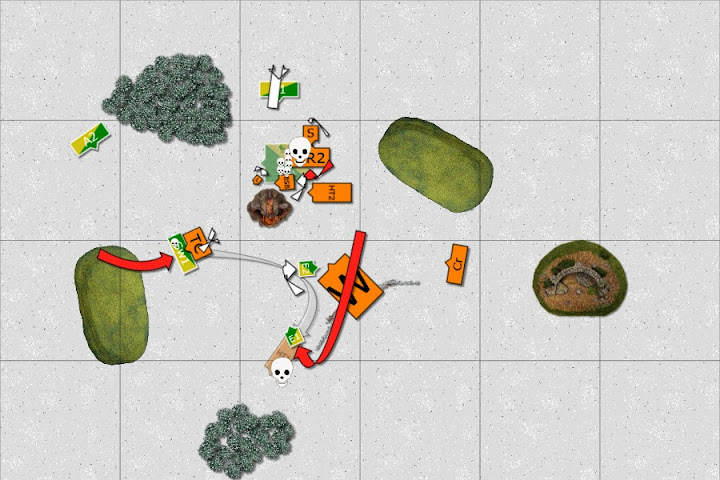
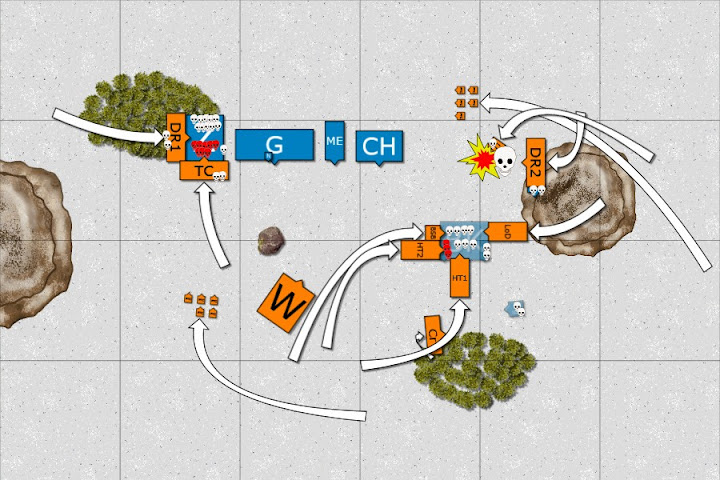
VC turn 1:
He advances a bit, keeping care to keep his terrorgeist out of dragon charge range, though he elects not to move his wolves.
Magic 10v6 (?), he uses a few dice on Dance hoping to draw some dispel dice, but I decline and he moves up his guard anther inch or so. Another few dice and he gets 14-15(?) on Gaze at my fast cav; not wanting to soak 2d6 S4 hits, I throw four dice but fail to match. The resulting hits vaporize the riders and unnerve the hydra who turns to flee. An invoke from the lesser mage adds some zombies. My eastern flank is not looking healthy...
Image

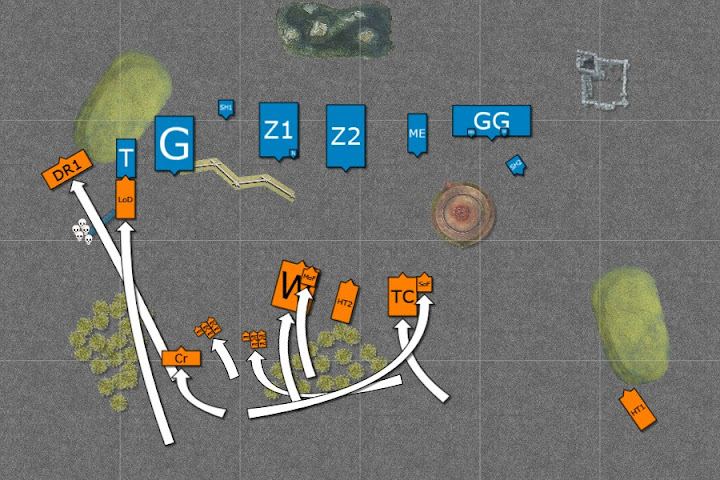
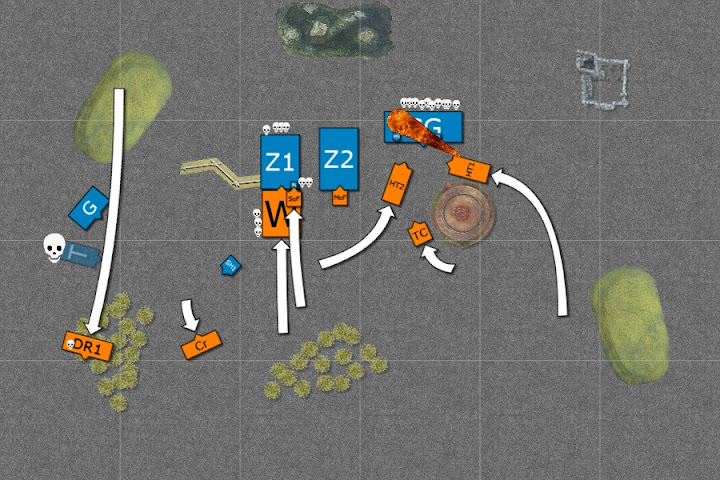
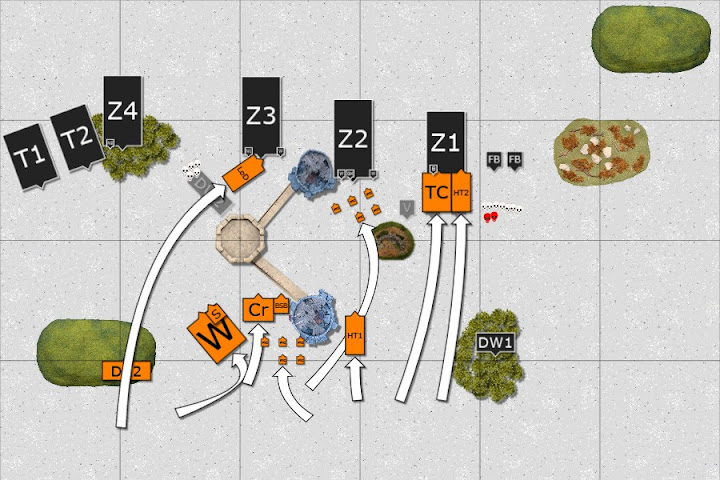
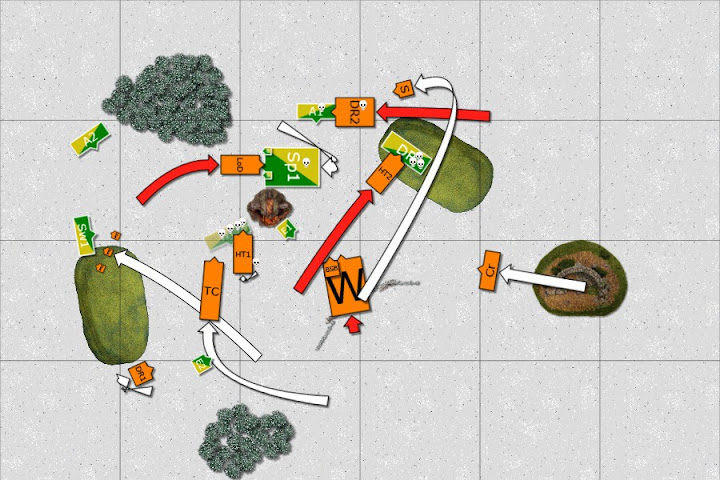
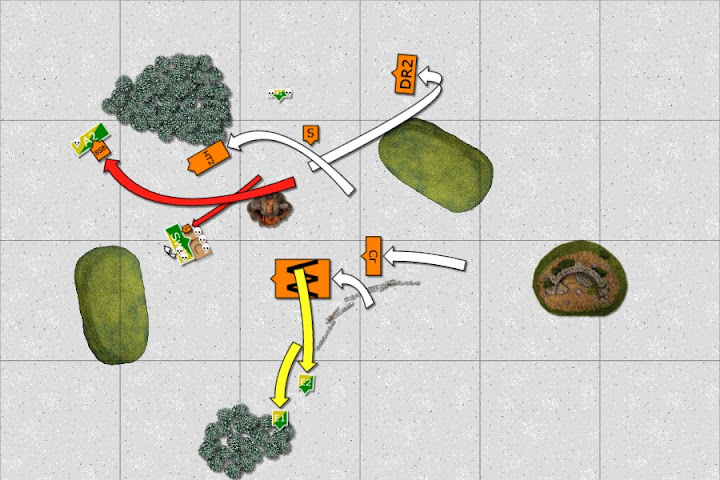
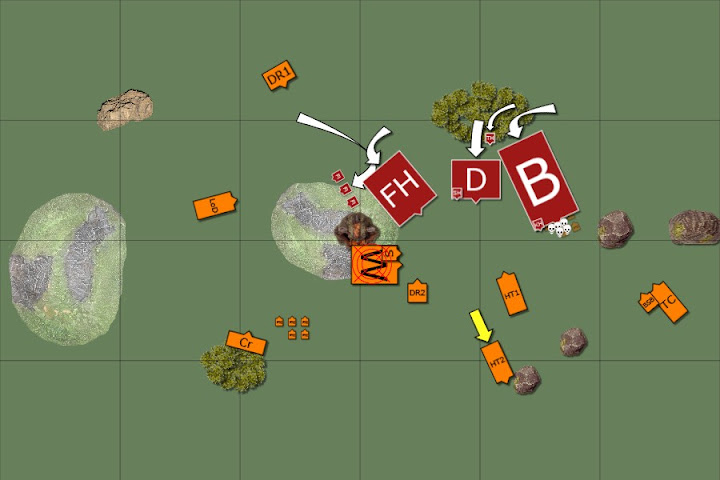
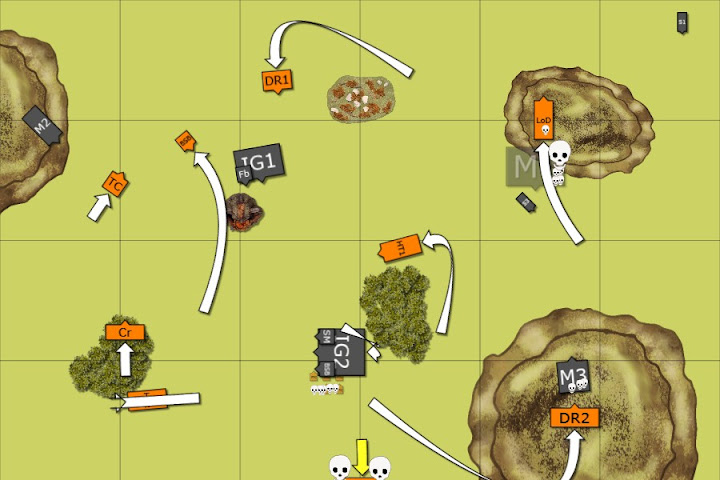
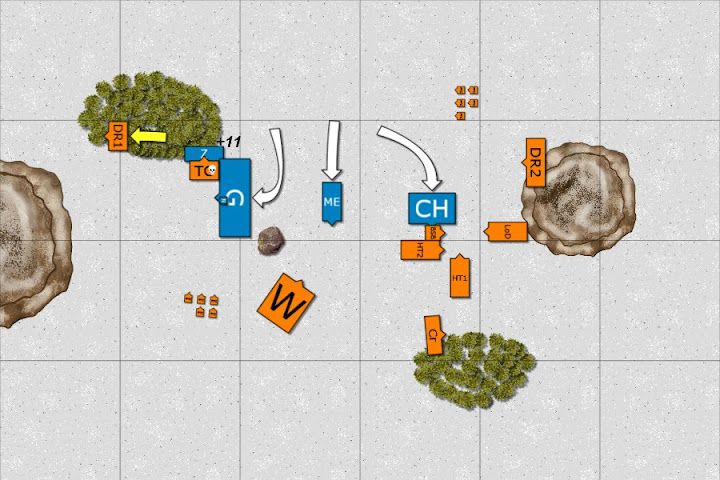
Tigers turn 1:

The sinister statue would cause issues with my opponent all game; the question arose whether the hits were magical since the fluff was pretty clear that they were, but the rules didn't mention anything; we asked the gentleman who set up the terrain with the response to die off. I won, thus the hits were magical, but the statue failed to activate against the spirit host this turn.
His wolves are in range of the dragon, but an overrun would not hit the terrorghiest. However, I charged with my fast cav and harpies as well; this allowed my to place the dragon on the eastern edge of the wolves with an easy overrun into the terrorgeist. We hit a question on weather the harpies could make it in, with my opinion that they could close the door midair (and thus over the fast cav) as long as the final position was legal. The opposition thought that initial contact before closing the door must be on the ground, and since the fast cav was in the way, would be a failed charge. We agreed to die off and he won, thus the harpies failed the charge. Otherwise the hydra thankfully rallied, I advanced up, and had the sorceress join the knights.
Magic was 9v7 (those arcane ruins really working for him). I spent two dice on Power of Darkness which gave me two back. I then spent two on Miasma to bring the initiative of the engine down, which he dispels. A nice casting roll on Pit brings out his dispel scroll and he saves two dice through the periapt.
In combat the dragon only bring down one wolf, but the fast cav take out the rest. The light tigers overrun and the dragon goes into the terrorghiest.
Image

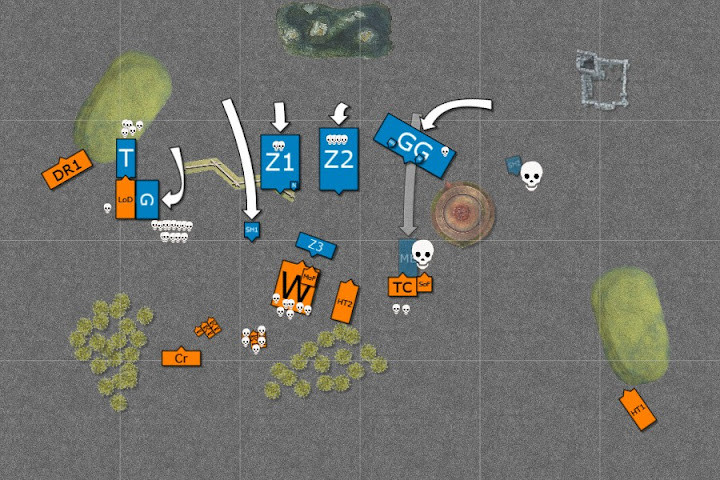
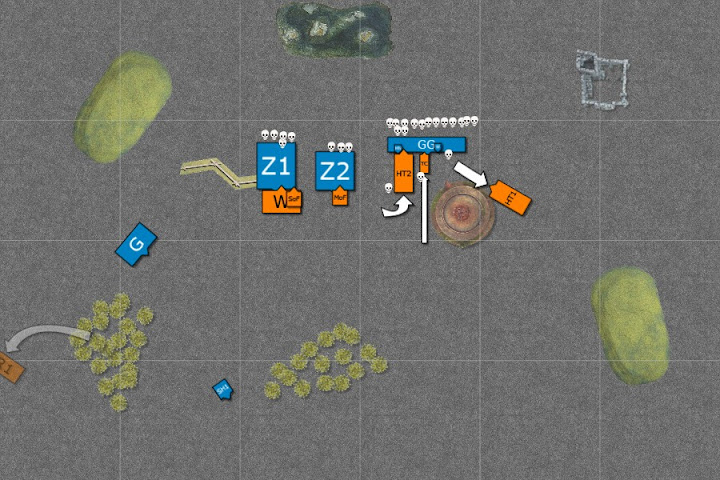
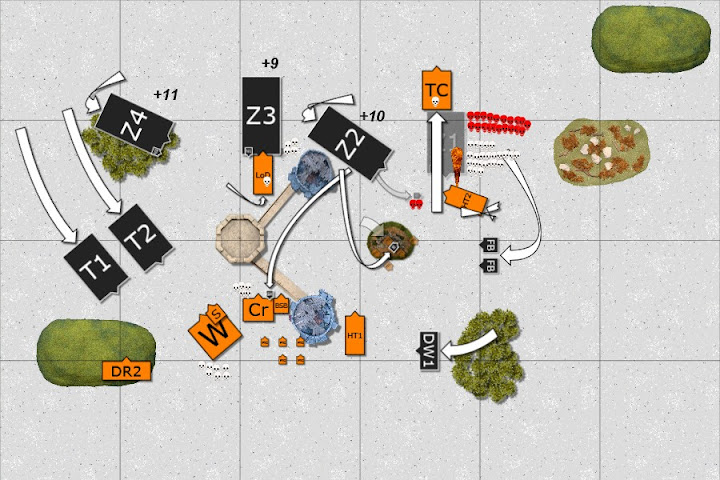
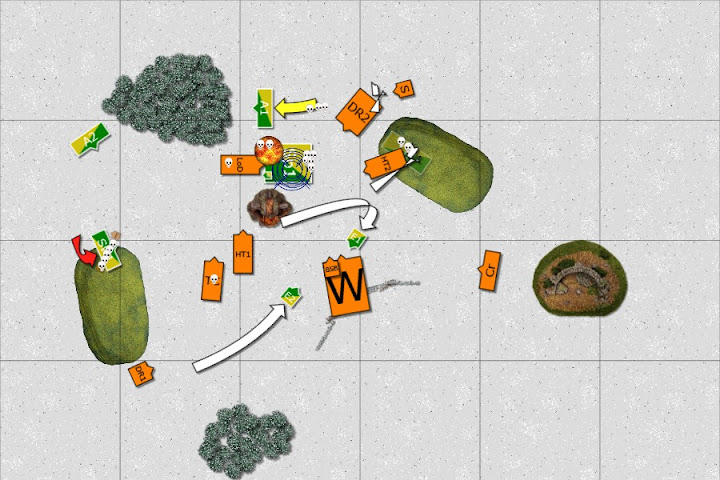
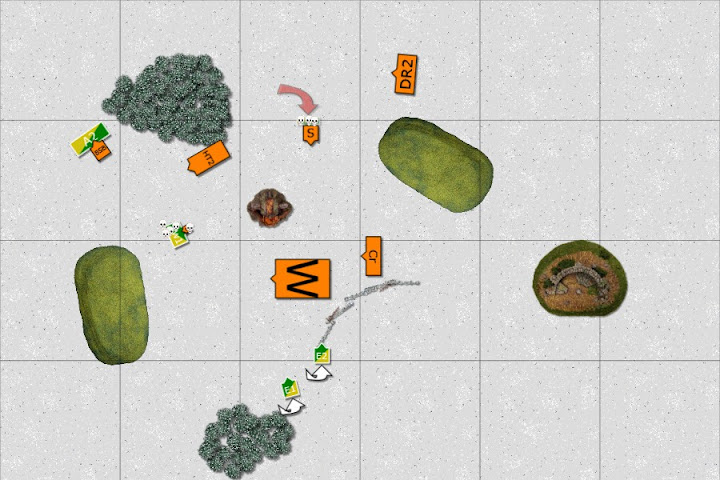
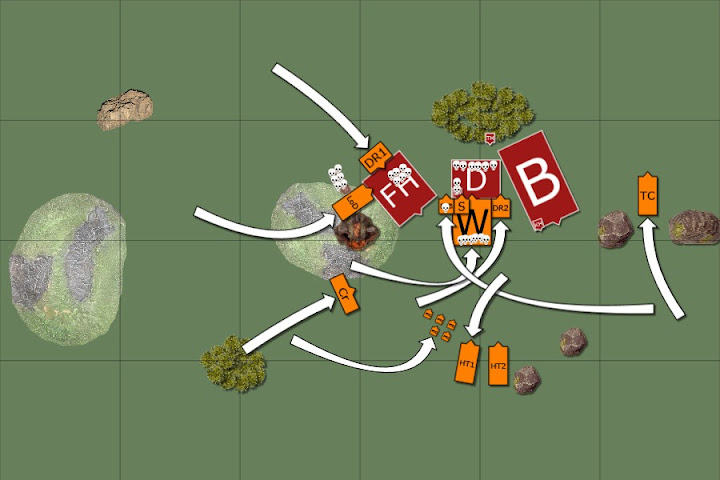
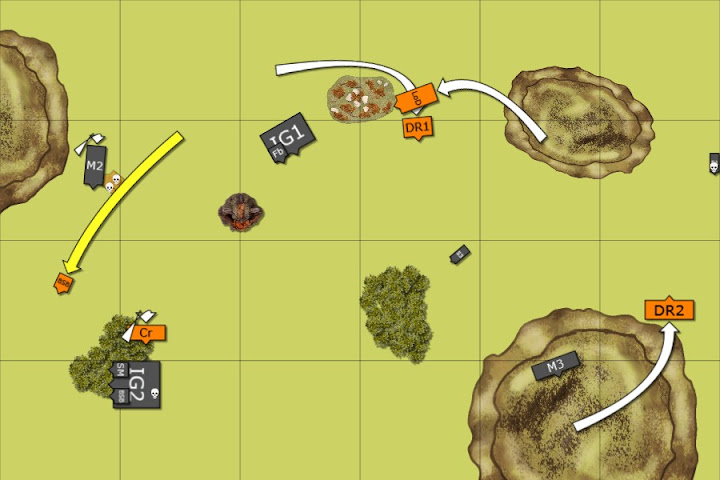
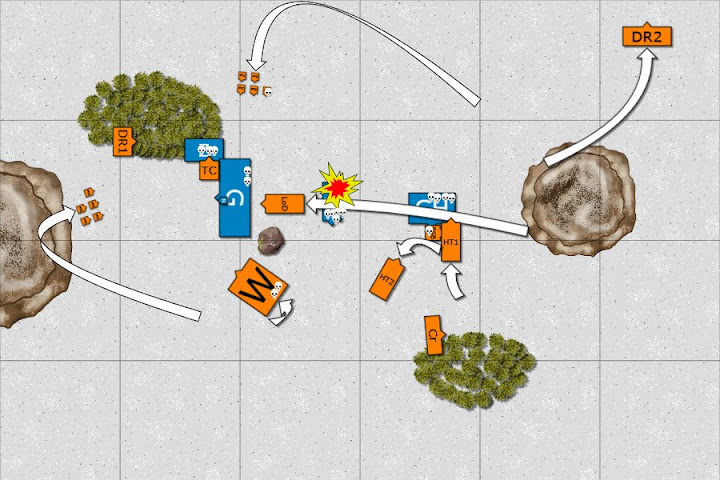
VC turn 2:
This time the statue activated and vaporized the spirit host, which was incredibly lucky for me as it would have pinned my hydra down, and though my sorceress likely could have relieved him, but by that time it would have been late game and possibly too late to contribute to the larger game.
Here is where my mistake becomes apparent. The dark riders' charge was short, so I didn't need the harpies to charge as insurance. I didn't forsee that against the terrorgheist, my dragon would be presenting his flank to the ghouls. The smart thing would have been to sacrifice the harpies to block the ghouls' flank charge. As it was, I didn't and the ghouls easily went into my dragon's flank. The mortis engine also seeing an opportunity to take out both the knights and sorceress went barreling into them.
Magic is 9-10v5 and I dispel the combat buffs, but he's able to Raise 8 zombies right in front of the spearmen as well as Gazing off 6 of them. The terrorghiest scream is lowish and only puts one wound on the dragon.
In the west, there's no challange, I attack the ghouls (but forget to target the champion), hoping for combat res to take care of the terrorgheist. I kill 9 ghouls, he doesn't cause any, and both units crumble for five wounds. The engine only gets one impact hit and after all his attacks only drops one knight. I do four wounds and crumble does the rest. As the engine eplodes, the 14" blast consumes one grave guard, a few zombies, 5 spearmen, and eliminate one unit of harpies (causing four panic checks, but all pass).
Image

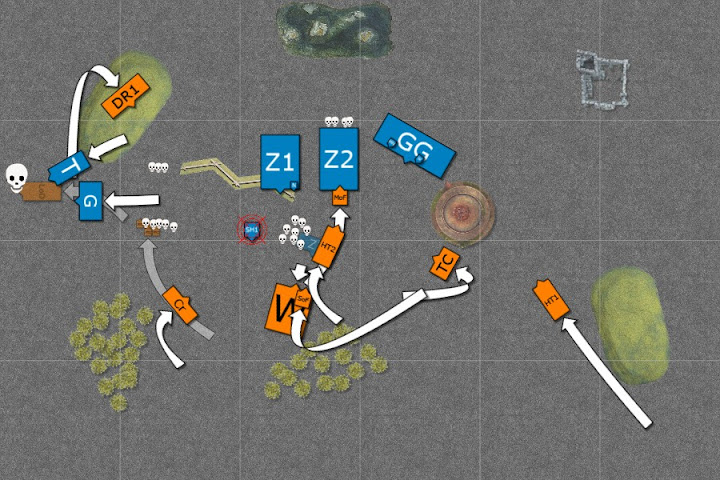
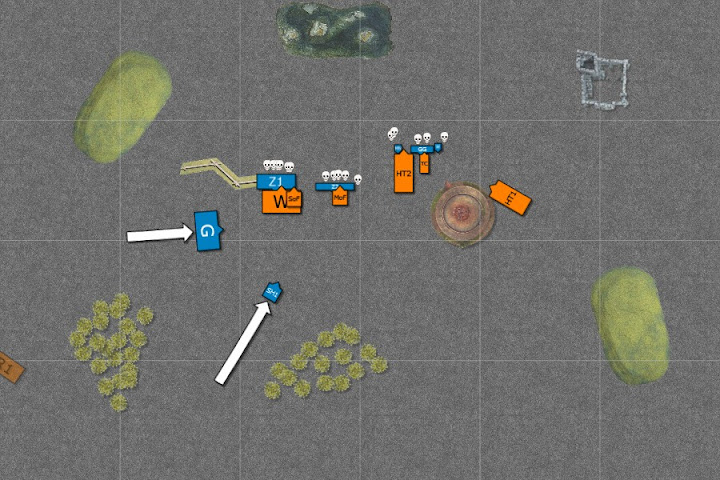
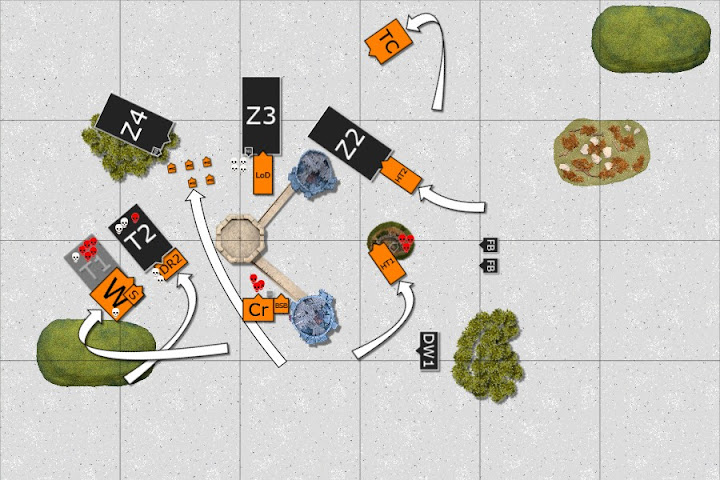
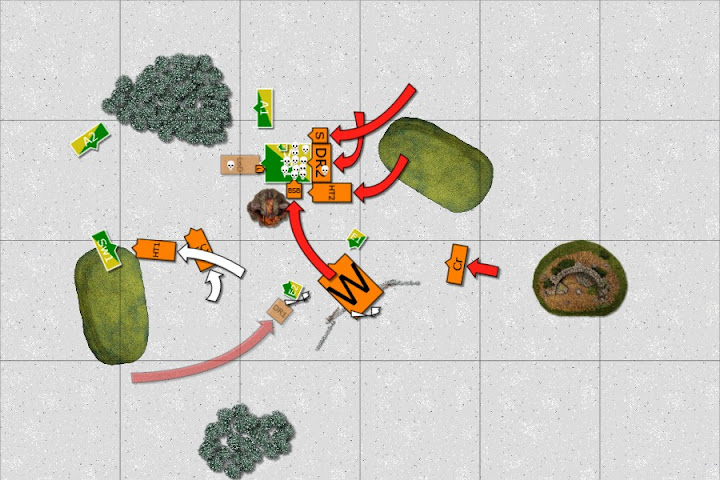
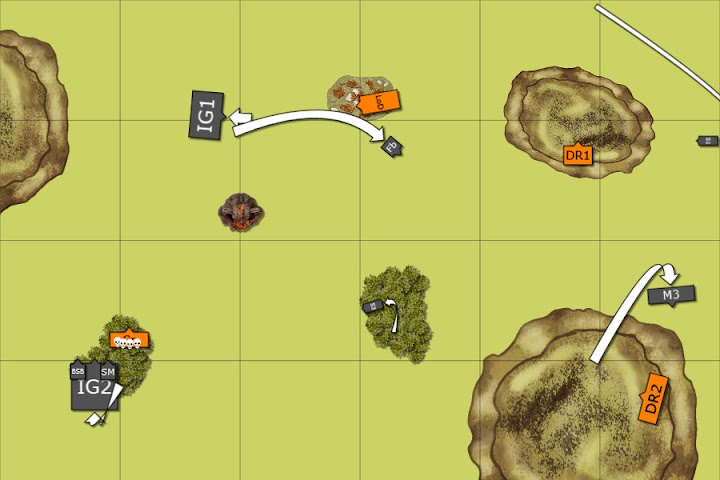
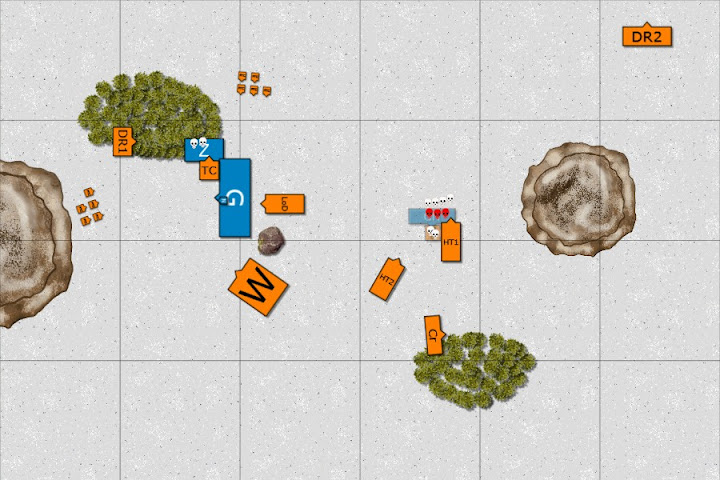
Tigers turn 2:
Western hydra goes into the freshly raised zombies while the eastern advances to get back into the battle. His grave guard are essentially blocked by his zombies and the statue, so I charge my BSB into them, essentially holding up them and the guard. I bring in the harpies to the flank of the ghouls, hoping to add a little combat resolution with few wounds in return as they're only three ranks deep. The spearmen back up and the sorceress joins to avoid magic missiles.
Magic is 10v6 and at this point I remember the Ring of Hotek; I'm out of range now, but I wasn't a turn before (as was his necromancer). My opponent graciously allows the mistake to pass. I get Power of Darkness for no net gain, boosted Misasma off on the spirit host so that if he gets into the crossbows he'll hit on 5s, and he dispels Pit.
My BSB gets a few zombies, he loses one or two to crumble; we'll be here for a while. The hydra eats all the zombies and overruns. In the west, my he does challange and my dragon gets two wounds in, but no lord attacks or stomp as the champion is already gone. The harpies get one wound in but his three ghouls with six attacks kill all five harpies(!!). We calculated that I lost combat by six; we counted three ranks for the ghouls when it should have been only one, but it doesn't matter as I roll a nine for my break test and I am quickly run down.
Image

VC turn 3:
The statue claims two tiger cavalry.
The grave guard backs up to try and get some room to maneuver as well as get the necro out of ring range, the spirit host moves up to continue the pressure on the crossbows while also avoiding the arc of the spearmen. The ghouls turn around and the terrorghiest moves to scream off some crossbows, but with one wound and a poor roll, none are removed.
Magic is 12v7, he gets both bubble Dance and Vigor off, which I let through as I'm not too worried about my BSB. I am able to dispel Gaze on the knights.
In combat the BSB takes off four, but the zombies get one through the 1+ armor save and the combat's a tie.
Image

Tigers turn 3:
Even with BSB nearby, the tiger cavalry fail the stupidity and stumble forward. I want the lesser necro dead, so forgetting about the combat buffs still in play, I rush them into the other zombies. I consider having the hydra join, but move him to threaten the guard along with the other hydra. I place them so that he cannot charge one individually; any charge must include both - my opponent agreed as I made clear my intention; it helps prevent any disagreements later on. The dark riders barely have line of sight to the terrorghiest and with only one wound I decide to go for it and I'm in, though the ghouls nearby mean I can only get in with two riders. The crossbowmen briefly consider charging, but instead turn around so as not to present a flank/rear to the ghouls.
Magic is 10v5 and my sorceress is in ring range herself. I throw two dice at Miasma against the guard WS. He uses three dice to dispel, which is a great move as Pit is a direct damage and I have no targets in my front arc.
The eastern hydra breathes and gets a dozen wounds. The western hydra could only get 11 hits so I elect to save the breath weapon as I figure an average of seven hits in combat is worth more than 11 hits out of combat. One ghoul falls to crossbow bolts.
A wizard combat duel has my sorceress cut down his necromancer. I only kill a few zombies; he gets three wounds on me and I remarkably save all on a 6+ light armor save preserving my third rank! He loses one or two to crumble. My BSB whiffs and looses by two; I roll 11 followed by a 9 and I am very grateful for the crown! The tow dark riders get two hits but can't roll a six. The tigers also manage to hit twice and one gets the six I'm hoping for! His regen comes up as a 5 and is removed. The overrun takes me far away from the ghouls, but I lose one to the dangerous terrain of the forest.
Image

VC turn 4:
The statue can't get past armor of the knights or the regen of the one hydra it hit.
He looks at the situation of his guard and realizes that if he moves up my eastern hydra can't close the door on a charge due to the statue. The ghouls fail a charge on the crossbows, and I drop two for their trouble, but the spirit host makes it in.
Magic is 10v4(?) and though he's in ring range, it either didn't come up or we forgot about it. He casts bubble Vigor and I use my dice to dispel. I'm planning on using my scroll for the bubble Dance, but with a poor roll he fails to cast it and is done for the phase. He saves the last two dice.
I fail my rerollable fear check with both the spearmen and the BSB, but I roll well enough to barely win both combats. The spirit host gets one kill with is enough to remove the rank and I lose. I'm steadfast, but not rerollably so, and I break and am run down.
Image

Tigers turn 4:
The statue decides not to stare at the knights or either hydra but do decide that the grave guard have not had enough trouble and take another two!
The tiger cavalry (all two of them at this point) and the western hydra go into the guard. The eastern hydra backs up for a later flank charge. I foolishly march with my fast cavalry, losing one to the forest, causing a panic check that sends them off the board.
My sorceress is now out of ring range and magic is 10v8 which becomes 12v8 after a nice Power of Darkness. I can't cast Pit as no legitimate targets are in my front arc, so I throw all 12 dice at Miasma on the guard. I roll nothing above a four for a result of 34! My opponent then throws all 8 dice at dispelling, and though he doesn't manage two sixes, his roll results at 37!!
In the zombie fights I keep grinding and somewhere along the line my sorceress looses a wound.
His wight king challenges and I must accept with my cavalry champion. I manage to get one wound past his ward save. He only hits twice, which does one wound, but I manage the 5+ armor save! The cavalry bannerman gets a wound, the hydra hits all seven times but the breath I had saved earlier was only worth two hits! His return attacks kills the cavalry banner and only puts one wound on the hydra. He's left with the necromancer, BSB, banner, and champion.
Image

VC turn 5:
His ghouls and spirit host run toward the main battle.
Magic is 5v4 and he rolls two dice on Dance and gets double 1s, which not only fails to cast but is also a miscast due to the ring! He takes a wound from the miscast and we move on.
The zombie combats are a grind. The wight king only hits once and fails to wound but I fail to wound him in return. My hydra kills the remainder of the guard and the necro and the BSB dies to crumble.
The rest his force starts to crumble and we call it.
Image

Post Game Thoughts:

Overall a fun game, went back and forth a bit, but upon evaluation, I'm realizing that though I know how to use the list, there's still a lot I can improve upon.
I really need to learn to use my chaff to protect my dragon as evidenced by the ghoul flank charge. I really need to remember the ring's effect's from turn 1, as it really can affect where my sorceress moves. My BSB worked exactly as designed holding up a large unit for several turns. Granted it was against zombies, but it should work against other core with similar results. Points-wise more of my points we tied up than his, but with the statue effectively cut off the grave guard, allowing my hydras to get into position. I was a little too reckless with my sorceress, as I really wanted to kill the lesser necro, but was not worth putting her in danger and essentially removing Pit as a viable spell. I was really rattled when my dragon was eliminated, but I have to remember that two hydras working as a together is still a force to be reckoned with.

Comments and criticism very welcome!
User avatar
Sedge
Trainee Warrior
Posts: 39
Joined: Thu Jul 05, 2012 8:03 pm
Location: UK

Post by Sedge »

In your opponent's turn 2, you took a panic check as a result of your harpies being destroyed? Their "beasts" special rule means that they never cause panic tests to friendly units - not that it made a difference in this battle, but worth bearing in mind.

Good report, and I enjoyed reading it, especially as I'm looking to field a dragon in my army.
User avatar
Tyrannus deathbringer
Noble
Posts: 497
Joined: Fri Dec 23, 2011 7:28 pm
Location: The Black Ark Nemesis

Post by Tyrannus deathbringer »

Nice victory. Batreps without pictures are annoying so thanks for going to the trouble of a proper write up!

No criticism to add - thought you played a nice game, and its easy to forget a few things during the heat of battle :P

One question though - do you use little "Tigers" for your models, or is that just a nickname? If you have little tigers instead of cold ones and the like, would like to see some pics of your army in the PnM section :D
"All who surrender will be enslaved; whoever does not surrender but opposes with struggle and dissension, shall be annihilated."
Cycloptic squirrel
Corsair
Posts: 86
Joined: Wed Sep 05, 2012 7:54 pm

Post by Cycloptic squirrel »

Thank you!

I had completely forgotten about the 'beasts rule'; usually they're far ahead causing trouble and it's only recently I've tried keeping them in reserve, so this should come in handy.

The army is completely tiger themed; it started as I was admiring a friend's high elf lion cavalry he had modeled up from a few chariot boxes. I was thinking that cold one stats were a pretty decent representation of a large cat; after that all the animals were modeled as tigers: hydras, harpies, dragon, everything. I don't have any pictures handy, but I'll try to get some up soon.
Cycloptic squirrel
Corsair
Posts: 86
Joined: Wed Sep 05, 2012 7:54 pm

Post by Cycloptic squirrel »

Had a match against another dark elf player trying out a zombie list; it's his first attempt with VC, but I was able to learn a bit from it.

Tigers
Dreadlord on Dragon w/ sea dragon cloak, Blood Armor, Soulrender, Pendant of Khaeleth
Master BSB on Dark Pegasus w/ heavy armor, shield, sea dragon cloak, Crown of Command, Dragonhelm, Luckstone
Sorceress[SHADOW] on Dark Pegasus w/ level 2, Dispel Scroll, Whip of Agony

27 Spearmen w/ full command, Warbanner
10 Repeater crossbowmen w/ full command
5 Dark Riders w/ repeater crossbows

5 Harpies
5 Harpies
5 Cold One Knights w/ banner, Banner of Eternal Flame, champion, Ring of Hotek
Hydra
Hydra

Vampire
Ghoul King, red fury, flying horror
Necromancer, dispel scroll (?)
Necromancer
Necromancer
Cairn Wraith
Cairn Wraith
Cairn Wraith

40 Zombies, Standard, Musician
5 Dire Wolves
5 Dire Wolves

3 Varhgheist
2 Fell Bats
Terrorgheist
Terrorgheist


Setup and Deployment:
The battlefield was the sight of a ruined castle; the western tower was still intact, with walls connecting to the impassible ruble of the north and south towers. The remains of the eastern tower were dangerous terrain that prevented steadfast.
For spells I rolled Pit of Shade and Enfeebling Foe; both seemed more useful than Miasma so I didn’t swap. All the Necromancers and the Ghoul King took Invocation.
The zombies spread out with the Terrorgheists teaming up on the far western flank. My crossbowmen set up to first take the wall, then the tower; if they garrisoned it, they would likely be eventually ground out, but not before occupying zombies a few turns. The knights and hydras set out in the open field and the spearmen positioned to engage zombies with the tower anchoring one flank or the other. My BSB set up with the crossbows to be in range of the knights for the initial stupidity test, the dragon to threaten the Terrorgheists and the sorceress went with the spears simply for protection from terrorghiest screams.
The western dire wolves vanguarded forward severely restricting my western dark riders; I elected not to vanguard them so that I could charge the wolves if I got first turn. The eastern flank was the reverse as I vanguarded forward (losing one to the forest) and his wolves held back so that they could charge.
Image

Vampire turn 1:
The eastern wolves follow the plan and charge the dark riders, losing one to a stand and shoot. The rest of the army advances except for the other wolves which keep behind the tower.
Magic is 10v5 and the first two dice Invocation is cast on two dice and nine zombies are raised for the two western hordes. The ghoul king fails a 12” Invoke on three dice and a 12” Invoke is cast and dispelled on five dice each. The last two die Invoke raises five zombies on the far western unit.
In combat the dark riders and their mounts hit three times each, but both get a 1,2, and 3 for the roll to wound. The dire wolves respond by killing two, breaking the unit, then running them down.
Image

Tiger turn 1:
The dragon went into the wolves looking for an overrun into the zombies and a chance to take out the necromancer, hoping I’d be able to grind out the zombies before he could support them. The knights and hydra charge the vargheists; I contemplate adding the BSB, but decide against it as his reroll is needed in the west. One unit of harpies move to protect the flanks of the knights, the other stays in reserve. The crossbowmen move up to man the wall and the BSB stays with them. The spearmen turn to discourage the terrorgheists and the dark riders stay put for a better chance to wound one.
Magic is 4v3; we both throw all dice at Pit, but I get it off. I hope to take off a few zombies before the dragon gets into them, but it veers off and only takes two of them.
Shooting fails to get anything. The knights and hydra roll through the vargheists and into the zombies behind them. The dragon barely pauses at the wolves before plowing into the zombies.
Image

Vampire turn 2:
The ghoul king declares a flying charge into the crossbowmen, while the wraiths charge the flank of the knights and the harpies who flee and are caught; the wraith reforms to face the rear of the knights for a later charge. The terrorgheists advance and the nearby zombies reform to support their brethren against the dragon.
Magic is 6v4 and the first two die Invoke fails. The second spell uses four dice for a 12” Invoke and is cast with irresistible force. The western three units of zombies gain about 10 zombies each and the miscast fails to do anything significant.
The terrorgheists screams and claims seven spearmen.
The crossbowman champion challenges the ghoul king and gets cut down; I make the break check. Against the dragon, the wraith challenges and puts a wound on the character with his chill grasp. The dragon loses combat by one and fails the first break test, but is barely within 12” of the BSB and makes the second. The wraith challenges and chill grasps the knight champion. The knights and handlers kill five zombies; the hydra uses his breath to kill nine, his attacks kill seven, and the thunderstomp takes three more. The zombies lose by 21, crumble, the knights overrun, and the hydra reforms.
Image

Tiger turn 2:
There’s enough room for the spearmen and dark riders crisscross against the terrorgheists, allowing the dark riders to be in range of the BSB for their eventual break check. The hydra charges into the zombies and the other charges the rear of the remaining wraith. The knights circle to assist the dragon in a later round and the harpies move to block the dragon’s flank.
Magic is 8v7 and a two die Power of Darkness is dispelled with three dice. At this point I should have chosen one spell and pushed it through, but instead I cast Pit of Shades on the unengaged zombies with four dice and it was dispelled with four. I used the last two trying to Enfeeble a terrorgheist but fail to cast.
The spearmen hit the terrorgheist seven times and roll five 5s a 4 and a 3 to wound. The sorceress has similar results, but the dark pegasus manages one wound. The terrorgheist only takes down one spearmen and can’t stomp thanks to the mounted sorceress. The terrorgheist crumbles and the spearmen reform to face the other as well as the far zombies. Against the other terrorgheist, the riders manage two wounds, suffering two in return, winning the combat by one. The necromancer challenges the dragon and is cut down; again the dragon loses by one, fails the break test, but passes on the BSB reroll. It’s impossible for the hydra to wound the wraith and the hydra regenerates the one wound the wraith causes. A rear and charge causes the wraith to crumble and the hydra reforms to support her sister. Since I sacrificed the crossbowman champion to find out with the ghoul king had for attacks, I accepted the next challenge with my BSB without too much worry. He hit and wounded five times, but I made four of the 3+ armor saves and used the luckstone to save the last. The vampire regenerated the one wound my BSB managed to cause. With no wounds on either side, I was up by one rank, standard, and battle standard; he crumbled by three and lost his general.
At this point, he only had one necromancer, a wounded terrorgheist, and zombies; it was pretty clear what would happen in ensuing turns and we called it.
Image

Postgame:
Though the game was short there was a lot of action. On the eastern flank, the vanguarding cavalry skirmish didn’t go my way, but later on I was very lucky to break through the zombies in one round. I was pleased with how well the BSB held up as well as how much combat resolution the spears can rack up. My huge mistake was committing the dragon to a non-critical unit that would bog it down for several rounds. I think I would have been able to grind it out before opposing support arrived, but my army really works best in teams, as evidenced by the knights and hydra.
Overall, I had to drop the other trickster’s shard from the dragon as I recalculated the points and found that I was over. I’m so close on the points that as much as I want it, it’s the element I’m most willing to drop, the other options being the magic armor, the magic whip, the sorceress’ pegasus, or even a unit of harpies. Any thoughts?
Cycloptic squirrel
Corsair
Posts: 86
Joined: Wed Sep 05, 2012 7:54 pm

Post by Cycloptic squirrel »

Had a game against a High Elf Coven of Light. I was worried about double S6 banishments getting thrown around, but at least there were only three mages - S7 gets a lot worse.

Tigers
Dreadlord on Dragon w/ sea dragon cloak, Blood Armor, Soulrender, Pendant of Khaeleth
Master BSB on Dark Pegasus w/ heavy armor, shield, sea dragon cloak, Crown of Command, Dragonhelm, Luckstone
Sorceress[SHADOW] on Dark Pegasus w/ level 2, Dispel Scroll, Whip of Agony

27 Spearmen w/ full command, Warbanner
10 Repeater crossbowmen w/ shields, full command
5 Dark Riders w/ repeater crossbows

5 Harpies
5 Harpies
5 Cold One Knights w/ banner, Banner of Eternal Flame, champion, Ring of Hotek
Hydra
Hydra

High Elf Coven
Wizard Lord [Light], Ethereal, 5+ Ward, +1 Power Dice
Wizard [Light], Staff of chosen spells [Banishment, Pha’s Protection]
Wizard [Light], Crystal of Steal Power Die

10 Archers, banner, musician
35 Spearmen, full command Gleaming Pennant

10 Swordmasters, musician, champion, Skiensliver
10 Swordmasters, musician
17 White Lions, full command, Banner of Sorcery
5 Dragon Princes
Eagle
Eagle


Both armies have a one use reroll.

Setup and Deployment:
For magic I rolled Pit and Steed of Shadows; against high elves Pit is almost useless, and with a dragon Steed of Shadows could actually be useful. The high elf level 2 came in with Pha’s and Banishment, the level four got Pha’s, Banishment, Timewarp, and Gaze. The level one got Speed of Light.
The building was an acropolis of heroes, which makes everyone within 6” stubborn and units garrisoning gain +1 to hit. The benefits weren’t necessarily as important as the fact that it was a building; if the high elf spear elves made it into the building with the mages, I doubt I’d ever be able to get them out. With that in mind, when I won the roll off to pick sides, I chose the one closest to the acropolis and placed the crossbows near enough that they’d be able to move in the first turn. Once I committed there, the high elf army went to the opposite flank, near the elven waystone. This left the crossbows out of range, but I’d gladly do it again, simply to deny the building to the enemy. Otherwise, beyond chaff, I go fairly centrally with the spears and blocks and put both heroes in the spears to keep them safe from banishments. The dragon went across from the lions to keep my options open. His level 2 went in with the lions in the forest that makes units stupid, his other two mages went into the spears. I vanguarded the two units of dark riders and he won the roll for first turn.
Image

High Elf turn 1:
The lions made their stupidity save and advanced, both to get out of the woods as well as to get their mage close to the waystone. His spears inched up just close enough to get their mages close to the waystone. The western flank started to swing inward setting up for any inevitable action while the eagle had enough move to just get out of sight of the harpies; the other eagle, cavalry, and central archers stayed in reserve.
Magic was 12v6 and started with a low level Shem’s (2v0), which I let though since I knew more dangerous things were coming. The hydra was only wounded once and the armor save was good. I also let through a Timewarp (3v0) on the lions as they were out of charge range and I was planning on advancing anyway. We were both surprised when the first Banishment failed (3v-), but the second Banishment (4v6) cast with four dice could not be dispelled with six! The casting value was 23 and the dispel value was 19; of the 5-6 hits, one wounded the lord and was saved, but three wounded the dragon and I only saved one.
The archers killed three dark riders and two harpies, and luckily both passed the panic check.
Image

Tiger turn 1:
The lions were 20-21 inches away from the dragon and I felt a charge was a bit too risky at this stage in the game. I moved up the dragon into breath range and one hydra followed suit while the other advanced. The spears tried to man the wall, but I ended up advancing them farther up to give the knights room to wheel behind them and get into better position. One unit of harpies screened the dragon from the swordmasters while the other stayed in reserve. The crossbows took the acropolis while the eastern dark riders moved to the flank of the dragon princes and the other fell back to take a few shots at the eagle.
Magic was 4v4 and as my sorceress was in range of the Ring, I wasn’t too keen on spending many dice, especially while she was in the center of the spears. I threw one die at Miasma (at the lions?) but failed.
Crossbow bolts harmlessly deflected off cavalry armor and both units of dark riders failed to put any wounds on the eagles. The dragon loosed it’s breath and caught 11 lions, killing 6 of them; the hydra imitated and 8 lions hid behind their cloaks and 4 of them fell.
Image

High Elf turn 2:
The lions had decided to charge the hydra, making the ld 6 test forced by the dragon’s breath. The far swordmasters charged the harpies; since I had forgotten that they condense when charged, this left the barest amount of room for the near swordmasters to charge the dragon, which they did. One eagle screened the spearmen from the unengaged hydra, the other flew up in case he was needed. His spears and the dragon princes stepped up to threaten my spears.
Two 1s were rolled for the winds of magic, but we both channeled one dice, he had the jewel for another, and his banner gave him three more; the result was a 7v2 phase. He started with a bubble Pha’s with three dice from his lord but failed to meet the casting cost. Next two dice were used for single target Pha’s on the lions, which was cast with a roll of 1 and 2. With the last two dice he irresistibly cast Timewarp on the lions; the miscast was the small template and five spearmen perished.
Three of my spearmen fell to arrows.
The lions only did three wounds to the hydra and five of them fell in return. The harpies were slaughtered as expected. In combat, I think we were both expecting the swordmasters to do more – I had challenged and he declined. The high elves put another two wounds on the dragon before losing eight of their own and running; the dragon reformed to look at the spearmen.
Image

Tiger turn 2:
My dragon and spearmen charge the bunker, but only the dragon makes it in. The hydra pulled off a decent range charge against the dragon princes and the dark riders went into the flank of the archers. The last three harpies screened the dragon from the other swordmasters, the knights advanced, and the crossbows began the long march to get into the battle.
Magic was 9v7 and my opponent dispelled Power of Darkness (2v1) and Miasma (4v5) and I cast Steed of Shadows (3v0) just to get the sorceress out of the spearmen, since it was safe now and the spearmen would soon see combat.
The dark riders cause and take a wound, but the archers are steadfast and stick. The dragon princes can’t get through the hydra’s defenses as he pulls three from their mounts, but they hold. The lions put one more wound on the hydra before he stomps them out. The spearmen champion challenges and I must accept; after the dragon eats him, I pass the break test and the spearmen reform to face.
Image

High Elf turn 3:
The swordmasters clear the harpies. Once in remaining moves, we discuss the archers charging the rear of the dragon, but my opponent says that it doesn’t matter, since he didn’t see it during charges. One eagle redirects the spearment, the other stays in reserve.
Magic is 6v4 and I let a two dice Pha’s go through on the spearmen, only see Speed of Light cast with irresistible force on four dice! The miscast is again the small template, taking out 4-5 spearmen and putting a wound on the dragon and archmage.
One lucky arrow gets past the cold one knight’s armor.
The hydra eats the remaining dragon princes and reforms. The dark riders kill three archers and even though they’re steadfast, they break; I reform. The harpies are slaughtered. The archmage challenges and since he’s ethereal the dragon cannot harm him. The lord has a magical greatsword and rolls incredibly well taking off the two remaining wounds. I lose by two, fail the first break test, but pass the second on a six; had the archers charged this would have been enough for me to break (though we rolled just to see and the archers would have failed the charge anyway).
Image

Tiger turn 3:
The spears are blocked, so I charge out the BSB alone into the bunker, along with the dark riders, hydra, and sorceress to the rear. Two dark riders charge the rear of the reserve eagle and the crossbows fail the long charge on the other. The spears reform and I decide to sacrifice the hydra, and possibly knights, to keep the swordmasters from getting into the rear of the dragon.
Magic is 9v8 and I increase it using an unopposed two dice Power of Darkness to gain four power dice. I then use all 11 dice to cast booseted Miasma on the high elf spearmen and the casting result is only 25!!! Eight dispel dice later, it’s irresistibly dispelled (with a value of 36, not that it matters).
He briefly considers challenging, but I talk him out of it; the dragon only has one wound left and he has sixteen attacks that are hitting on rerollable threes; I would still have to fail an armor save, but it’s a decent shot and it works! The dragon and one dark rider are down, but I have a mess of return attacks. It doesn’t really go as planned though – Pha’s Protection combined with Speed of Light really cuts down on the incoming attacks. Between attacks and stomps I kill 11 and he makes his steadfast check. In the rider eagle fight, I fail to wound, the eagle turns and attacks twice for two kills! He then reforms facing my knights…
Image

High Elf turn 4:
I know what’s coming as the eagle can charge the knights and then the swordmasters can plow through the hydra and fight again against the knights in the same round! So, when charged by the swordmasters, I simply flee, fully expecting to be charged and caught by the eagle, but hoping that the swordmasters fail the leadership test for a redirect. I get an extremely long flee through the eagle! I fail the dangerous terrain threatening her last wound, but make the regeneration! I am elated until my opponent realizes that the other eagle still has line of sight; he charges, I flee, and am caught. The swordmasters do make the check to redirect into the knights and do so. The archers now try the rear charge against the lord, but since the dragon’s gone, it’s farther away and they fail. The other archers rally.
We roll magic, but with one spell, he casts and I pull the scroll for simplicity.
The mage is cut down, the spears take many wounds and run. I elect to hold with everything except the dark riders, who run them down but are stopped immediately by the sorceress. Between horrible rolls to hit by the swordmasters and decent armor saves, the knights only lose one but due to horrible rolls of their own fail to wound any swordmasters. The knights pass the break check and the check to reform.
Image

Tiger turn 4:
The sorceress charges an eagle who flees, redirects to the other, who also flees, leaving the sorceress with her back turned to the archers behind her. The lord runs into the swordmasters and the BSB into the remaining archers. The hydra moves up to support whoever needs it and the dark riders reposition to clean up the rallied archers.
I didn’t record magic, but I guess nothing happened (we were running short on time at this point).
The dark riders take out two of the rallied archers, leaving them at three.
In combat the BSB killed an archer, but they hold on steadfast. The swordmasters kill all three knights and the lord only kills two…
Image

High Elf turn 5:
The archers charge the rear of the sorceress, the eagles rally.
The archers wound the sorceress once and she takes revenge, smiting two while her tiger eats the last. The archers and BSB can’t hurt each other. The swordmasters manage to get one wound on the lord and he responds by hitting and wounding with all four attacks; they pass their break check.
Image

Tiger turn 5:
The archers lose one more and don’t break. The four remaining swordmasters can’t get another wound past the pendant and the lord strikes back killing three, but the lone swordmaster refuses to run. I suppose I would have gotten him had I charged with the hydra, but this last turn was really rushed and we both just wanted to see if the lord could take out the swordmasters before we had to end it.

Postgame:
I was pleased how the building turned out; I’ll gladly put 130 points to the far side of a battlefield if it means denying my opponent a key piece of terrain. The high elves were much too focused on getting the +1 to channel with the mages; while it’s good, it’s only half of a power/dispel die a turn and not worth centering your battleline around. I thought the high elf setup was good, but put the mages in the western flank, farther away from the main force of my army, giving more opportunity for Banishments. In that scenario, I think I have to just rush the dragon forward and try to break through the units trying to get to the mages; this would keep me in combat and ineligible for damage spells, though if those lions got into my flank, especially with a Timewarp, I’d be a quite a bit of trouble. I think I did better with the harpies this game, blocking key elements. I might be a bit too brash with the sorceress – she’s designed to be able to clear chaff, but I keep throwing her into combats where I’m not sure if her extra wounds are all that critical (though it is a lot of fun to be throwing out S5 attacks with a sorceress).
This may be the first game with the dragon where I think I didn’t commit a huge error, but as always there are definitely areas for improvement.
As always, comments and critiques are very appreciated!
Cycloptic squirrel
Corsair
Posts: 86
Joined: Wed Sep 05, 2012 7:54 pm

2200 No Comp Dragon List [battlereports with diagrams]

Post by Cycloptic squirrel »

I faced my feared opponent the orges! I was fortunate in that there was only one ironblaster, but it still wasn't going to be easy as they were supporting a greedyfist death mage.

Tigers
Dreadlord on Dragon w/ sea dragon cloak, Blood Armor, Soulrender, Pendant of Khaeleth
Master BSB on Dark Pegasus w/ heavy armor, shield, sea dragon cloak, Crown of Command, Dragonhelm, Luckstone
Sorceress[SHADOW] on Dark Pegasus w/ level 2, Dispel Scroll, Whip of Agony

27 Spearmen w/ full command, Warbanner
10 Repeater crossbowmen w/ full command
5 Dark Riders w/ repeater crossbows

5 Harpies
5 Harpies
5 Cold One Knights w/ banner, Banner of Eternal Flame, champion, Ring of Hotek
Hydra
Hydra

Orcres
Slaughtermaster lv4 [DEATH]w/ Grut’s Sickle, Rock Eye, Greedy Fist, ward(?)
Butcher lv2 [MAW]w/ Hellheart
Bruiser BSB w/ heavy, extra hand weapon(?), Runemaw Banner

6 Ironguts, standard, Standard of Discipline
6 Ogre Bulls, full command(?)
10 Gnoblars
10 Gnoblars
10 Gnoblars
10 Gnoblars
10 Gnoblars
10 Gnoblars
10 Gnoblars

4 Mournfang w/ Ironfist, banner
2 Mournfang w/ Ironfist, banner
Sabretusk
Sabretusk
Sabretusk
Ironblaster

Both armies have a one use reroll.

Setup and Deployment:
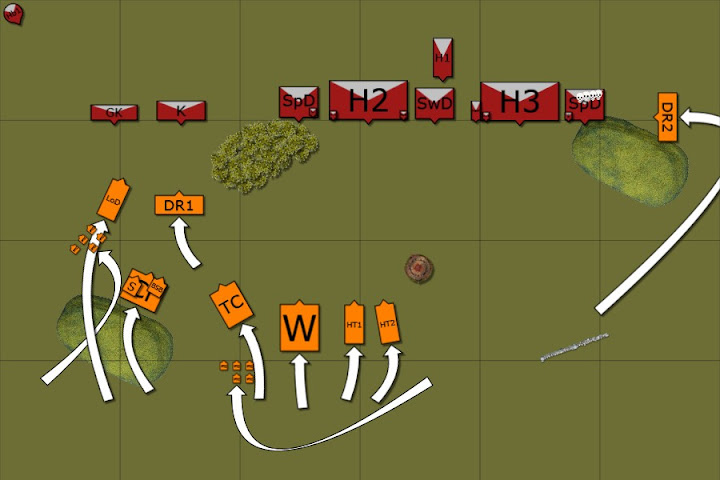
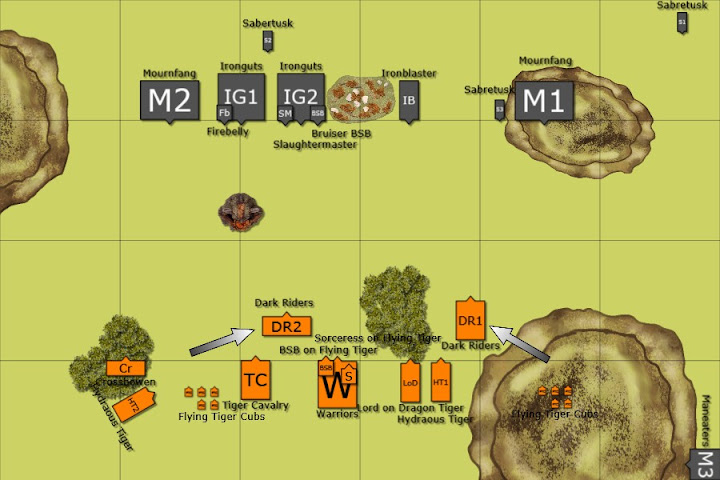
The scenario we played was a modified Dawn Attack with the major objective (worth 300 VPs) to destroy all opponent’s units worth the least amount of points (harpies and sabretusks) and a minor objective to destroy all opponent’s units worth the most amount of points (4 mournfang and both spearmen and knights). All units and characters worth fortitude points would not have to roll to see where they deployed.
I won the roll to choose sides and I elected to take the side with the wizard’s tower. I was able to pair the hydras and hid the dragon on the off chance I did not get first turn. The warriors stayed near the building and I placed the knights midwest for the option of projecting power on the other side; the BSB joined them for similar reasons. For spells I rolled Enfeebling and Mindrazor; I traded the former for Miasma.
My opponent was able to see my entire deployment before he placed his first unit, though with the sheer number of drops he had, he’d have the majority of this advantage in a battleline scenario anyway. The ironblaster rolled the central deployment zone and was placed as far east and away from my fast elements as possible. The unit of four mournfang was placed far west to threaten my heavies and his ironguts with characters set up directly across from the bulk of my forces with their flanks protected on one side by bulls and a mess of gnoblars on the other. I honestly forget what spells his level 2 had, but his level 4 had Spirit Leech, Soulblight, Doom and Darkness, and Fate of Bjuana.
I vanguarded my riders up, keeping the eastern unit just over 20” from his mournfang.
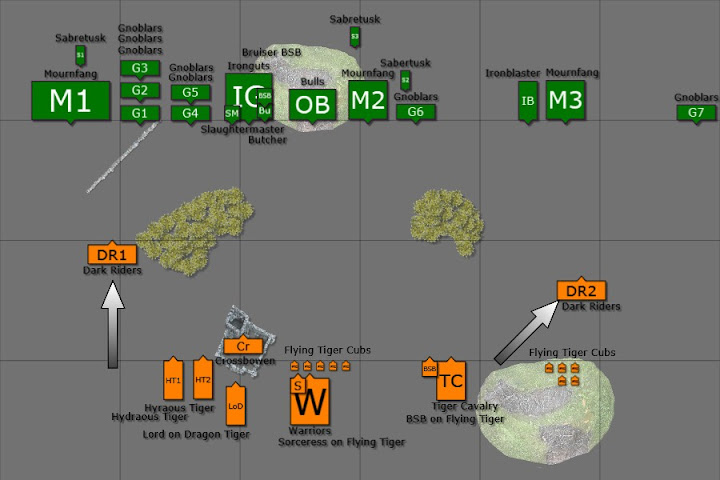
Image

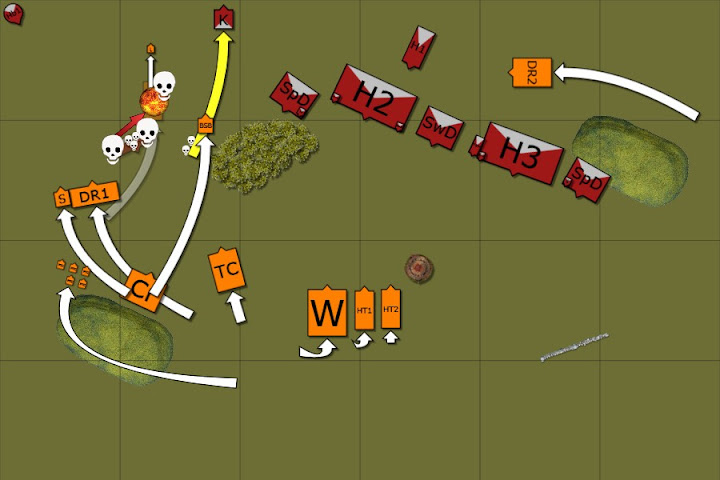
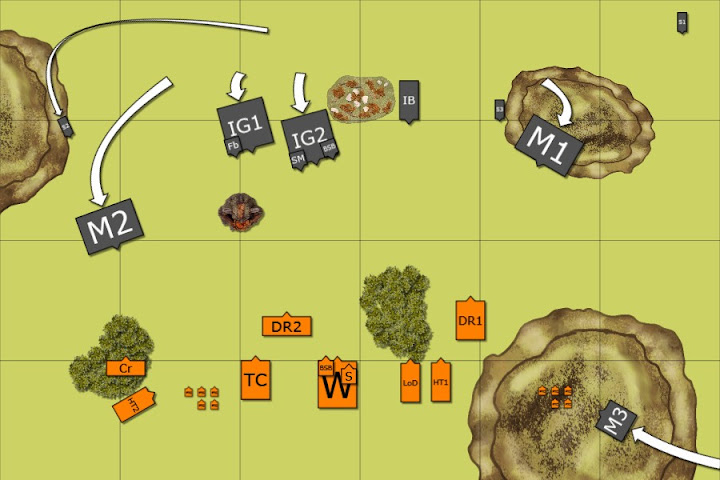
Tiger turn 1:
I advanced the dragon and hydras somewhat conservatively as I did not want to get in range of either the mournfang or the ironguts. The knights advanced similarly. There weren't any battleline gaps to exploit, so my BSB just moved west where his reroll might come in handy. Both units of dark riders stayed in place as again there were not any battleline gaps yet and +1 to hit in shooting is nice to have.
Magic was 12v7 and since I was near the wizard’s tower I knew all seven shadow spells. I started with four dice trying to Pit his ironguts but was dispelled with four in turn. My sorceress was in the front arc of the big mournfang unit by a hair (4+ roll) so I tried to send a Pendulum into the ironguts but failed to roll 11+ on four dice.
The dark riders managed one and two wounds on mournfangs while the crossbows took off one irongut.
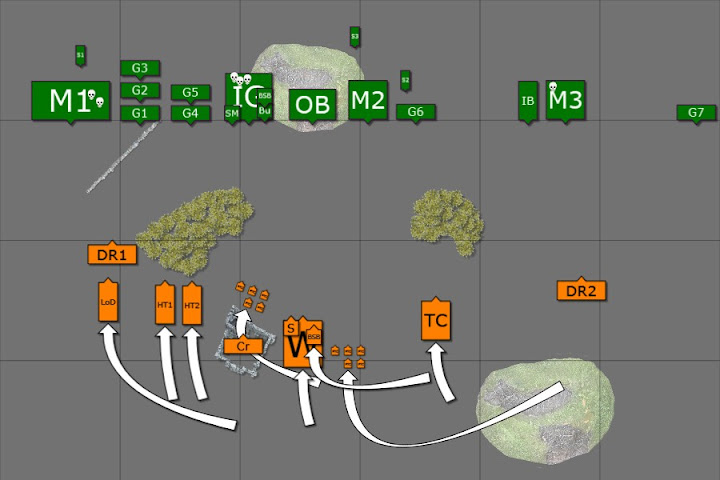
Image

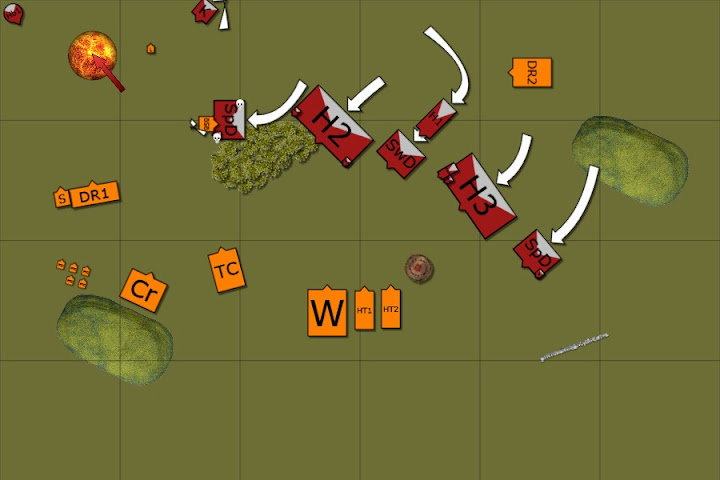
Orcres turn 1:
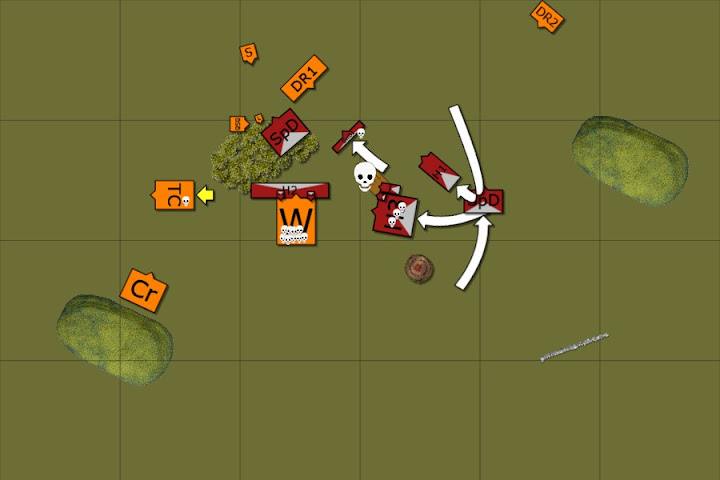
The western mournfang charge my dark riders, who elect to flee. Their flight causes panic checks for the dragon and a hydra, and the hydra fails. The mournfang decide not to redirect into the dragon (it’d be a long charge anyway) I’m assuming so that the dragon is free for the ironblaster. Otherwise the orcre battleline advances as a solid mass.
The slaughtermaster inflicts one wound on the ironguts with Grut’s Sickle. I didn't record what the winds were this phase, but my dispel dice were powerless to stop a Doom on my fleeing hydra and a long range Spirit Leech on my sorceress. No wounds are inflicted, but apparently it still counts as a hit and I lose a wizard level along with Mindrazor thanks to Greedy Fist.
The ironblaster takes aim at the dragon and puts four wounds on her; I make the reverse ward save for the lord.
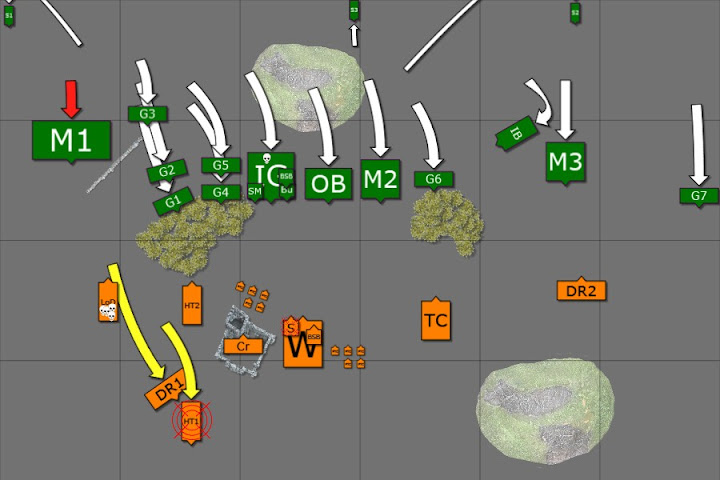
Image

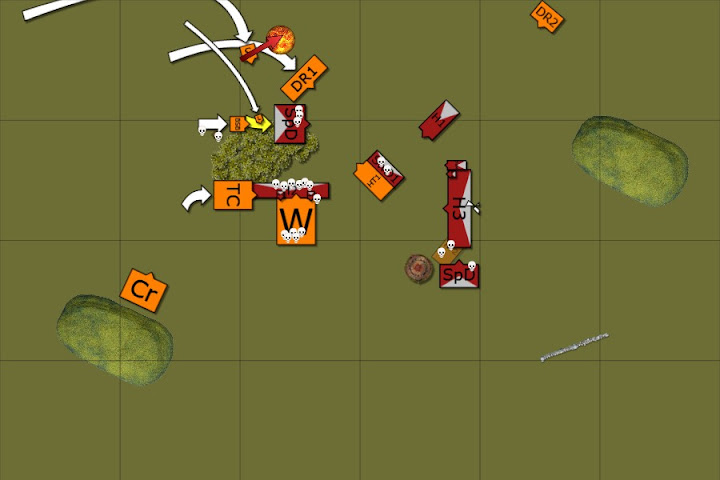
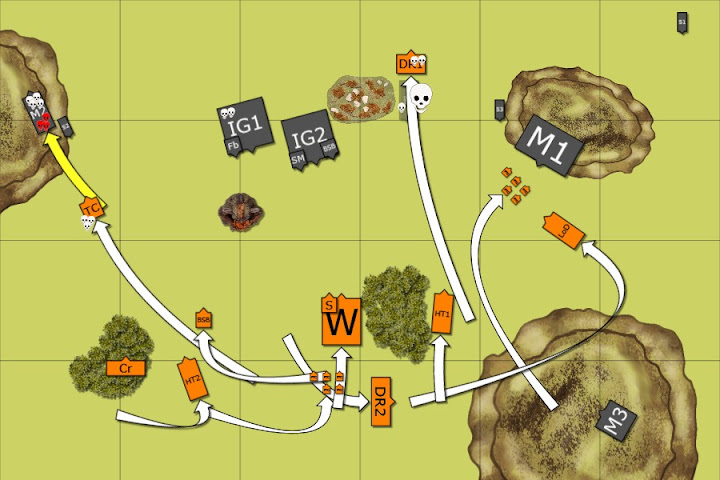
Tiger turn 2:
At this point, I would love nothing more than to hit the flank of the ironguts with the dragon, but their flank is protected by gnoblars, who in turn have their flank protected by more gnoblars. With two wounds remaining on the dragon, I don’t relish taking on the mournfang, but she has a decent chance at survival and a good chance at breaking them, so I declare the charge; after some consideration, the mournfang hold. The dark riders charge the flank of the ironblaster – I’m hoping to tie it up for a turn, but with luck I may be able to break it in combat. I declare the knights against the bulls who hold. I declare the BSB into the bulls as well and they flee 10”, which is just outside of the range of the harpies. The knights redirect into the unit of two mournfang who hold. I hem and haw at this point, knowing that if the BSB follows suit they’ll flee, but I’m unsure if the knights can go in alone. I decide to charge, the mournfang do flee, again ending outside of the range of the harpies. Later doing the math, the knights likely would have been fine and more importantly a failed charge puts them in a very dangerous position. The hydra doesn’t really want to go into the ironguts alone, so begins to start clearing up some gnoblars.
The dragon needs to roll only 5+ swiftstride to get into the mournfang and the dice come up with a trio of 2s. The fleeing hydra fails to rally because of the Doom and Darkness but flees only 3” giving me another shot next turn. The dark riders do rally and move up screening the dragon from the mournfang, making sure that an overrun will sail past the dragon.
Magic is 5v5 and the butcher uses the Hellheart, needing to roll a 4+ for the sorceress to be in range, but he rolls a 1. My opponent elects to use the game reroll and comes up with another 1. I know I need more power dice to get anything through, so I start with 2 dice on Power of Darkness, but it’s dispelled with 2 dice. At this point, the odds are low of getting anything off successfully, so I throw the last three successfully dispelling Doom and Darkness.
In shooting, the dark riders get only one wound on the large mournfang unit which they save and the crossbows put two on the ironguts, which they do not. In combat, the other unit of dark riders cannot wound the ironblaster, lose two of their own, and the combat’s a tie. The hydra mows through gnoblars and overruns into the unit behind.
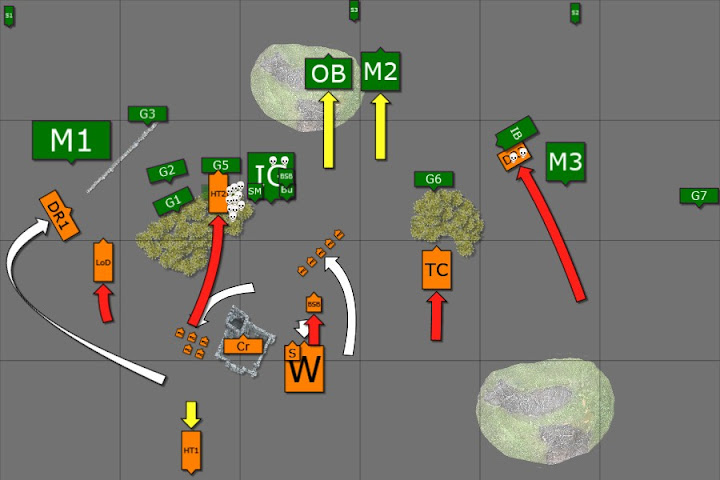
Image

Orcres turn 2:
The four mournfang charge the dark riders and the two mournfang charge the flank of the knights. Both the bulls and the fleeing mournfang rally. The ironguts move up to the harpies and the gnoblars shuffle around.
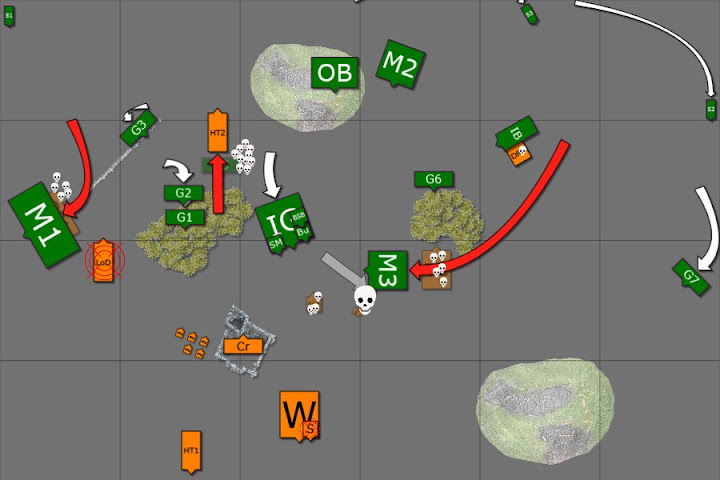
Magic is 6v3 and Grut’s Sickle is used again. Two dice are used to Spirit Leech my sorceress again and though no wounds are caused, I lose my last magic level (now as a level 0, I can channel and use arcane items, but cannot cast). Two dice are used to Doom and Darkness my dragon and I reluctantly let it go. Finally, two dice are used to Fate my BSB; I save the scroll, mistaking Fate for Caress and thinking I have a decent shot at surviving it. I still throw my three dispel dice at it, but as he’s +6 to cast and I’m now +0 I am nowhere near close enough. He only rolls 6 subtracting my toughness of three leaves 3 hits, all of which wound and my BSB croaks. I pass the panic check with the crorssbows, but fail with the harpies and the spearmen.
The dark riders again fail to wound the ironblaster, losing one, and we’re tied again. The mournfang obliterate the dark riders with impact hits and overrun just barely out of sight of the dragon. Then on the panic check I roll a 3 and 5, which now fails due to Doom and Darkness. I consider letting it go but realize that if I flee, the mournfang would be able to set up a charge if I rally. I use my game reroll to reroll the 5 and roll low enough to pass. On the other side, the mournfang only kill one knight with the impact hits, but take out two more with attacks. The last knight with the flag dies where he stands when he fails the break check and the mournfang overrun coming into contact with the fleeing harpies, destroying them and giving him a free reform. The hydra kills all the gnoblars, but my opponent had cleverly moved another gnoblar unit 1” away from the hydra’s center, limiting my reform options to turning around. I thought that I could use the gap between the gnoblars to wheel and get into contact with the flank of the ironguts, but after patiently walking me through the proposed reform and charge I agreed with my opponent that the charge would not be possible. With reform options limited, I elected to overrun so that I could get some room to maneuver.
Image

Tiger turn 3:
Although it doesn’t look like it, the dragon can see the forward gnoblar unit and charges. The flee roll is low enough for me to catch and I elect to not redirect looking for the free reform a catch will give me. Once I actually contact them however, the same unit of gnoblars that stopped the hydra also limits the dragon! (Shame on me for not checking on this before) The spears and hydra both thankfully rally. I swing the hydra around to charge the ironguts later.
I roll high for the winds of magic but can’t use the dice for anything but dispelling the Doom and Darkness.
The crossbows get three wounds on the mournfang, but they are all saved by armor.
Again I can’t wound the ironblaster, this turn I don’t lose any in return, but the ironblaster resolutely stays put with a pair of 1s for the break test.
Image

Orcres turn 3:
Two mournfang charge the spears looking to take out the sorceress. The four mournfang turn around, as do the ironguts, being careful to stay out of the dragon’s charge arc, but still able to see her. The bulls move up to flank the hydra should it charge the ironguts.
Magic is 5v4 and the Sickle is not used. All five dice go into Fate on the dragonlord, but I pull the scroll.
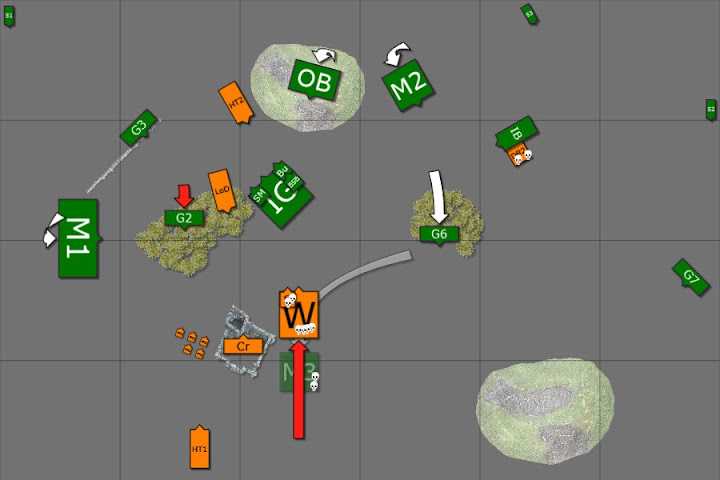
For the fourth round in a row my dark riders cannot wound T6! The last two are pummeled and the ironblaster is again free. I’m very happy with the ironblaster being held up for two whole turns, but at the time it was a bit frustrating to not roll even a single 6 over the course of more than a dozen hits. Against the spears the mournfang cause four kills on impact. The elves sneak one wound past the armor and the sorceress puts on another, killing one orcre. The remaining mournfang throws all attacks at the sorceress, but only gets two wounds, leaving her alive to prevent stomps. We count up combat resolution and I lose by one but pass on steadfast. I’m considering charges in the next turn when I remember the Warbanner in the spears and my opponent graciously agrees to go back and recalculate, where I’m up by a musician. He fails his ld6 test and runs; I chase but fail to catch him. Halfway through turn 4 he remembers that the last mournfang was a standard (this unit was just bases) and thus I couldn’t pursue. He declined to go back though since we had already finished Tiger turn four combat.
Image

Tiger turn 4:
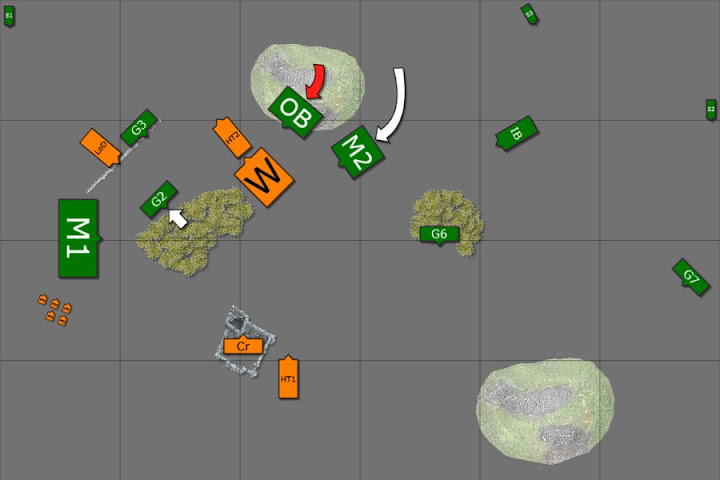
I was going to charge the hydra in regardless, but with the result of the previous combat, I’m now able to support it with a rear charge from the spears. The dragon repositions out of line of sight from the mournfang, using the wall as cover from the ironblaster.
Shooting is again ineffective.
My sorceress challenges just to try and prevent one the characters hurting the hydra and his BSB accepts. The sorceress and mount cause only one wound but is wounded once in return and dies. The spears add one or two wounds, but the hydra’s breath is good for 11 hits and six wounds. All the attacks go on the ironguts since I want as little retaliation as possible. His mages cannot wound the hydra. He needs insane courage to hold and fails to get it. I chase with both and run him down.
Image

Orcres turn 4:
The bulls charge the spearmen and I have little choice but to hold. They need a something low (5+?) and only roll a 4 failing the charge.
The ironblaster takes aim but the shot lands short of the wall, bouncing into and destroying it.
Image

Tiger turn 5:
I reposition trying to hide the dragon behind the hydra maintaining decent charge options, but later realize I did a very poor job of it. The spears march forward and do a big wheel so that the bulls are in their front arc with their rear protected from mournfang by the gnoblars. The last hydra advances.
Once more I try to pick off some mournfang but the crossbow bolts cannot get past the armor.
Image

Orcres turn 5:
The bulls charge the spears and I hold. The mornfang join and I was going to hold until I learn that they are in the flank; I don’t think I can hold up to that so I flee bouncing through the gnoblars losing a few. The gnoblars and mournfang reform for their eventual rally.
The ironblaster hits the dragon and takes off the last two wounds; I make the reverse ward save for the lord.
Image

Tigers turn 6:
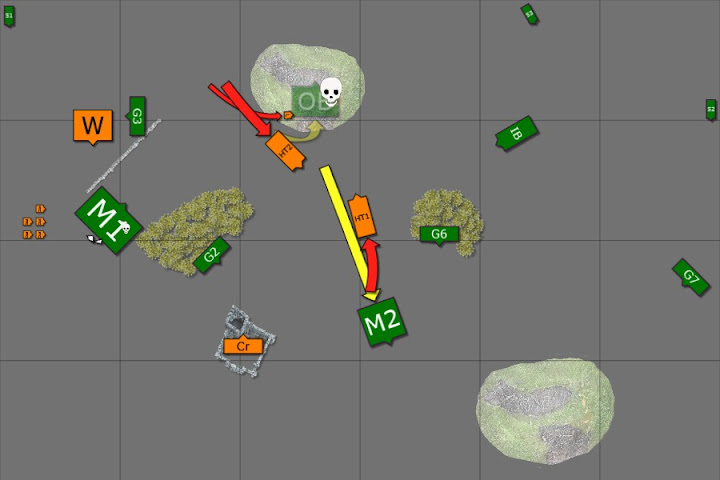
The northern hydra and dismounted lord charge the bulls and redirect into the mournfang who both flee. The mournfang bounce through the southern hydra. The southern hydra charges the bulls, pushing them back into the lord’s range and he catches them. The warriors rally and I face the mournfang exposing their flank to the gnoblars.
The crossbowmen loose another volley on the mournfang and one wound finally goes through.
Image

Orcres turn 6:
The mournfang and gnoblars charge the spearmen and kill them to an elf. The ironblaster takes one more shot at the lord, but I again make the reverse ward save.

Postgame:
I had earned about 1650 VPs and my opponent earned about 1320 with would translate to a 12-8 victory. If the rules were different and you could get points for killing the dragon separately then it would be an almost perfect tie. Neither of us obtained the major objective, indeed I didn't even really try as I knew I'd have to take out three sabretusks safely hid in the backfield. As both my knights and spears died, the orcres did get the minor objective and I did not.
Overall, I think there were several mistakes and a bit of good and bad luck on both sides, making a very close game. Let's go my mistakes over it turn by turn:
Deployment: I'm not sure if I made any big errors here. I suppose the western dark riders did not need to be in charge range of the mournfang to begin with, risking the two panic checks and the subsequent rally.
Turn 1: I'm using the spears as a bunker for both the sorceress and BSB, which is fine if there's a lot of BS shooting around, but here there was not and being aggressive with the spears could have really changed things. I probably would have kept the sorceress near the wizard's tower (because I'm foolish), but it may have been smarter to try and fly her into the backfield, where if the death mage wanted to target her, he'd have to turn around. Failing the cast was unfortunate, but that's odds and I'd do it again.
Turn 2: Sending the BSB into the mournfang was a sucker's move and I went for it. I should have just elected to fail the charge or better yet go into the ironguts with the hydra; if the hydra can take out some or most of the ironguts, the BSB should be able to hold for a while pinning the unit in place. Even without the BSB, I should have sent the hydra in; he'd likely die, but probably not the first round and take out 3-4 ironguts with him. Mistaking the two death spells was stupid, but by unwittingly saving the scroll, the dragonlord survived the next magic phase. At the end of turn two I was ready to throw in the towel since a quarter of my army was dead, another quarter was fleeing, and the rest did not look to be in a position to turn things around; at this point I had killed two units of gnoblars and two ironguts. I did stick it out and look for advantages, but my attitude needs work.
Turn 3: I shouldn't have charged the dragon at all, simply repositioning; 1-2 unit of gnoblars was not worth it and unlikely to be able to block a charge to the ironguts. I also really need to remember that warbanner.
Turn 4: Surprisingly few mistakes in this round. Hiding the dragon behind the wall was good, but I was still in the front arc of the death mage, which would have been really bad had he held (with a stubborn crown or insane courage). Perhaps the best thing would have been right in front of the bulls and in the flank of the ironguts, safe from death, but accepting that the dragon would likely die to the ironblaster.
Turn 5: Ensuring that the mournfang were in the spear's front would have been good, and I should have either picked to use the hydra as cannon cover or have good charge options - instead I tried for both and didn't do either very well.
Turn 6: S3 isn't going to do anything to mournfang, so I should have reformed the spears to face the gnoblars; in the end it wouldn't have made a difference, but the extra few kills could have theoretically had the dice been different; or the gnoblars may not have charged at all, which may have been just as good.

List changes
I was impressed by death magic and am considering changing the sorceress to this lore. I am deathly afraid of a double ironblaster ogre list and if I'm lucky enough to roll purple sun it could change the game. Spirit Leech might be nice for unit champion sniping in prep for a dragon charge. I'm enamored with the idea of smoke and mirroring with the BSB, but it's so situational that it's not a great reason to pick a lore. I like the range of Miasma, but I'm finding the sorceress staying near the front lines anyway (which may be a habit I should break...). Any opinions on lore options?
I'm also considering dropping two spearmen to add musicians to the dark riders. Two times this game the riders were in a tie combat and the musician would have tipped it. That said, I feel the spearmen are already pretty low on numbers for their role and hesitate to drop two more. Do any of you feel that the musicians would be worth losing two more spearmen?
User avatar
Sedge
Trainee Warrior
Posts: 39
Joined: Thu Jul 05, 2012 8:03 pm
Location: UK

Post by Sedge »

You might be better off dropping the champion/standard bearer on the crossbowmen - they're less likely to see combat than the DRs. That'd give you enough points to buy musicians on both DR units.

I don't have any helpful comments about how you played the battle - you're far more experienced than me :P I love the reports though.
Cycloptic squirrel
Corsair
Posts: 86
Joined: Wed Sep 05, 2012 7:54 pm

Post by Cycloptic squirrel »

Thanks Sedge, glad to hear you're enjoying them. I hadn't really considered dropping the banner and champ from the xbows, but I really like the suggestion. The tournament has a scenario that deals with fortitude so I'm initially hesitant, but I think I still like it better than dropping more spears. Now that I'm considering the xbows, I'm realizing that in over half a dozen games, their shields have not really come into play.

Oh, and so no one gets the wrong impression, it turns out adding a mounted character to an infantry does not prevent stomps as I thought. A friend showed me where the information was buried in the skaven FAQ. It makes sense, but I am a little sad :(
Cycloptic squirrel
Corsair
Posts: 86
Joined: Wed Sep 05, 2012 7:54 pm

Post by Cycloptic squirrel »

I had a game against Jon's demons a few weeks ago, and though a bit truncated, was still a very enjoyable game.

Tigers
Dreadlord on Dragon w/ sea dragon cloak, Blood Armor, Soulrender, Pendant of Khaeleth
Master BSB on Dark Pegasus w/ heavy armor, shield, sea dragon cloak, Crown of Command, Dragonhelm, Luckstone
Sorceress[SHADOW] on Dark Pegasus w/ level 2, Dispel Scroll, Whip of Agony

27 Spearmen w/ full command, Warbanner
10 Repeater crossbowmen w/ full command
5 Dark Riders w/ repeater crossbows

5 Harpies
5 Harpies
5 Cold One Knights w/ banner, Banner of Eternal Flame, champion, Ring of Hotek
Hydra
Hydra

Demons
Khone Herald BSB, sword of reroll wounds 1st round of combat
Tzeench Herald, lv 2 wizard, loremaster shadow
Slaanesh Herald, ‘you must charge me’

42 Bloodletters, icon of endless war
17 Deamonettes, icon of stubborn for one turn
12 Fleshhounds
Soulgrinder
3 Flamers
3 Screamers
3 Screamers

Both armies have a one use reroll.

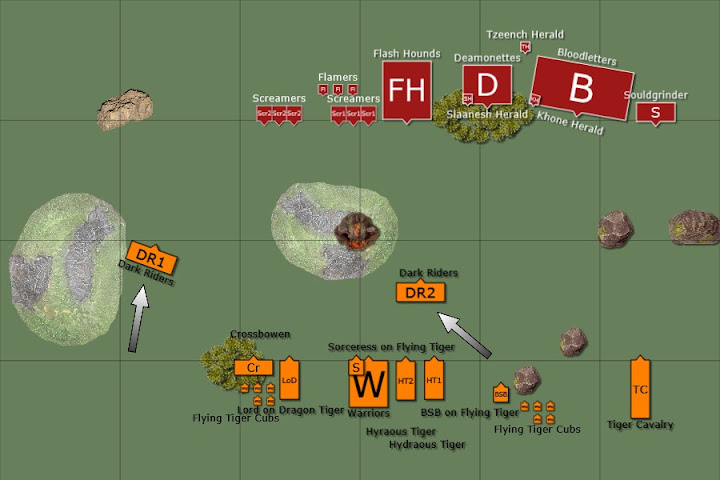
Setup and Deployment:
Straight battleline. I was a little worried about the horde of bloodletters, but I figured if I could position the hydras correctly, I could cut down on their numbers with breath weapons and one round of combat before breaking, then I could clean up with the dragon and whatever else I could muster. The killing blow worried me greatly, but as I’m prepping for a tournament, I wanted to push the list a bit to see what the limitations were.
I was a bit surprised when the demons went for a refused flank with the bloodletters to the far end; this would allow him to limit his flank exposure, but with my mobility, I’m pretty sure I can just start on the center and roll east. I’m mindful of the caster and would really like to get the ring near it, so I rank the knights only two wide which would allow them to pass under the eastern arch (shown as rocks) and into his back field; the soul grinder went to counter, but with my armor, I’m not too worried. I had used the harpies to discover that the forest was a venom thicket, and worried about screamers into my crossbowmen, I figure the poison attacks might be enough to deter.
Image

Tiger turn 1:
I get the first turn, and I advance the crossbowmen just a bit to get in range and lose three to dangerous terrain! Otherwise I advance, using the impassible sphinx in the center to protect the spearmen’s flank. I don’t mind the position of the central riders and they stay put for increased shooting accuracy. The harpies stay in reserve and the hydras reposition. The knights advance cautiously, keeping in mind that the bloodletters likely have an increased charge range and my BSB joins them in case the soul grinder decides to come in.
Magic is 7v3 which is increased to 9v3 after an unopposed Power of Darkness. I cast an unopposed long range Spirit Leech on the Slaanesh Herald the with 5 dice, but we tie on the opposed roll (both ld 8 ). I use the last 4 dice on Doom and Darkness on the Flesh Hounds which he fails to oppose with his three dispel dice.
I shoot everything I have at the screamers, but only manage one wound.
Image

Demons turn 1:
The soulgrinder goes into the knights, but since it has to charge through the arc, it cannot maximize and I kick myself as I now realize my BSB is stuck out of the fight (can’t make way with different bases). One unit of screamers charge my dark riders and I hold; I think normally I’d run, but I’d like to see how they hold up. The other screamers charge the dragon and I’m not worried a bit.
Magic is only 3v2 and it’s here that I realize how lucky I am; screamers cause d3 wounds against large targets so a Withering or Mindrazor cast into the dragon fight and I’m likely to lose the beast. With strong winds, both could be attempted, and I’d probably have to use the scroll. However with only three dice, only a boosted Miasma is attempted and cast successfully, reducing the dragon and rider’s I, WS, BS, and M by 2.
The flamers throw mystical flame into the dark riders and two fall, but the flames linger protecting the remaining three (granted 6+ regeneration save).
The soulgrinder knocks off two knights, receives two wounds in return, and easily passes instability; I reform to get the BSB in. Before getting squashed, the screamers manage to wound the dragon once, only to have it multiplied into… one wound. The surprise is the other unit of screamers completely spoon everything except their ward saves and I pass the break test.
Image

Tiger turn 2:
I figure this is my opportunity to move both hydras up and flame the bloodletters, but the slannesh herald has other plans and I’m forced to either charge her or flee. I charge and don’t roll the 12 I need to get in; the other hydra moves up to keep pace. The dragon charges the flank of the flesh hounds, but fails due to the Miasma still in effect. The spears get into the flank of the screamers as I assume the dragon will hold up the flesh hounds, and if not, I think I’ll at least have the ranks for steadfast. I’m worried about the blodletters getting into either the hydras or the knights, so I redirect with some harpies.
Magic 7v5 and I put it all into a Spirit Leech on the Tzeench herald, but we tie on the opposed roll again…
The knights armor works this round, BSB finishes off the chariot, and I reform back into two ranks so I can again squeeze through the arch. The screamers take out three cavalry this time before wounds and the massive combat resolution of the spears cause them to pop.
Image

Demons turn 2:
The bloodletters charge the harpies, which also depletes their icon of bonus d6 on the first charge. We determine that if the flesh hounds do charge the spears and I flee (center to center), the sphinx will block completion. With this thought, the dogs charge the hydra and though it’s a long charge, if it’s completed, they’ll be out of range for the dragon, so I flee. The hounds try to redirect into the spears, just to get them running, but fail due to the Doom and Darkness still in effect. The flamers move to screen the hounds from the dragon.
Magic is 9v5 and the first 3 dice are used to irresistibly cast Enfeebling Foe on the Spearmen; the resulting miscast is the small template which causes no wounds but drains 5 dice. The last die is used on Miasma but shut down by 5 dispel dice.
The harpies are predictably slaughtered and the bloodletters elect not to overrun.
Image

Tiger turn 3:
The dragon charges the flamers, the northern dark riders charge the rear of the flesh hounds, and the demonettes are charged successfully by the other dark riders, spears, and BSB. The hydra rallies and her sister repositions beside, not wanting to take on the bloodletters alone.
Magic 8v5 and I use 4 to dispel the Enfeebling Foe. A 2 dice Power of Darkness is denied by three dispel dice and we both throw our last 2 dice at Spirit Leech, but my casting roll is higher than his dispel. The opposed roll is tied for the third time(!), so no wounds.
The dragon stomps the flamers, overruns into the flesh hounds and because of the dark riders, gets to fight again! The dragon and rider cause six wounds and receive none in return. The dark riders cause no wounds, and are wounded thrice in return. I pull them all off, then I am kindly reminded that they have 6+ regeneration! If I can make one of these, I’ll have a rider left to claim the +2 for being in the rear as well as preventing a reform. Three sixes later my opponent is cursing his flamers. I’m giddy thinking about the combat resolution, but they’re steadfast and easily make the instability roll. The deamonettes take a bunch of wounds and I lose a few spearmen; the BSB skewers the herald. The demonettes are stubborn this round, but clearly won’t last the next and with the bloodletters out of position, my opponent concedes.
Image

Postgame:
At the time the concession seemed a little premature, but in reflection, it was pretty clear what would happen with the remainder of the game. In his turn the bloodletters would have either advanced or reformed, the demonettes would have died, and the dragon would likely kept grinding with the hounds. In my turn, the knights and the pegasi put pressure on his caster, the spears position to flee from the bloodletters, while both hydras put S5 breath weapons into them. Late game, I charge in with everything and though I’ll lose a character or two, but between two hydras and a dragon, I should be able to grind out the remainder.
I was a little disappointed with my shooting but overall happy with the development of this game. We discussed the game, tactics, and lists for a long time afterward; I think my opponent’s list had all the tools he needs for an ‘all comers’ army. Not as much against a dragon specifically, but in this meta, that’d be a shortsighted goalpost to build around. I think the biggest mistake was deploying to a side with the horde. With a large killy unit like that, deploying centrally should give you enough options to get into combat somewhere, especially if the screamers are used in an anti-chaff/redirector role (I think the combat against the dark riders was an anomaly).
User avatar
xFallenx
Malekith's Best Friend
Posts: 1255
Joined: Fri Sep 22, 2006 1:04 am
Location: Calgary, Alberta
Contact:

Post by xFallenx »

These bat reps are seriously sharp. Thanks for taking the time, I just wish my lunch house was a bit longer!!
Oct 2013-Current: 3-2-0
User avatar
Tyrannus deathbringer
Noble
Posts: 497
Joined: Fri Dec 23, 2011 7:28 pm
Location: The Black Ark Nemesis

Post by Tyrannus deathbringer »

Thanks for the batreps. I wish everyone would take the time to add the pictures as it changes them from a huge unreadable block o' text into a cool and informative story.

Oh and btw:

I WANNA SEE PICTURES OF YOUR TIGERS!!! Please :P
"All who surrender will be enslaved; whoever does not surrender but opposes with struggle and dissension, shall be annihilated."
Cycloptic squirrel
Corsair
Posts: 86
Joined: Wed Sep 05, 2012 7:54 pm

Post by Cycloptic squirrel »

@xFallenx Thanks! It's always nice to hear that they are appreciated.

@Tyrannus Shoot! I had forgotten that I promised to get some pictures up. I'll dig through the photos and see if I can find some good ones.


Had a game against a friend and he was trying an empire list that was a bit different than most empire players run; he's always been an infantry guy - even back in 6th. The big deviation is no hellblasters, which are a little like our hydras - you can build competitive lists without them, but they are so good it's not a surprise to face two of them.

Tigers
Dreadlord on Dragon w/ sea dragon cloak, Blood Armor, Soulrender, Pendant of Khaeleth
Master BSB on Dark Pegasus w/ heavy armor, shield, sea dragon cloak, Crown of Command, Dragonhelm, Luckstone
Sorceress[SHADOW] on Dark Pegasus w/ level 2, Dispel Scroll, Whip of Agony

27 Spearmen w/ full command, Warbanner
10 Repeater crossbowmen w/ full command
5 Dark Riders w/ repeater crossbows, musician, champion
5 Dark Riders w/ musician

5 Harpies
5 Harpies
5 Cold One Knights w/ banner, Banner of Eternal Flame, champion, Ring of Hotek
Hydra
Hydra

Empire
Templar Grand Master, White Cloak(?)
Wizard [HEAVENS] 5+ ward(?)
Wizard [SHADOW]
Warrior Priest, heavy armor, additional hand weapon
Captain BSB, 4+ ward(?), full plate and enchanted shield(?)

42 Halberdiers, full command
20 Spearmen Detachment
20 Swordsmen Detachment
42 Halberdiers, full command
20 Spearmen Detachment
Cannon
5 Knights, banner
3 Demigryphs
Celestial Hurracanum

Both armies have a one use reroll.

Setup and Deployment:
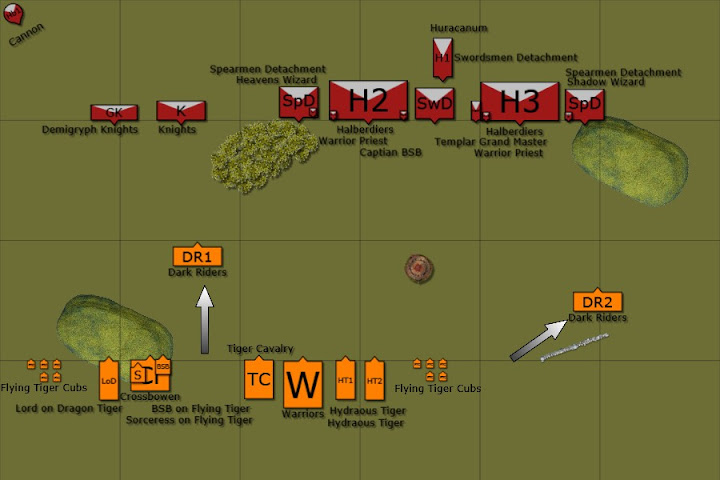
With this list I wanted to try some command options on the dark riders and dropped crossbows from one unit (eastern) to do so.
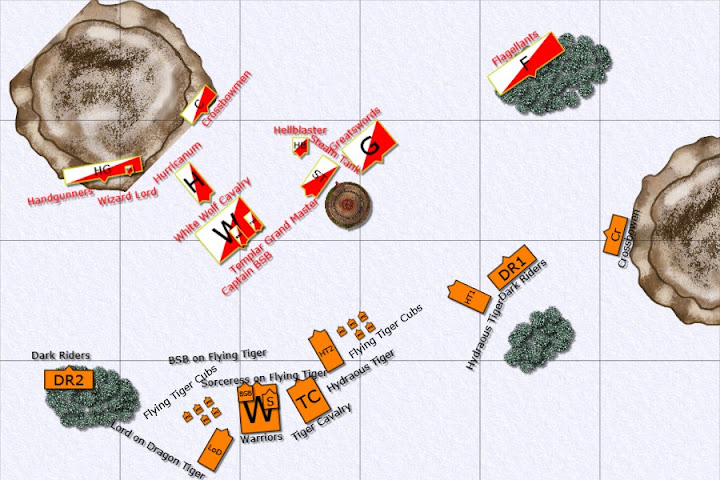
I put down chaff while heavily weighted the eastern flank. I was a little concerned about the cannon as well as 1+ AS cavalry in the western side, so I deployed favoring that side, with the plan to crush that flank and circle back to the hordes.
I rolled Doom and Darkness and Purple Sun and elected to keep both; I was facing Chain Lightning, Comet of Cassendora, and Miasma.
Image

Tiger turn 1:
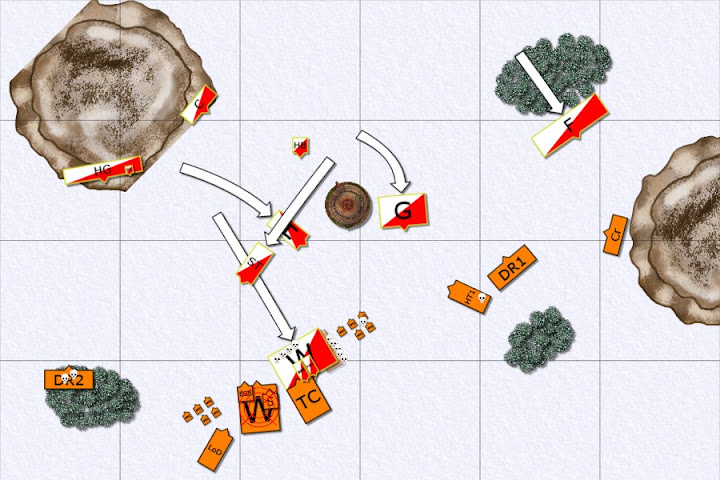
I luckily won the first turn and advanced pretty aggressively with the dragon, using it to shield the harpies from the demigryphs. One unit of dark riders started circling his line, while I advanced the other, tempting a charge from his cavalry, from which I would flee and counter with a charge from my own. The spears and hydras were cautious, waiting for the hordes to circle.
Magic was 3v3, but since I was within ring range, I didn’t want to chance too much on something that would be easily dispelled. I threw one die at Power of Darkness to gain an advantage but failed to cast.
Four spearmen fell to dark rider bolts – one from the unit champion that wouldn’t have hit without the additional ballistic skill.
Image

Empire turn 1:
The demigryphs charged the dark riders who fled, then redirected into the crossbowmen and failed (I thought I had blocked the angle with the dragon, but I was a quarter inch off). The knights also charged the spearmen but rolled low and failed – I was expecting them to make it then I’d countercharge with my knights. Otherwise, his army starts a long wheel with the western infantry maintaining position as to not break up the battleline.
Magic is 10v6 and we both throw 4 dice at Comet, with my dispel higher than his cast. One power die goes to a failed Miasma. The last 5 are used on a Chain Lightning, which rolls low on hits and fails to wound the dragon before bouncing to the harpies and completely obliterating them.
The cannon took aim at the dragon the demigryphs left alone for them and promptly misfired, taking it out of commission for this turn and the next.
Image

Tiger turn 2:
The dragon charged headlong into the demigryphs while the BSB supported my tiger cavalry charge into his knights; the knight however, rolled extremely low on the charge roll and left the BSB on his own.
The dark riders rallied and moved toward the cannon and the sorceress joined them. The hydra and spears waited for the wave of infantry.
Magic was 12v7 and 5 dice went to an unopposed Purple Sun aimed down the line of demigryphs; I only rolled two on the artillery die, but this was enough to catch one who failed the initiative test and was sucked into the blackness. 2 dice for an unopposed Power of Darkness yielded 4 dice and then I threw all 9 dice into Doom and Darkness, but was stopped by an irresistible dispel.
The dragon had lined up with the center demigryph, the western was killed by the Sun, so when the dragon and lord did three more, my opponent cleverly removed the center demigryph, leaving only the eastern which then fled away from the cannon. Without thinking, I pursued right through my own purple sun! The dreadlord easily made the initiative check, but the dragon was not so lucky. The BSB managed to sneak two wounds past the armor of the knights accepting none in return. Down by three, the knights broke, but got away due to a low roll on the pursuit.
Image

Empire turn 2:
The spearmen charge the flank of my BSB and I hold. His two remaining knights rally and the rest of his army continues its wheel.
Magic is 8v5 and one die is again thrown into a failed Miasma. The western priest uses one die to grant flaming to his unit. The last 6 dice are thrown into a Chain Lighting which draws my scroll. The still active Purple Sun drifts the direction I do not care for and I elect to discontinue concentration.
The spearmen cannot get past the armor of my BSB. In return he wounds the Heavens wizard twice, but one is saved by the ward. I’m stubborn and reform.
Image

Tiger turn 3:
I take a small risk and charge the sorceress into the cannon alone and fortunately make roll the 7+ required to get in. The dark riders take the opportunity to charge the hurracanum in the rear. Otherwise the harpies move into the woods to direct the horde into the spearmen with knights set up for a flank countercharge. The hydras take this opportunity to move beside both hordes to unleash their breath weapons. The dismounted lord moves to block the rallied knights.
Magic is 6v4 and I use all 6 dice to cast Doom and Darkness on the hurracanum.
The eastern hydra covers 22 halberdiers in flame and 17 die. The western hydra is able to catch 30 halberdiers in its fiery breath and 27 of them fall!
The sorceress and her ount eat the artillery crew. The spearmen sneak a wound onto the BSB, while the bannerman cannot seem to land a hit on the wizard. The dark riders hit five of six times, but fail to roll even one 5+ to wound; the mounts fare no better. On the other hand, the hurricanum’s attendants use their two S3 attacks to kill two riders. The wizard cart still loses by one, but makes the ld5 break test and proceeds to reform to face!
Image

Empire turn 3:
The western halberdiers go into the harpies while their eastern brethren take on the hydra, with spearmen support. The swordsmen detachment steps up into the hydra in front of them as do the knights into the lord.
Magic is 11v6 and an extremely poor roll on 5 dice fails to even cast Chain Lightning. 4 dice are unopposed, giving the western halberdiers flaming attacks while I successfully dispel the same spell on the eastern halberdiers (2v6).
Once again the BSB cannot land a hit on the wizard but no spears find their way past his armor. The hurricanum claims another dark rider and they fail their ld7 break test. Halberdiers run through the harpies and into the spears behind, but not before the harpies wound the warrior priest once. The swordsmen (who gain flaming from their parent unit!) fail to wound the hydra, losing 13(!) of their own but hold on steadfast. The other hydra prioritizes the spears and wizard, but also kills the halberdier champion. The horde and detachment put through three wounds, but I pass the break test.
Image

Tiger turn 4:
The knights take the charge I set up, the dark riders rally, and I move the lord toward the action.
Magic is 11v8 and I spend 5 dice casting Purple Sun with irresistible force. I roll a misfire, but pass the initiative test. The miscast causes a hit to everyone in base contact (no one!) and I lose 1 power die. I cast Power of Darkness with two dice but am dispelled with 4. I use the last 3 trying to cast Doom and Darkness, but fail to meet the casting value.
In combat, I finally kill the heavens wizard, another spearman, and the unit breaks! I pursue, fail to catch, but another two are lost passing through the lord behind them. In the fight below the woods, there’s about half a dozen wounds on each side, and he’s facing a break test at ld3. Thanks to hold the line and a BSB reroll though, the unit holds! The other halberdiers chop down the hydra and reform facing west. The other hydra is not wounded, but only kills two swordsmen in return.
Image

Empire turn 4:
The halberdiers charge the hydra and the northern spears rally, reforming to block the lord! The hurricanum backs up, almost daring the other unit of dark riders to charge it.
Magic is 9v6 and the northern priest casts ‘reroll failed wounds’ and I elect not to oppose; we both throw 2 dice at the 5+ ward on the same unit and I successfully dispel. The last 4 dice are used to irresistibly cast ‘reroll failed wounds’ on the eastern halberdiers.
The hydra causes a few kills before breaking and being run down by the remaining swordsmen. The halberdiers cannot pursue into the other fight as they cannot close the door against my spearmen. In the other fight, I can only kill one halberdier but lose nine spearmen in return; the spears stick due to steadfast, but the knights take off.
At this point we’re out of time and have to call it.
Image

Postgame:
I was disappointed that we couldn’t finish; I do need to continue to work on my decision speed, but this was a very laid back game so I’m not too worried. Pointwise, it’s about even at this point, but I’m pretty sure I’m not in a good position for the last two turns.
Overall, Purple Sun hurt me way more than my opponent, but mostly due to my own mistake; as soon as the center demigryph was taken off, I should have ceased concentration. My opponent had some lucky breaks with break tests, but I think I lucked out with the cannon misfire. The hydras performed exactly how I had intended, the only change I would make is the positioning on the eastern – I couldn’t get exactly where I wanted, but I should have ensured that the detachment wouldn’t hit the flank.
I really like the hold the line rules for the empire; if you need it you’re probably in trouble, but it could really help if you count on it to last until help arrives. I think it’s a very thematic rule for the empire to have. It will take me a few games to get it into my head how hard it is to break an empire battleline that includes a captain, but that’s not too different from getting used to any other new army book with new upgrades and abilities.

As always, comments and criticism very welcome!
Cycloptic squirrel
Corsair
Posts: 86
Joined: Wed Sep 05, 2012 7:54 pm

Post by Cycloptic squirrel »

Tyrannus Deathbringer wrote:I WANNA SEE PICTURES OF YOUR TIGERS!!! Please :P


As requested! I've been documenting these battles by pictures, but most of them are from a bird's eye view, so not really suitable for showing off the aesthetics. I've done all the modeling/conversions, but my wife picked the color scheme and painted most of them (I only painted half the infantry). Once the tournament comes, I'll take some decent pictures with a display base.

An overall view:
Image

The BSB (missing her flag) in the crossbowmen being attacked by a Stirgoi. You can see wingless (at the time) harpies in the background.
Image

Something to warm your dark elf heart: a unit of high elf spearmen surrounded by a dragon, two pegasus riders, a hydra, and four dark riders!
Image

And a teaser from a 3 game tournament I attended last weekend.
Image
User avatar
xFallenx
Malekith's Best Friend
Posts: 1255
Joined: Fri Sep 22, 2006 1:04 am
Location: Calgary, Alberta
Contact:

Post by xFallenx »

Wow. And again. Wow. The sheer amount of extra work on that is mind blowing, sure does explain the Battle reports. Thanks for sharing!
Oct 2013-Current: 3-2-0
Cycloptic squirrel
Corsair
Posts: 86
Joined: Wed Sep 05, 2012 7:54 pm

Post by Cycloptic squirrel »

This is the first of three games I played last weekend in a tourney designed to be a primer for the tournament I'm prepping for. Thus the scenarios are all going to be at the tournament and lists I'll be facing will conform to the comp (which is pretty much nothing).

Tigers
Dreadlord on Dragon w/ Ironcurse Icon, Blood Armor, Soulrender, Pendant of Khaeleth
Master BSB on Dark Pegasus w/ lance, heavy armor, shield, sea dragon cloak, Crown of Command, Dragonhelm, Luckstone
Sorceress[SHADOW] on Dark Pegasus w/ level 2, Dispel Scroll, Whip of Agony

27 Spearmen w/ full command, Warbanner
10 Repeater crossbowmen w/ standard, musician
5 Dark Riders w/ repeater crossbows, musician

5 Harpies
5 Harpies
5 Cold One Knights w/ banner, Banner of Eternal Flame, champion, Ring of Hotek
Hydra
Hydra

Ogres
Slaughtermaster (lv 3 MAW), 4+ ward, dispel scroll, rock eye, Warrior Bane
Bruiser BSB, Tormentor Sword
Firebelly, Hellheart

6 Ironguts, banner, musician
7 Ironguts, banner, musician, Standard of Discipline

Sabercat
Sabercat
Sabercat
3 Mournfang, banner, Banner of Eternal Flame
3 Mournfang, banner, Gleaming Pennant (?)
Ironblaster

Both armies have a one use reroll.

Setup and Deployment:
The scenario we played was a modified Dawn Attack with the major objective (worth 300 VPs) to destroy all opponent’s units worth the least amount of points (harpies and sabretusks) and a minor objective to destroy all opponent’s units worth the most amount of points (I'm assuming Ironguts for him and both spearmen and knights for me). All units and characters worth fortitude points would not have to roll to see where they deployed.
I win the roll, so I elect not to take the side with Khermian quicksand. I place the crossbowmen in the forest to determine that it’s a blood forest (thus the other is as well). Since I must deploy my entire army first, the elements I’m able to choose go centrally in case I’m presented with a refused flank. If you look back a post or two, you'll see a picture of most of my deployment line. For spells I roll double 2; I elect to keep Caress and choose Purple Sun.
My opponent sets up the ironblaster directly across from the dragon and the majority of the remainder west of the quicksand. I kick myself for not realizing that I could be facing scouts and see the maneaters deploy in a corner. For spells he got regeneration, toughness, and stubborn with his slaughtermaster and defaulted to fireball with the firebelly.
I’m not too worried about the setup until my opponent rolls a six and steals the first turn!
Image

Ogres turn 1:
The eastern mournfang set up on a hill waiting for the dragon and/or hydra to come down that flank while the other mournfang advance down the opposite side. The ironguts all advance, taking care to stay out of 6” of the sinister statue.
Magic is 3v2 and all dice are spent on a midlevel Fireball, but fails to cast.
The ironblaster takes aim, lands the shot right in front of the dragon, and it easily cares through and wounds both. My shiny new Ironcurse Icon gives the dragon a save and I roll a pair of sixes; this is great for the dragon, not so much for the lord with the Pendant. I’m loath to spend the reroll this early in the game, but it’s worth the expenditure and the lord comes through fine.
Image

Tiger turn 1:
The tiger cavalry can just see the mournfang and charge them. I charge the dark riders into the ironblaster hoping to hold it for a turn. The dragon repositions looking at the ironblaster and the harpies move to block the mournfang. Both hydras move for possible mournfang charges, and I fly the BSB over in case the tiger cavalry need a break test reroll. I want the sorceress advanced as far as possible, but with the firebelly on the loose, I need to keep her in a unit; I advance the spearmen just within 16” of the ironguts. If they really want to charge, I’m willing to let them try to roll a 12 for distance.
Magic is 6v5 and I spend 2 dice unopposed to gain 3 through Power of Darkness. I then spend all 7 on Purple Sun which draws out the scroll.
The dark riders can’t hit a thing, but the crossbowmen peel off two wound on the ironguts.
The other dark riders manage a wound on the ironblaster, losing two of their own. Combat’s a tie, but I win since I now have a musician! The ironblaster is close enough for a reroll, but not for the general’s inspiration. Two rolls later, the cannon bolts and I chase it down. On the other side, the knights punch four wounds through, though the counterpunch causes three; I’m up by three and the mournfang break (losing the banner), but I fail to run the last one down.
Image

Ogres turn 2:
My mistake is apparent when charges are remeasured and the ironguts do not need to roll a 12 to make it into my spears, they need a 10; I hold like the fool I am as 10 comes up on the dice. To further complicate things, I had neglected the sabretusk when redirecting with the harpies; the sabretusk charges the flank along with the mournfang to the front. Another sabretusk charges the knights, hoping to hold them for a turn.
Magic is 3v3 and all dice are again spent on a midlevel fireball that fails to meet the casting value.
In combat, we have a wizard duel where the sorceress puts a wound on her obese counterpart while he fails to hit her in return. The spears take off only two wounds from the ironguts and one on the BSB before losing 16 of their own. I run and he fails to catch me; the dark riders pass their panic and surprisingly the harpies do as well before the ironguts crash into them. The sabretusk loses one wound to a knight and the other to his steed and I reform so that I can see both the rallied mournfang and ironguts. The harpies predictably die but the sabretusk only overruns 5” blocking the mournfang; 2” more and he would have been into the dragon, pinning me in place for a turn. With the sabretuk blocking an overrun, the mournfang reform so the dragon is at least in their front arc.
Image

Tiger turn 2:
I’m still kicking myself about the spearmen placement (and as I write this I’m kicking myself for not fleeing, which I had not considered at the time) when my knights fail their stupidity test, stumbling forward presenting their flank to the last mournfang they failed to run down. I’m not excited about rallying the spearmen, since they’ll just get charged by the ironguts again, but I am looking forward to one more round of magic. At that point I fail the ld 9 rally check and run off the board. Well. I still have both hydras and I position them as far away as I can while still presenting a threat. The BSB flies up to threaten a charge into the firebelly’s unit as well as provide reroll support to the knights (though now I’m not sure why he didn’t just join the knights). The dragon charges the mournfang.
I skip magic since there’s nothing to do.
The dark riders kill one maneater through shooting forcing one passed panic check.
Dragon and rider cause 3-4 wounds taking one in return. The mournfang break, are run down, and the sabretusk passes its panic check. The ironguts squash the harpies and reform to face the hydra.
Image

Ogres turn 3:
The ironguts charge the hydra, needing an 8-9, but getting 10 for additional impact hits. The last mournfang on the table crashes into the flank of the stupid knights.
Now that my dispeller and scroll have ran off the table, the winds of magic really pick up and magic is 11v6. The slaughtermaster casts the toughness buff with 4 dice and I dispel with 6, assuming I can cut through some regeneration with my breath weapon. The regeneration buff then fails on 3 dice. Finally, a large Fireball is cast at the unengaged hydra, wounding six times and I make only 1 armor save (three 4s!) resulting in one crispy inanimate husk.
The mournfang, his impact hits, nor his mount can get any wounds past the armor of my knights while I get him for one more. I pass the break test and am able to reform to face him to try and cause that last wound. Meanwhile the hydra loses two wounds from impact hits and another from the slaughtermaster, losing one attack. I use the now S2 breath weapon, and cause in total only three wounds before the breaking and getting run down.
Image

Tiger turn 3:
I I briefly consider running the BSB into the flank of the firebelly’s ironguts, but with four of them, they’d likely reform and get a mess of S6 attacks which would make short work of him, so instead I just fly to the west side of my knights, keeping the mournfang and southern ironguts in view. The dragon repositions west. It’s at this point that I consider the mission objective of eliminating all the lowest cost units; my harpies are gone, but with only two sabretusks, I figure I can take a round with the dark riders to ensure I also get those VPs, so the dark riders reposition to do that. The crossbows turn around to take a few potshots at the southern ironguts.
The northern dark riders can’t seem to hit and the southern riders only wound their sabretusk once. The crossbowmen nick a wound off the ironguts.
In combat, I all the attacks with the knights, the mournfang wounds me 3(?) times and I fail two armor saves. This causes the nearby BSB to fail her ld9 re-rollable panic check and she starts running. The mounfang reforms to chase.
Image

Ogres turn 4:
The mournfang charges the BSB who flies into sight of the ironguts, who then charge to push me off the board. The sabretusks run around preserving points and the maneaters continue to twirl creating no-fly zones for my riders. The ironguts back up awaiting the dragon.
Magic is 8v5 and the first 3 dice are used failing to cast the regeneration spell. We both throw 5 dice at the mega-Fireball, but his roll is higher. 11 hits on the dragon resolve into 1 wound on the rider saved by the Pendant and 1 wound on the dragon saved by his scaly skin.
Image

Tiger turn 4:
The dragon charges the ironguts but I fail to roll the 6+ needed to complete and land smack dab in the middle of khemrian quicksand. I hold my breath as I roll the dangerous terrain test; if I fail, the entire model is removed! I pass this turn, but dread the next one I’ll have to make to get out. The northern dark riders turn around, but can’t manage to get that last wound off the sabretusk. The southern riders fail their marchblock test, but are still able to get behind the maneaters; firing into the sabretusk at long range into woods after moving they unsurprisingly fail to hit. The foot slogging crossbowmen turn around once more and unleash a volley into the mournfang bearing down on them; a decent volley takes the last wound and the ogre knight falls.
Image

Ogres turn 5:
The northern ironguts back up while the firebelly bails out. The southern ironguts turn to face the crossbowmen. The sabretusks continue to hide and the maneaters spin.
Magic 7v4 and the first 3 are used to cast the toughness spell on the southern ironguts; I want to see if the blood forest will give me a break and I’m not planning on engaging them this turn so I let it go. The forest claims four crossbowmen and no ironguts (though with the increased toughness I shouldn’t be surprised) before wandering off ~9 inches northwest. The last 4 dice cast a mid-level Fireball but I use all my dispel dice to irresistibly dispel it.
Image

Tiger turn 5:
I consider charging the ironguts, but I really don’t want to risk that dangerous terrain test. Furthermore, if I charge, I’ll likely win, but then I’d have to pursue to gain the points which would leave me in a terrible position for last turn. I’m down in points pretty badly and need to do something drastic if I’m going to pull myself back up. With that in mind I fly ten inches out of the quicksand looking south exposing my flank to the northern ironguts. If they want to charge me, they can and I’ll take several wounds, but I’m pretty sure I’d get the better in that fight, especially with the breath weapon. Next I move my crosbowmen 5” forward; if the southern ironguts charge I’ll flee, they’ll catch me, and they’ll be in decent charge range for the dragon. The northern dark riders finally knock the last wound off their sabretusk. The southern riders fail another marchblock test keeping them at long range and again cannot hit anything.
Image

Ogres turn 6:
My opponent sees the trap and elects not to charge anything.
Magic is 6v3 and all dice go into a mega Fireball which gets 12 hits on the southern riders which turn into 6 wounds and none make the 6+ armor save…

Tigers turn 6:
The sinister statue which hasn’t done a thing all game decides now is the time to kill 3 crossbowmen. The last three crossbowmen and three dark riders position for a hail mary on that last sabretusk, but the one shot that finds its mark fails to wound. Meanwhile the dragon flies to the northern ironguts to unleash its breath weapon for lack of anything better to do; I easily catch all five in the flames which remarkably cause four wounds, taking off two ogres and causing a failed panic test. They run, but stay on the board so I don’t get any points for them, but it’s a small moral victory.

Postgame:
Adding up the points, I was down by 776 VPs which became 1226 after scenario objectives resulting into an 18-2 loss.
Wow. This game was a bit of a shock as I don’t think I’ve ever been this soundly beaten with the dragonlist (which is a bit surprising since I usually play with a sharp bunch of folks). There was definitely some luck involved, but it did swing both ways and there are a few key moves/decisions I can identify that directly led to my defeat. Not to say that my opponent didn’t factor in, rather that most players make mistakes that can be exploited and he played a superb game and didn’t really hand me any opportunities – besides placing his ironblaster so far forward. Straight up, this was my game to lose; I had a mage with purple sun and that’s usually a game ender against ogres.

Let’s review luck first. It was unfortunate that I set up blind and didn’t even get first turn (though these things happen). It was disastrous that his ironguts rolled the 10+ needed to charge my spears. It was bad luck that I failed four key ld9 rolls: spears rallying, knights stupidity, BSB re-rollable panic check. My opponent was very lucky in killing a hydra outright with one large Fireball. It was ill luck that the dragon failed the 6+ roll to get into the ironguts and landed in quicksand.
It seemed like bad luck that I kept pouring shots into the sabretusks without killing them, but later doing the math, it’ll take five dark riders about two turns to bring one down assuming they can get into short range.
On the other hand, it was nice that my sorceress rolled up purple sun against ogres. My cavalry was able to make their charge into his mournfang. It was very lucky that the ironcurse icon worked to save the dragon and also lucky that I didn’t use the reroll only to roll another 6 (I’ve seen this happen an incredible amount of times, but this could be observational bias at work). It was lucky that the sabretusk did not overrun into the dragon after the harpies. I feel incredibly lucky that the dark riders were able to even charge the ironblaster, much less break and run it down. I was counting my blessings when the dragon passed the dangerous terrain test for the quicksand.
Taking everything into account, I think luck was just a hint against me, but it seems worse than it was because of my decisions.

For my mistakes, the winner goes to miscalculating the charge range of the ironguts; even putting them within 18” would be too close as there’s no overwhelming reason the the spears need to be that close while I’m still cleaning up the flanks, especially with the sorceress who’s holding the ‘I win’ card. Second mistake was not fleeing once I realized my mistake. I probably would have felt pretty foolish once they bounced through everything and failed their rally test, but it would have been the right decision. The ironguts would still be up north, I’d still have the harpies and I’d have a chance to pair up the hydras. The redirect with the harpies was good, but I couldn have changed the angle just slightly had I paid attention to the sabretusk beside the mournfang. I should have protected the stupid knights with the BSB, either by screening or by joining up; I can’t be cavalier with him around mournfang, but with his superior armor save, I don’t need to be cautious around a singular model.

List wise, I like the choice of Death magic, as I think ogres are still my most numerous and difficult foe. The musician on the dark riders really tipped the scales against the ironblaster. I worry about light missile fire, but I believe Ironcurse Icon is still worth giving up the sea dragon cloak for on the dragonrider. I was not impressed with the standard on the crossbows; I may trade it in to get shields back on them. I don’t think either will make much difference; maybe I’ll use the points to get two more spearmen.

Though I was trounced, I thoroughly enjoyed the game and learned quite a bit. C&C always welcome!
User avatar
Tyrannus deathbringer
Noble
Posts: 497
Joined: Fri Dec 23, 2011 7:28 pm
Location: The Black Ark Nemesis

Post by Tyrannus deathbringer »

cycloptic squirrel wrote:
The BSB (missing her flag) in the crossbowmen being attacked by a Stirgoi. You can see wingless (at the time) harpies in the background.
Image


AWESOME.

I want some!!! Your Peg Tiger in particular looks ace!

A slightly trippy but very cool army u got there.
"All who surrender will be enslaved; whoever does not surrender but opposes with struggle and dissension, shall be annihilated."
Cycloptic squirrel
Corsair
Posts: 86
Joined: Wed Sep 05, 2012 7:54 pm

Post by Cycloptic squirrel »

@ Tyrannus: Thanks! The tiger part of the pegasi and knights are from Hasslefree miniatures (tigress); the wings are the standard GW pegasus wings.

Second game was against Empire. My armies are usually to a tabletop standard, so it's not uncommon for me to face a better looking army, but there are a few times where there's absolutely no question: some of my opponent's models are on the GW site; absolutely beautiful stuff.

Tigers
Dreadlord on Dragon w/ Ironcurse Icon, Blood Armor, Soulrender, Pendant of Khaeleth
Master BSB on Dark Pegasus w/ lance, heavy armor, shield, sea dragon cloak, Crown of Command, Dragonhelm, Luckstone
Sorceress[SHADOW] on Dark Pegasus w/ level 2, Dispel Scroll, Whip of Agony

27 Spearmen w/ full command, Warbanner
10 Repeater crossbowmen w/ full command
5 Dark Riders w/ repeater crossbows

5 Harpies
5 Harpies
5 Cold One Knights w/ banner, Banner of Eternal Flame, champion, Ring of Hotek
Hydra
Hydra

Empire
Templar Grand Master w/ barded horse, full plate, shield Runefang, Seed of Rebirth, Potion of Speed
Wizard Lord [METAL] w/ Dispel Scroll, Ironcurse Icon
Captain BSB w/ barded horse, full plate, shield, Talisman of Preservation

10 Inner Circle White Wolf Cavalry w/ standard, musician, great weapons, Steel Standard
18 Handgunners
10 Crossbowmen

24 Greatswords, standard, musician
22 Flagellants
Steam Tank
Hellblaster
Hurricanum

Both armies have a one use reroll.

Setup and Deployment:
This was a diagonal deployment with alternating drops. The major objective (300VP) was to have the unit with the most models within 6” of the center at the end of the game. The minor objective (150VP) was to kill all opposing characters.
My opponent won the roll for choosing sides and in true empire fashion took the side with the hill, though I’m not sure any choice offered superior advantages over the other.
I started with chaff while he deployed his missile troops on the hill and the hellblaster behind the wyrding well. I was excited as I would have a decent charge with the harpies until the steam tank just barely fit between the hellblaster and well, blocking my fliers' line of sight. His flagellants determined that the woods (and thus all woods on the board) were normal. Since he had ranged advantage I was deploying aggressively and my hydra and knight were down when he placed his white wolf cavalry directly opposite. The hydra would go down quickly, but my knights even more so; with this in mind I placed my spearmen at an angle such that there was not enough room between my spears and my hydra for his cavalry to charge my knights. With my knights denied, if he got first turn he’d like charge either my spears or the hydra. In the former I’d be steadfast until help arrived and if the latter, he’d likely overrun into my knights giving me an opportunity to flank with the spears and dragon. If I was lucky and got first turn I could go into the cavalry with everything I had.
For spells I rolled Purple Sun and Aspect of the Dreadnight, which I traded for Spirit Leech. I was facing Glittering Robe, Transmutation of Lead, and Searing Doom.
I vanguarded the eastern riders toward the middle and the southern riders west into the woods; I knew they were going to get some lead coming their way and every bit of protection I could get would be appreciated.
He had +1 for finishing first and rolled higher than I did for first turn.
Image

Empire turn 1:
His white wolves charged the hydra. We had a bit of disagreement about the movement of the steam tank: he had placed the tank cleverly to screen the hellblaster, but this also prevented him from pivoting to face the dragon (his northern corner was already 1” away from the hellblaster). It came down to a 4+ and I was the beneficiary, so the steam tank moved straight forward but I would not be facing a cannonball this turn since the dragon was not directly in front of the tank. The flagellants moved through the woods toward the crossbowmen and the greatswords moved around the well. The hurricanum moved up to support the cavalry.
Magic was 9v6 (that accursed hurricanum and its bonus power die!). 3 Dice went unopposed into Transmuting the spearmen. The last 6 were used for an upgraded Searing Doom on the dragon; the casting roll was high and I didn’t fancy my chances of catching it or rolling an irresistible dispel, so I used my scroll.
Hs handgunners unhorsed three dark riders and they passed their panic. The crossbowmen took one harpy out of the sky. The hellblaster fired twenty-something shots at the hydra, which I thought had cover behind the well, but after looking closely it was pretty clear it did not. Thanks to poor aim, high toughness, and regeneration, the hydra only suffered one wound.
In combat the grand master made way and unsheathed his Runefang! With the hurricanum supporting, he hit with all four 2+ rolls to hit and I only saved one with regeneration! Seeing it was now or never, the hydra used her now S2 breath weapon and got 11 hits! After the breath, attacks, and handlers, four knights lay in the dirt. After that either the rest of the knights took off the last two wounds or I broke and was caught, but either way, his cavalry overran into mine.
Image

Tiger turn 1:
Hi cavalry had acted as predicted and now I was ready to capitalize. The only problem is that I had placed the dragon too close to the infantry and the spearmen’s corner was almost clipping the dragon’s base. It came down to another 4+ and this time it went against me. So now I was faced with the choice of either the dragon or the spears into the white wolves flank; I went with the static combat resolution and charged the dragon into the steam tank along with the harpies to get them out of the way. The harpies charge the now visible hellblaster. The remaining hydra charged the hurricanum which opted to flee and I forced it to flee even further from the battle with the southern dark riders. I knew this would leave the riders out beyond their protective trees, but the last thing I wanted was the cart to rally and still be close enough to support. The other dark riders slipped through the line and loosed a volley toward the crossbowmen who would assuredly return the favor; only one fell. The crossbowmen saw the flagellants coming, but there was really not much they could do about it, so remained stationary and shot downed greatswords.
Magic was 9v5 and the sorceress was absolutely in range of the ring. Furthermore there was a distinct lack of eligible targets for Spirit Leech (I do not consider a non-champion greatsword an ideal target). This left me with only Purple Sun, which I’d have to spend six dice on to be assured to get it through, seven to be extra sure, and at that point I might as well spend all nine. Since the sorceress was in the second rank, results 2-7 on the miscast table would be near disastrous, all for the likely result of killing about three knights. Had I remembered how hard it was to get a wound through a 2+ armor save I should have done it, but instead I just discarded all the dice.
At the beginning of the turn, the grand master chugged a potion of speed, so I challenged with my knight champion, only to be answered and killed by his BSB. The grand master hits three times and three knights fall, leaving only the tiger cavalry bannerman (or bannerwoman I guess). My BSB is able to cut down two white wolves, but my spears can’t get past the 2+ armor save. After the dust settles, combat is tied, but the bannerwoman is still there preventing the reform. The harpies kill two artillery crew. The last man misses, but stalwartly holds protects his machine. Meanwhile, the steam tank engineer clubs a tiger cub and in return the cubs scratch ineffectively at the tank’s iron skin. The dragon on the other hand caused a few wounds, as did the rider, and after armor saves the tank was down three wounds. I’m feeling pretty good thinking I’m halfway there when I ask just to make sure that it only has six wounds; no, it has ten. I’m going to be here for a while…
Image

Empire turn 2:
The steam tank attempts to generate three steam points and rolls a two on the artillery die so nothing bad happens. The greatswords charge the hydra and I hold. The flagellants charge the crossbowmen and I see that even a stand and shoot is not going to do much to aid survival, so I flee. I’m figuring they must have a death wish as they stand as they only run two inches. The flagellants on the other hand, must have been confused by the feigned flight since they only rolled a 4+ for the charge distance. At this point my opponent elected to use his reroll to reroll the 1 (instead of the three), but only rolled a 2 and a 5+ was still not enough to catch the crossbowmen. To pile on the frustration, the hurricanum failed it’s rally check and continued toward the edge of the board.
Magic was double 1s which led to 3v1 (again with the hurricanum…). The dice were used for Transmutation on the spears again and I failed to roll double sixes on my one dispel die.
The handgunners obliterate the last two southern dark riders and the crossbowmen unhorse two of the eastern riders (mistakenly shown a turn later).
In combat his grand master challenged and my spearwoman champion stepped up before getting cut down. Otherwise no one can get past armor and the white wolves are down by three, but laugh with their BSB holding the line with a reroll. The tiger cubs eat the last artilleryman and reform catching both the hurricanum and crossbows in their arc. The steam tank grinds against the dragon and puts two wounds through before the dragon and rider respond with two wounds in return. Tiny cub teeth can’t sink in deep enough to worry the mechanical monstrosity. The hydra looks dismissively at the greatswords and unleashes her breath weapon for another 11 hits as S4. After burning, attacks, and stomps, more greatswords litter the ground than occupy it, but the ones still standing put another wound on the beast before steadfastly holding their ground.
Image

Tiger turn 2:
The harpies push the hurricanum off the board and redirect into the crossbowmen who do not have the time to stand and shoot. The crossbowmen turn around and wave to the doom that is chasing them. The dark riders advance toward the handgunners, knocking off one of them with shooting.
Magic is 7v5 and I use 2 dice to cast Power of Darkness yielding 4 additional dice. I then use 8 power dice to cast Purple Sun which pulls the scroll.
The hydra kills five greatswords and the remaining four manage to get two more wounds before breaking (eventually going off the board in turn 6). Since the guardsmen will need double 1s to rally, the hydra restrains turning his attention to the knights. The dragon and rider get another two wounds through on the tank. The cubs get bored and curl up under the tank’s warm rear engine. Against the white wolves, I challenge with the sorceress. The templar grand master land the three hits that he needs and the witch falls. The BSB lands a few hits on the remaining cavalrywoman banner; one gets past the armor and I use my game reroll, but to no avail. Another spearmen is killed, the combat is tied and the white wolves reform. With seven attacks, the harpies only kill one crossbowman who proceed to knock three out of the air, leaving one who holds on the dragonrider’s leadership.
Image

Empire turn 3:
The steam tank attempts to generate another three team points, but something goes wrong and they lose one to emergency venting (2d6 S2 to all units). The napping cubs get more heat than they expected and are fried. The flagellants make another attempt, but this time the crossbowomen’s flee distance is decent and they escape.
Magic is 4v2 and all dice are used on a failed attempt to Transmute the spears again.
In combat the steam tank has only three wounds left and I’m hoping to get lucky, knock them all off, and reform to face the knights, but only two wounds make it past the armor. Meanwhile the tank grinds (literally) another two wounds off the dragon while the rider remains protected by the Pendant. The crossbowmen dispatch the last harpy. In the south, I accept the challenge with my BSB we both do a singular wound to each other. I lose a few spearmen, and the combat’s a tie again!
Image

Tiger turn 3:
The hydra only has one wound remaining, but I need the help so she crashes into the rear of the white wolves. The dark riders charge into the crossbowman and my crossbowomen rally.
The three dark riders hit well and skewer four crossbowmen, but lose two of their own. The crossbowmen run and are cut down and the gruesome sight is enough to unnerve the handgunners who flee the scene. His BSB can’t cause the last wound on the hydra, who proceeds to eat three knights before the last one with a flag brings his hammer down to finish off the beast. The grand master gets the two hits he needs to finish off the BSB. I win by 3(?) but the BSB says ‘hold your ground’ and they do. (I think had the hydra still been alive, I’d have an extra one for charging and two for rear and that would have failed – I think – depends on what the reroll would have been). The dragon finally smashes the last wound off the steam tank and I spend a moment deciding where to face. I have no antimagic left and if that wizard rallies his searing doom will get me now that the Blood Armor had granted me a 1+ save. On the other hand, the spears absolutely need assistance. I chose to face the handgunners.
Image

Empire turn 4:
The flagellants charge and are pretty frothy when the crossbowomen once more flee just out of their reach. The handgunners do indeed rally and face the dragon.
Magic is 4v3 and all dice go to Searing Doom which I cannot dispel. Only one hit wounds the rider, but the dragon roasts in his own skin.
I lose some spearmen and prioritize my own attacks against the grand master; all three models have a 1+ armor save and I figure if I’m going to get lucky, I might as well try to nick the last wound off the Runefang wielder. I fail to wound but am steadfast.
Image

Tiger turn 4:
Dismounted and facing the wrong direction I throw caution to the wind and attempt a long charge against the handgunners and am a little surprised when I make it. The crossbowomen again rally; this time I know there’s not enough room to flee, so I reform in a singular line, which barely puts me 9” away instead of the 8” had I reformed in two ranks.
In combat, the spears fail to penetrate armor, fail their steadfast, and are run down. The dragonless rider kills three handgunners who then fail their steadfast and are run down.
Image

Empire turn 5:
The flagellants who will not be denied their victory roll an 11+ to get into the crossbowomen; they lose a few to stand and shoot, one or two more to combat, one to their own doomseeking, but otherwise absolutely obliterate their foes. The last white wolf and two characters reposition to the center of the board for the major objective.

Tiger turn 5:
The lord futilely turns around and starts running back toward the well while the last dark rider takes potshots at the knights, but failing.

Turn 6:
The knights stand where they are, my rider takes one last volley, but fails to hit.

Postgame:
I’m only down by 382 VPs, but that becomes 682 after the major objective leading to a 14-6 loss.
What a great game! I really have to be careful around those empire captains; I keep thinking I can beat them by combat resolution and really need to break myself of that habit. The runefang was a nice touch: with it the grand master killed half a hydra, three tiger cavalry, a spearwoman champion (with three overkill), a sorceress, a BSB, and another half a dozen spearwomen (he was counting ). My dragon is y multipurpose can opener, but I was not expecting it to take five rounds (though statistically that’s about right); next time I think I’ll just try to keep feeing it harpies of spearwomen or something. I’m a little ashamed of my deployment – I correctly predicted what would happen, but placed my units too close together so they got in each other’s way. Furthermore, the sorceress did not need to be in there; I knew they were going into combat – she should have been in the back field our of hellblaster range. I had bad target priority with the dragon – she should have initially gone after the knights instead of the tank. After the tank, I should have faced the knights; the mage would have rallied or not, but with only two wounds, the dragon was unlikely to survive the magic phase. Even on foot, my lord could have handled his (go Pendant brokenness!). I enjoyed the eastern flank baiting. The corssbows essentially tied up double their points; granted at the end of the game he would get those points and I would not, but usually I’d take that situation. Hydras are broken, especially if they get to use their breath weapon before getting wounded.
Listwise, I can’t see anything I’d really change; I had all the tools I needed, I just need to utilized them better.
I’m not a fan of losing, but I’d rather have a great game like this (or the previous) and lose rather than a rather static win! C&C welcome! :)
Cycloptic squirrel
Corsair
Posts: 86
Joined: Wed Sep 05, 2012 7:54 pm

Post by Cycloptic squirrel »

It’s the third game, this is the low table, and I’m playing against a friend, so at this point it’s pretty much kick back, relax, and enjoy a good game and not worry too much about the outcome.

Tigers
Dreadlord on Dragon w/ sea dragon cloak, Blood Armor, Soulrender, Pendant of Khaeleth
Master BSB on Dark Pegasus w/ heavy armor, shield, sea dragon cloak, Crown of Command, Dragonhelm, Luckstone
Sorceress[SHADOW] on Dark Pegasus w/ level 2, Dispel Scroll, Whip of Agony

27 Spearmen w/ full command, Warbanner
10 Repeater crossbowmen w/ full command
5 Dark Riders w/ repeater crossbows

5 Harpies
5 Harpies
5 Cold One Knights w/ banner, Banner of Eternal Flame, champion, Ring of Hotek
Hydra
Hydra

Vampires
Vampire Lord lv 3(?) Red Fury, +2 Str, 4+ ward(?) sword, heavy armor, shield, barded nightmare, Book of Arkhan
Vampire, heavy armor, shield, Dragonhelm (?)
Necromancer, scroll(?)

5 Dire Wolves
30(?) Zombies, musician, banner
40 Ghouls, champion

5 Crypt Horrors
7 Black Knights, full command, Banner of Eternal Flame
Mortis Engine
Vargulf

Both armies have a one use reroll.

Setup and Deployment:
The dragon is a bit wary of these particular ghouls since to date they’ve been the only unit to kill both dragon and rider (see first battlereport). This scenario is a standard battleline with a random game length, the major objective is to have a scoring unit (command model or character plus rank) in your opponent’s deployment zone, and the minor objective is to prevent your opponent from doing the same.
After chaff, his infantry seems to be hanging out center-west and I assume that’s where the necromancer is going so I place the knights opposite to get the ring near (big target misprioritization on my part). His zombies had already determined that the forests were abyssal woods and I figure that may be a decent place to put my crossbows as I didn’t want to start failing terror tests with them. The spears and hydra place centrally since I didn’t know where his knights were going. After his knights dropped I placed the dragon and sorceress on the same flank to counter (sorceress outside the spears? Am I finally learning?). I’m aware of the magic missile the lord is packing, but by placing the sorceress to the far flank, if he wants to see her, he’ll be placing himself directly in dragonsight and exposing his flank to my hydras – I’d be willing to make that trade, especially since I’m packing the scroll.
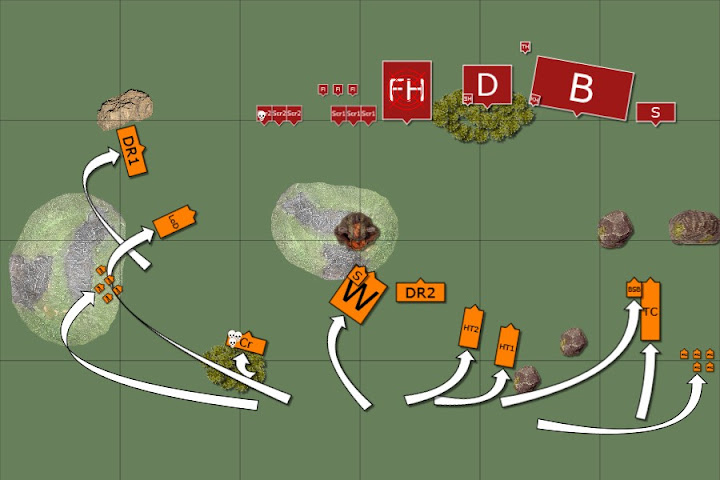
For spells I roll both snipers, I elect to trade Caress for Spirit Leech because of the low leadership in some of the opposing models. Against me I’m facing three Invokes, Dance, and Gaze of Negash.
He wins the roll, but allows me to go first. Neither of us have much ranged, and his thought was to let me come to him as well as secure the last turn for himself, which in prolonged games can be key. Note this makes the third game where I did not get to determine who went first, though these things happen…
Image

Tiger turn 1:
The dark riders start advancing up the flanks, the knights ride up and prepare to get stuck into either the ghouls or the zombies. The spearmen and hydras shift their battleline, anchoring their flanks with the waystone in the middle and the crossbowomen in the south. The sorceress advances with the intent to get into the back field. The dragon comes up staying out of the arc of the knights and ensuring that the knights in turn cannot advance out of hers. The crossbows step up just a bit to get the horrors and vargulf in range of everyone, but still in the forest. The harpies reposition, staying in reserve.
Magic is 8v6 and I spend 2 dice on Power of Darkness trying to pull some dispel dice, but it’s unopposed and I gain 3. Wolves are the only thing in range of Fate, so I skip it and spend 8 dice on Spirit Leech against the vargulf and his 6 dispel dice cannot stop it. I have a four points of leadership over the monster, but a decent roll only nets me two wounds.
The crossbows target the vargulf, hoping to take off the last two wounds before Invokes negate the damage, but I only cause one unsaved wound. The dark riders kill three wolves and two zombies.
Image

Vampires turn 1:
His knights advance with his back end barely visible to my dragon and his vargulf advances to their eastern flank. The wolves move up slightly and the remainder of the battleline advances.
Magic is 5v3 and the first 2 dice are spent on Dancing the vargulf; at this point I figure I can hit and kill the vargulf with the dragon and overrun into the knights, so I oppose it with all 3 dice but fail to catch it; the vargulf advances looking hungrily at the crossbowomen. The Vampire Lord then pulls out his Book and casts Dance on the knights with the remaining dice! I consider letting it go but then realize that if they advance I may never pin them down again so I use my Dispel Scroll.
Image

Tiger turn 2:
I charge the dragon, BSB, and both hydras into the knights; the dragon’s in automatically, the BSB has something like an 80% of making it in, and the hydras are both about even odds, so I’m expecting the characters and hopefully one hydra, but everything makes it in. The dark riders go in to clean up the last two wolves. On the west flank, the smart move would be to hold back and wait for the other elements of my army to support, but it’s third game and it sounds really fun just to go chop up some zombies, so both the dark riders and tiger cavalry go at it – two riders decide that crashing into a tree would be more fun than a zombie hacking, but it doesn’t bother the remaining three. The crossbows turn to face the incoming vargulf, the harpies and sorceress reposition, and the spear just kinda hang back to watch the slaughter.
Magic is 7v5 and the first 2 dice are used for an unopposed Power of Darkness yielding another 4 power dice. I spend 5 dice Spirit Leeching the vargulf again, and she must have really wanted it because she rolled four 6s! The Leech takes off the remaining wounds on the vargulf (we both rolled 6s!) and the miscast was a calamitous detonation; the blast didn’t catch anyone else, but the sorceress was pulled into the void. The tiger cubs were unnerved, but calmed by the nearby presence of the dragon.
The knights and riders smash in ten zombies but two of the undead shamblers manage to get their hands beneath protective armor and two cavalrywomen fall to the undead mass; eight more zombies crumble. The other dark riders easily dispatch their canine foes and reform. In the big knight fight, my BSB challenges and his unit champion answers only to be cut down. His lord attacks and causes three wounds on the flanking hydra, only to all of them regenerated! (My opponent had not realized that magical weapons do not benefit from the Banner of Eternal Flame). His knights all attack the hydra to the front and put through two flaming wounds. His vampire hero attack the dragon and get only a single wound. The dragon attacks knights and takes down two of them while her rider dispatches the vampire. Between her breath weapon and attacks, the hydra to the front kills all the remaining knights. The hydra to the flank attacks the only eligible target, the vampire lord, only lands one wound that is warded off. After combat, the lord is the only model standing and magnitude of the defeat is enough to disrupt the magic binding him together and he crumbles.
The dark energies temporarily disrupted, the zombies remarkably only lose one model, the necromancer holds all the ghouls by force of will, as does the engine. The crypt ghouls take only a wound or two.
Image

Vampires turn 2:
With control firmly reestablished by the necromancer, the crypt horrors charge the flank of the BSB while the ghouls hungrily leap at the flank of the knights. The mortis engine rubles forward toward the spears, but tops short with a poor roll on the charge distance.
Magic is 7v4 and 6 dice are used to successfully cast a large Invocation, but the Ring’s eldritch effects take hold and the resulting miscast causes a wound on the necromancer. The crypt horrors come back to full strength, while 11 zombies rise once more!
In combat, the horrors cannot get past the armor of the BSB, but only by expending her Luckstone. In return, she cannot get past the high toughness and regeneration of her foes. On the other side of the field, some zombies fall, as does one knight. The dark riders have had enough and flee, but the knights refuse to give ground and hold.
Image

Tiger turn 3:
One hydra moves forward to assist the BSB while the dragon flies over the fray to catch the mortis engine. The western riders rally while their eastern sisters move into the deployment zone to await the end of the game. The spears reposition to see the ghouls’ flank while harpies circle looking for an opportunity.
In combat, the hydra causes several wounds while the horrors manage to wound the BSB once. The dragon tears up the mortis engine, which explodes in horrific fashion. Only one harpy perishes, the knights take half a dozen wounds but all are saved by armor. The blast is barely noticed by the horrors, BSB, dragon, or either hydra. The engine killed, the dragon then overruns but falls an inch or two short of the rear of the ghouls. All alone, the knights continue to make armor saves while passing their break test.
Image

Vampires turn 3:
Magic is 9v5 and 6 dice are used to unsuccessfully cast the large invocation, but the attempt is enough to miscast due to the proximity of the Ring; another 8 is rolled on the miscast table and the necromancer dies.
The crypt horrors take some wounds and the last of them crumble, but not before sneaking the last two wounds off the BSB. The knights cannot fail an armor save and easily pass the break test.
Image

Tiger turn 4:
The spears hit the flank of the ghouls while the dragon crashes into the rear. The zombies are charged by dark riders and harpies; another dark rider crashes into a tree and unnerves the last two who decide it may be safer to retreat from the dangerous woods. Two harpies also crash into trees, but the presence of the dragon encourages the last two to continue on their mission.
More attacks on the knights cannot make it past armor. Many ghouls and zombies fall, more crumble, and at the end two ghouls are left standing.
Image

Vampires turn 4:
The ghouls pass their crumble check at the start of the turn. They target the knights, one wounds, but once again is saved by armor. The dragon stomps.

Postgame:
We were discussing the game afterward and specifically why he didn’t target the knights with the first Dance since it was so important. It was then we both realized that since my sorceress had failed a dispel roll, she was not allowed to use her dispel scroll! I felt (and still feel) bad about this, since it would have been a much different game. I do take some solace in that it was not only my mistake as my opponent could have also caught it (he was the one who actually caught it in the postgame discussion first). So I think the takeaway here may be to not let yourself get surrounded by three monsters and two characters and then proceed to let your opponent cheat :)
Though it was somewhat of a silly charge, the knights really held their own; after it was down to only two of them, they made something like 20-25 2+ armor saves. My opponent noted that his MVP may have been the abyssal woods, as they killed more models than the zombies or crypt ghouls did!

I doubt I’ll get another chance to envelop anyone as completely, though I’ll certainly keep my eyes open for the opportunity.
Image

Thoughts about the day and list
So I didn’t finish as high as I’d like, but at the same time I enjoyed every game and I think I learned some valuable lessons that didn’t quite take after first exposure. The dragon needs to get into combat, the dragonlord is very survivable provided he doesn’t break from combat, I need to protect my mage, but defaulting to the spears isn’t always the best idea, hydras are monsters against infantry, be wary of empire captains, and Spirit Leech is gold against a lot of undead. Oh, and don’t cheat.
The dragonlord herself survived every game. The BSB died every game, as did the mage. I can’t think of any changes I need to make to the list, with the possible exception of the crossbows’ standard. One of the five scenarios had reaching the break point as one of the major objectives, but I’m not sure that’s enough to include it. I considered using the points to put shields on the crossbows, but they rarely see combat or shooting. I doubt wherever I use the points will make a big difference; I think I may just default to the shields since I like the way they make the crossbows look.
The list for the tournament is due by the end of the month and I’ll probably submit at the end of the weekend, so if anyone has any advice or suggested changes, I’m open to opinions.
Otherwise comments and criticism on the game is always welcome.
User avatar
Tyrannus deathbringer
Noble
Posts: 497
Joined: Fri Dec 23, 2011 7:28 pm
Location: The Black Ark Nemesis

Post by Tyrannus deathbringer »

Lot of great write ups and some nice analysis to boot.

I dig your aggressive playstyle, and I especially like the way you set up the multi-charge on the Black Knights in your last game. Impressive. I also think Death lore SS and a Hotek Master synergises with your fast attack very well.

Dragons get a lot of criticism in 8th but your batreps show up their durability. I think the double hydras and peg masters make it work; multiple dangerous, hard-to-kill and rapid targets which complement the power of the DragonLord.

In regards to pre-tourney comments:
- have you playtested a FF on your sorceress? Might help keep her alive although you obviously like to take risks :P
- are crossbows necessary in some scenarios (I'm not that experienced in 8th)? If not, they seem to be redundant in a lot of your games. What about replacing with either Dark Riders or a small combat/irritation block like RHB Corsairs or Witches?
"All who surrender will be enslaved; whoever does not surrender but opposes with struggle and dissension, shall be annihilated."
Setomidor
Malekith's Best Friend
Posts: 1294
Joined: Wed May 21, 2003 8:12 am
Location: Umeå, Sweden

Post by Setomidor »

Wow, thanks for all the reports!

Over at The Dark City (Dark Eldar forum), they have organized similar reports with one thread per report and one thread with links to reports made by different people. I think this would be a great idea here as well, having so many good reports in the same thread makes it hard to comment on all but the latest one :)

I've only had time to read two of them so far, but I'm saving the rest up for later!
Post Reply