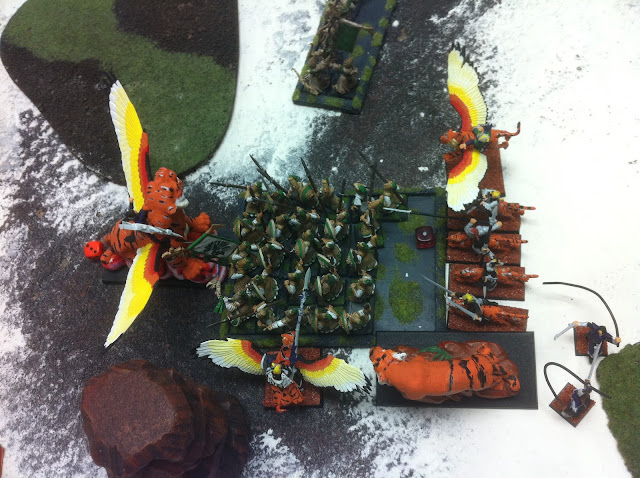
I faced my feared opponent the orges! I was fortunate in that there was only one ironblaster, but it still wasn't going to be easy as they were supporting a greedyfist death mage.
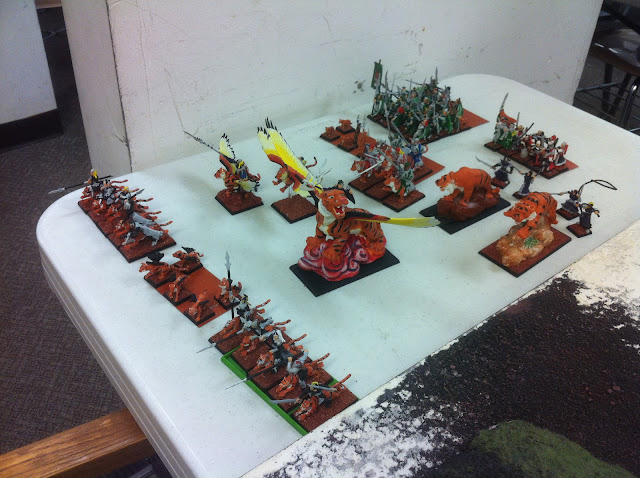
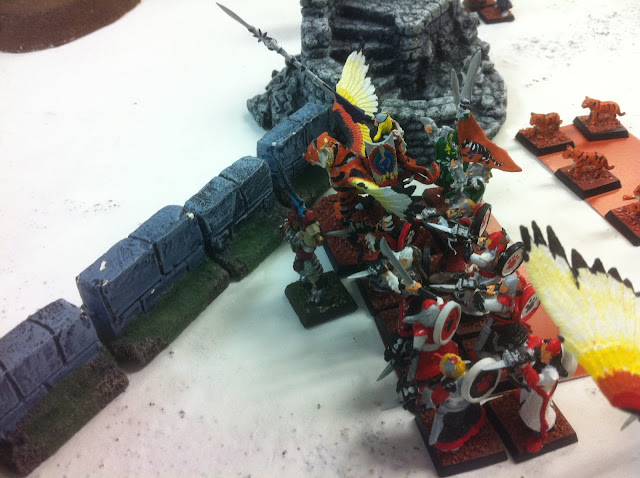
Tigers
Dreadlord on Dragon w/ sea dragon cloak, Blood Armor, Soulrender, Pendant of Khaeleth
Master BSB on Dark Pegasus w/ heavy armor, shield, sea dragon cloak, Crown of Command, Dragonhelm, Luckstone
Sorceress[SHADOW] on Dark Pegasus w/ level 2, Dispel Scroll, Whip of Agony
27 Spearmen w/ full command, Warbanner
10 Repeater crossbowmen w/ full command
5 Dark Riders w/ repeater crossbows
5 Dark Riders w/ repeater crossbows
5 Harpies
5 Harpies
5 Cold One Knights w/ banner, Banner of Eternal Flame, champion, Ring of Hotek
Hydra
Hydra
Orcres
Slaughtermaster lv4 [DEATH]w/ Grut’s Sickle, Rock Eye, Greedy Fist, ward(?)
Butcher lv2 [MAW]w/ Hellheart
Bruiser BSB w/ heavy, extra hand weapon(?), Runemaw Banner
6 Ironguts, standard, Standard of Discipline
6 Ogre Bulls, full command(?)
10 Gnoblars
10 Gnoblars
10 Gnoblars
10 Gnoblars
10 Gnoblars
10 Gnoblars
10 Gnoblars
4 Mournfang w/ Ironfist, banner
2 Mournfang w/ Ironfist, banner
2 Mournfang w/ Ironfist, banner
Sabretusk
Sabretusk
Sabretusk
Ironblaster
Both armies have a one use reroll.
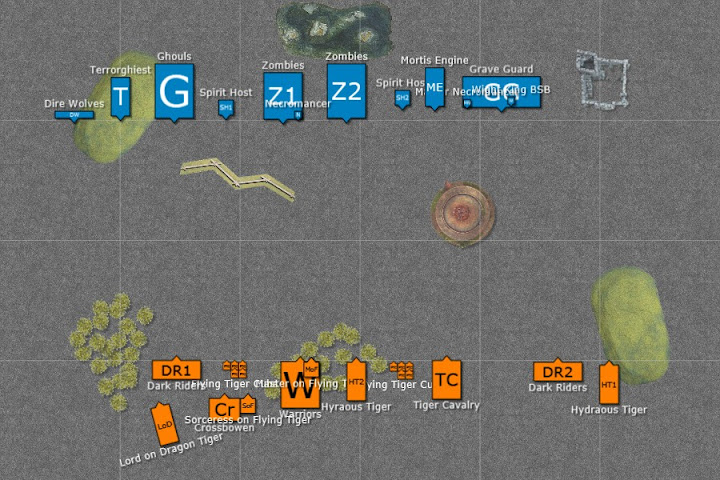
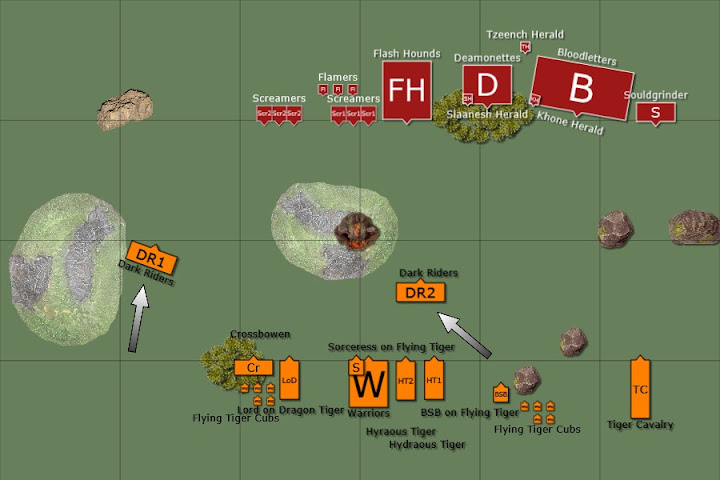
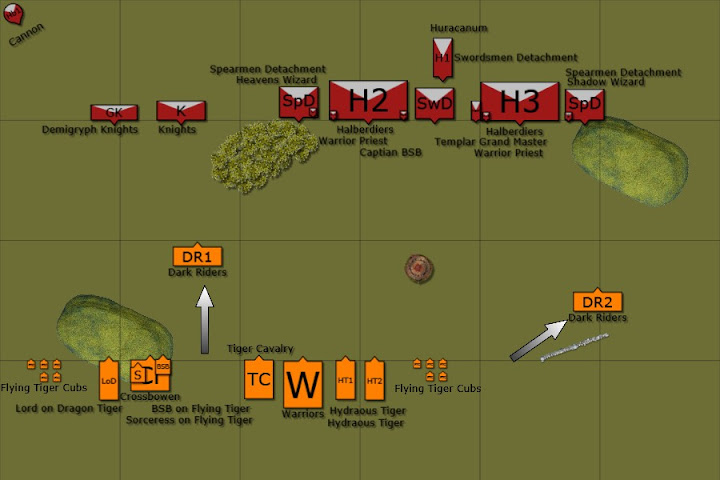
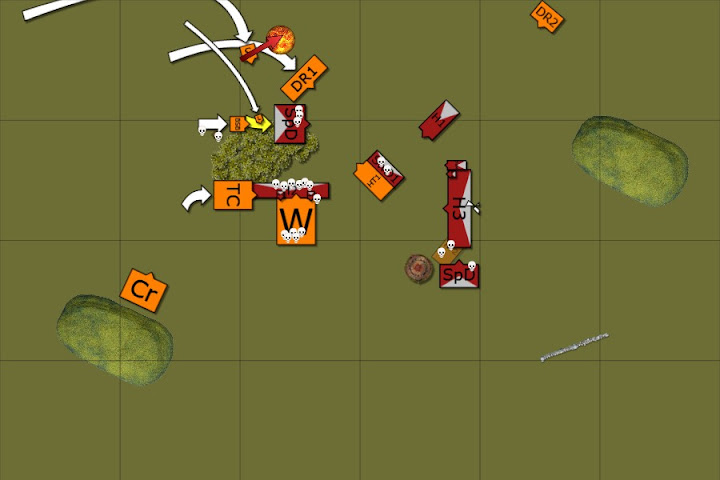
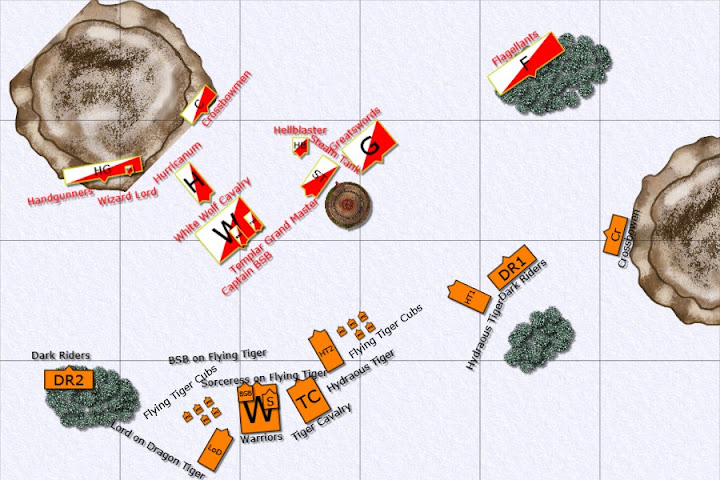
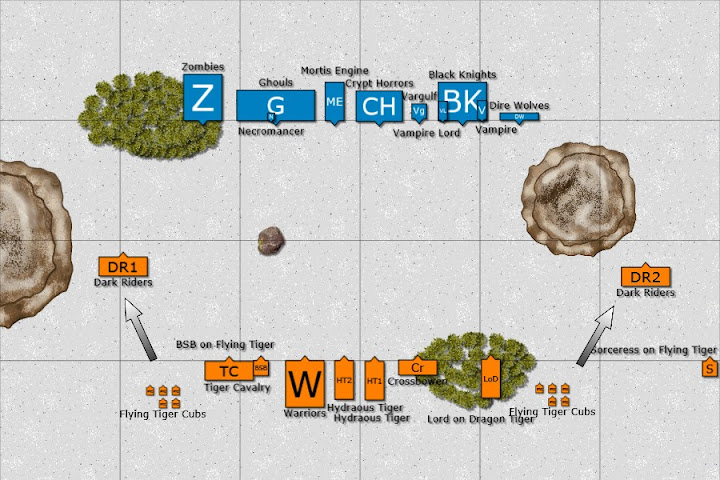
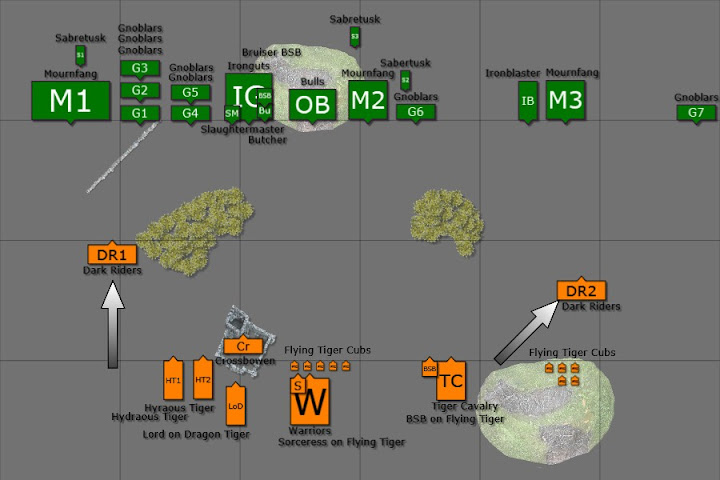
Setup and Deployment:
The scenario we played was a modified Dawn Attack with the major objective (worth 300 VPs) to destroy all opponent’s units worth the least amount of points (harpies and sabretusks) and a minor objective to destroy all opponent’s units worth the most amount of points (4 mournfang and both spearmen and knights). All units and characters worth fortitude points would not have to roll to see where they deployed.
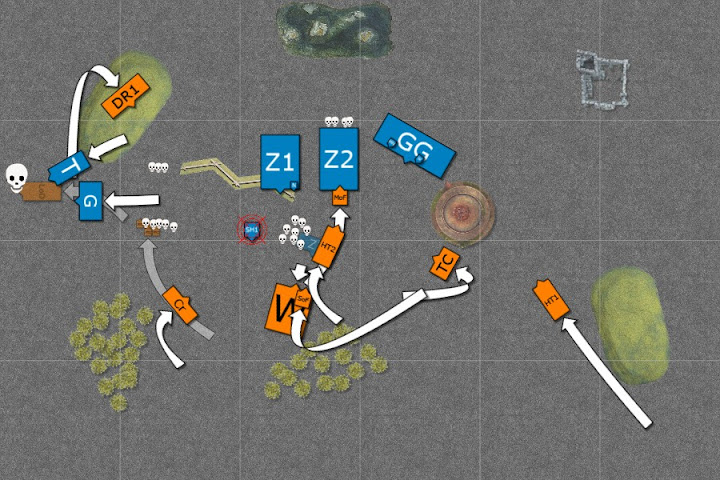
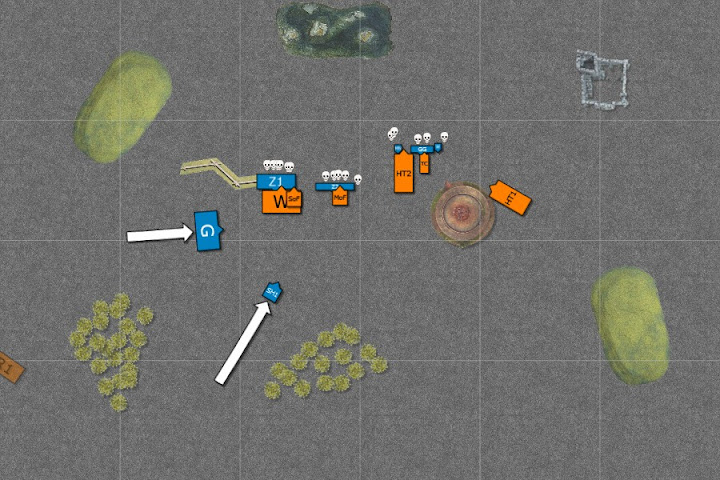
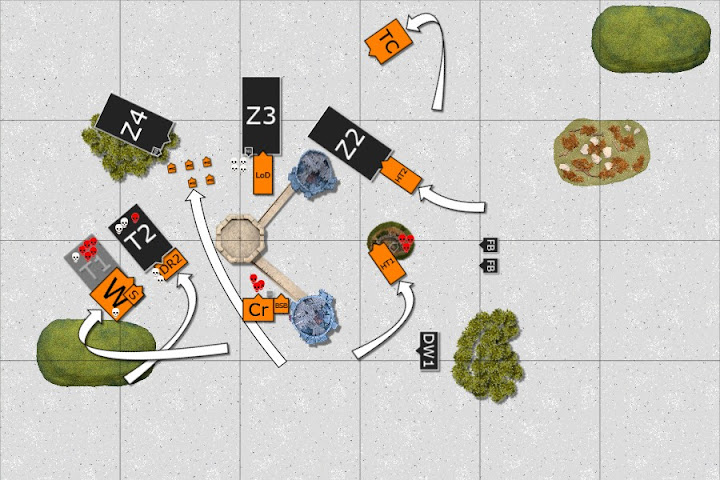
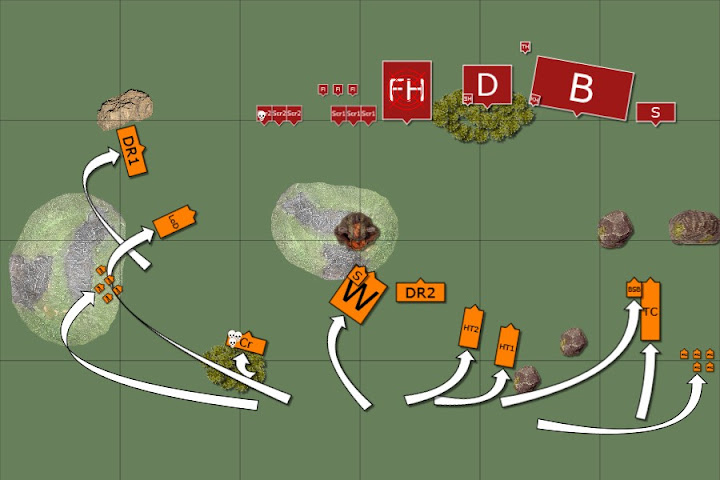
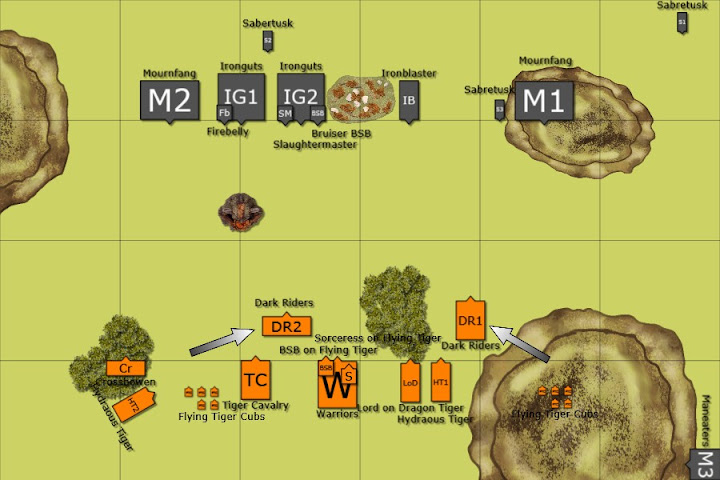
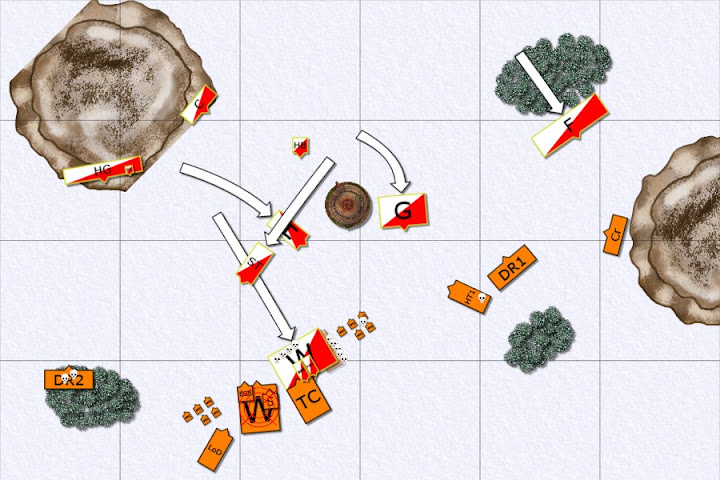
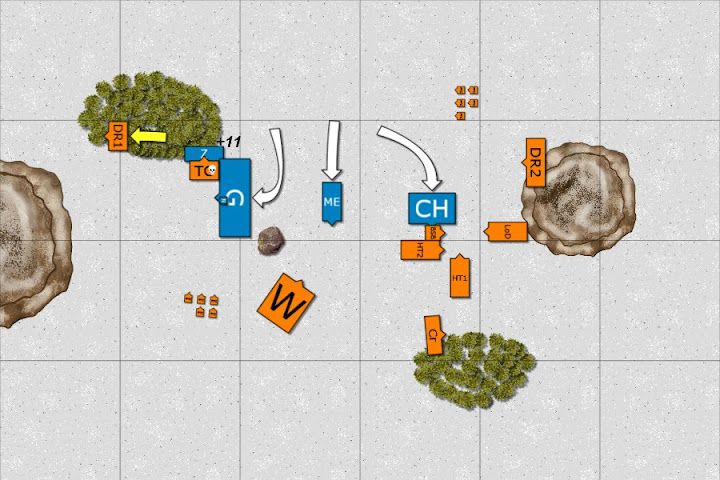
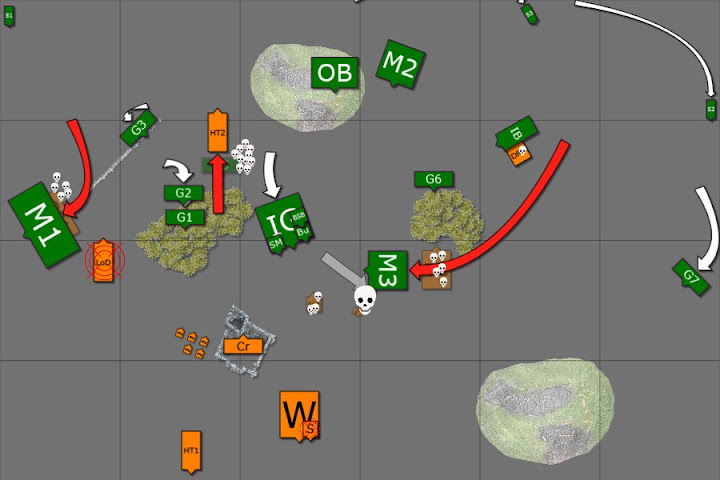
I won the roll to choose sides and I elected to take the side with the wizard’s tower. I was able to pair the hydras and hid the dragon on the off chance I did not get first turn. The warriors stayed near the building and I placed the knights midwest for the option of projecting power on the other side; the BSB joined them for similar reasons. For spells I rolled Enfeebling and Mindrazor; I traded the former for Miasma.
My opponent was able to see my entire deployment before he placed his first unit, though with the sheer number of drops he had, he’d have the majority of this advantage in a battleline scenario anyway. The ironblaster rolled the central deployment zone and was placed as far east and away from my fast elements as possible. The unit of four mournfang was placed far west to threaten my heavies and his ironguts with characters set up directly across from the bulk of my forces with their flanks protected on one side by bulls and a mess of gnoblars on the other. I honestly forget what spells his level 2 had, but his level 4 had Spirit Leech, Soulblight, Doom and Darkness, and Fate of Bjuana.
I vanguarded my riders up, keeping the eastern unit just over 20” from his mournfang.
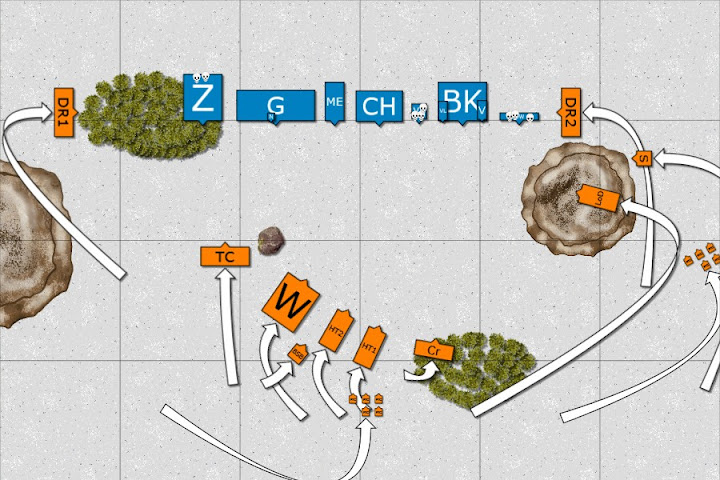
 Tiger turn 1:
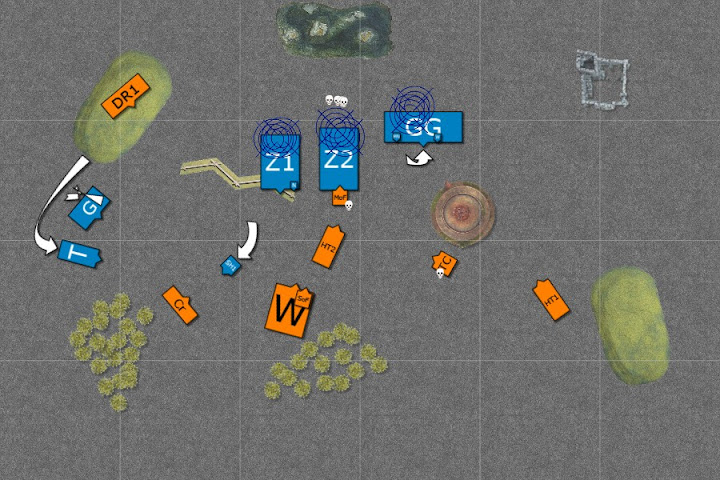
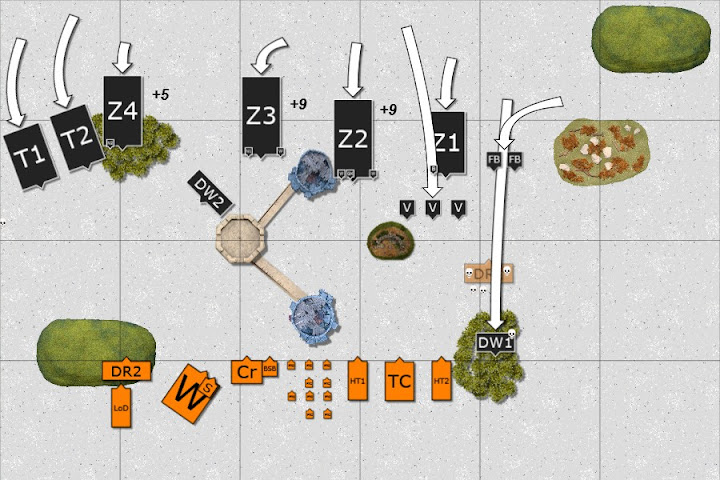
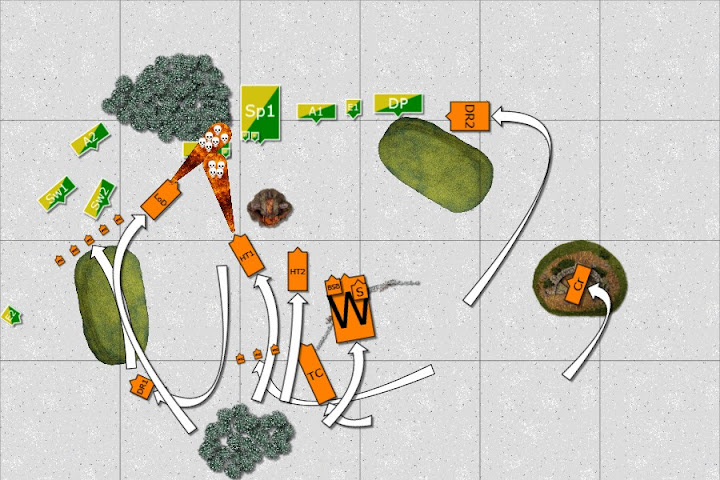
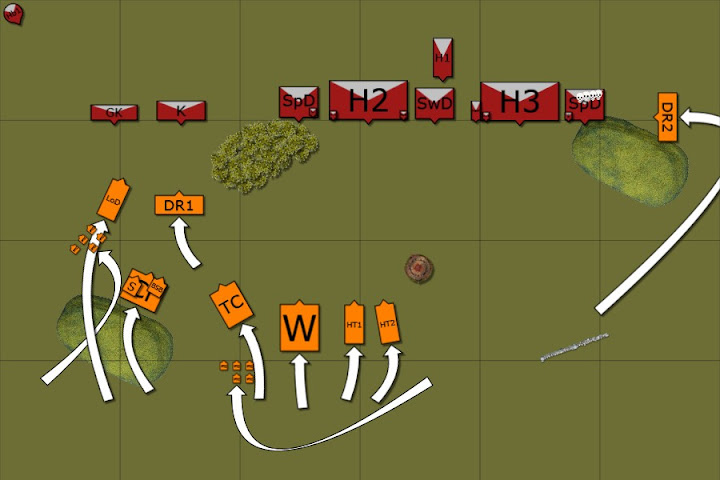
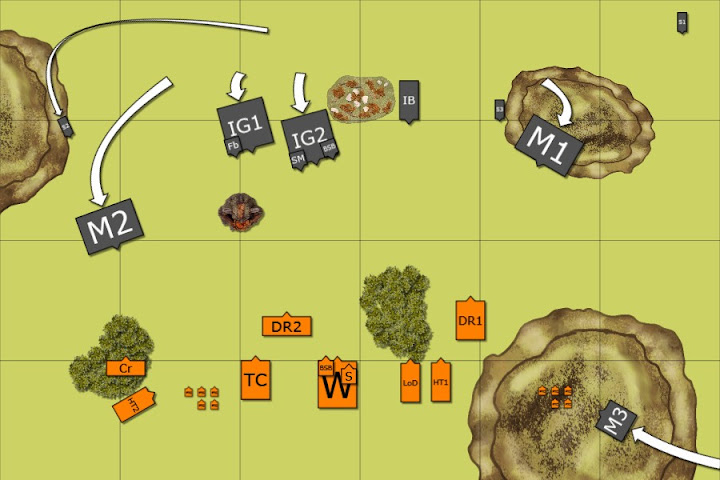
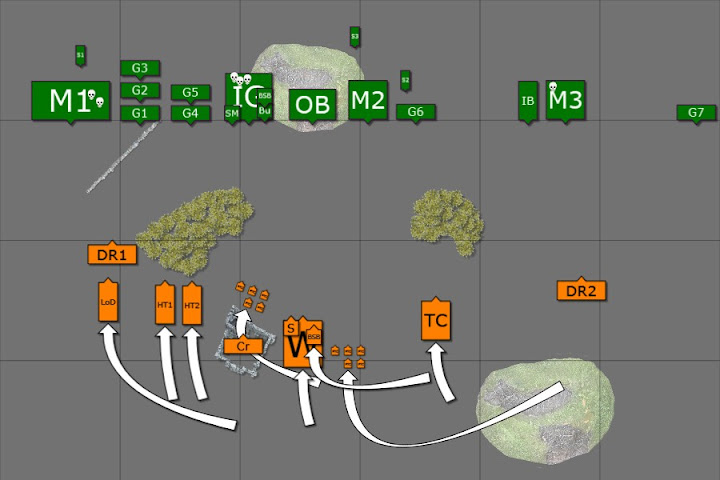
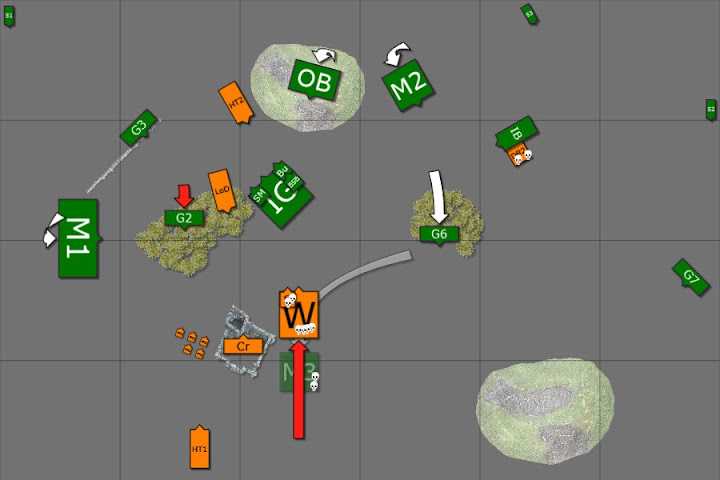
I advanced the dragon and hydras somewhat conservatively as I did not want to get in range of either the mournfang or the ironguts. The knights advanced similarly. There weren't any battleline gaps to exploit, so my BSB just moved west where his reroll might come in handy. Both units of dark riders stayed in place as again there were not any battleline gaps yet and +1 to hit in shooting is nice to have.
Magic was 12v7 and since I was near the wizard’s tower I knew all seven shadow spells. I started with four dice trying to Pit his ironguts but was dispelled with four in turn. My sorceress was in the front arc of the big mournfang unit by a hair (4+ roll) so I tried to send a Pendulum into the ironguts but failed to roll 11+ on four dice.
The dark riders managed one and two wounds on mournfangs while the crossbows took off one irongut.
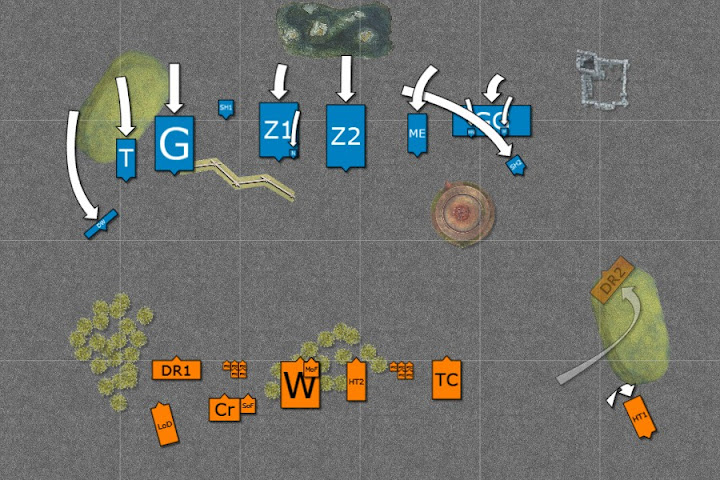
 Orcres turn 1:
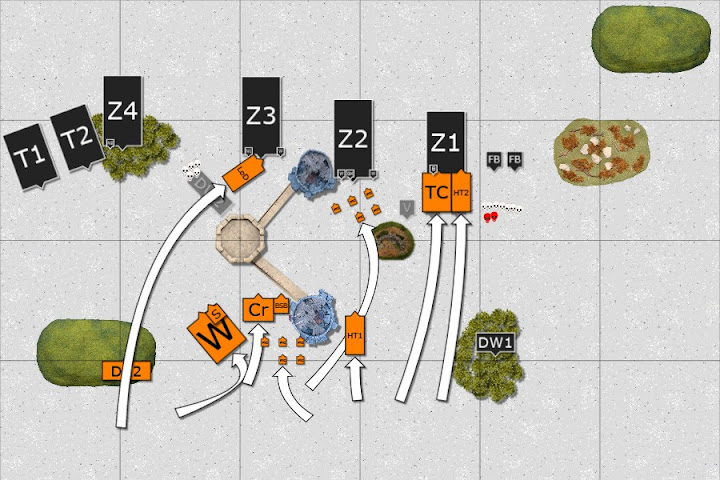
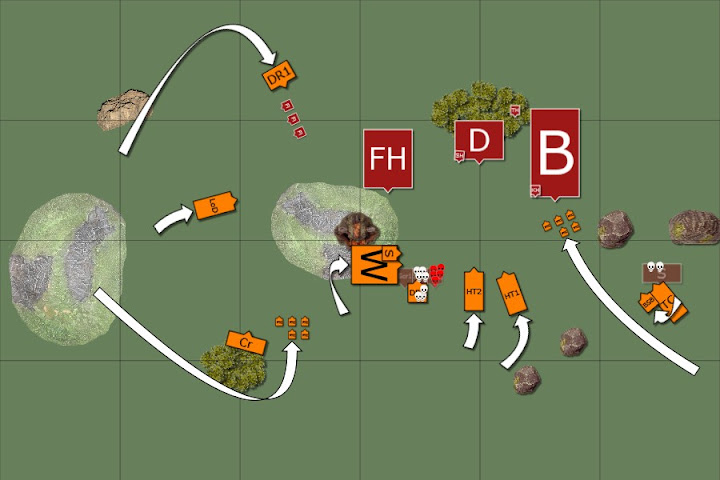
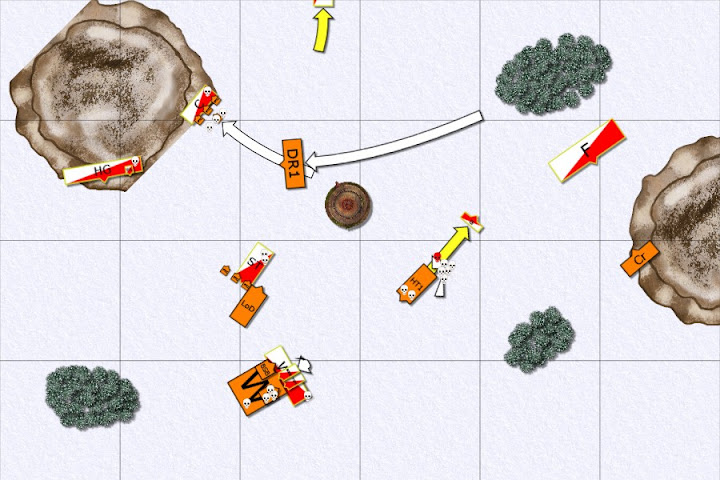
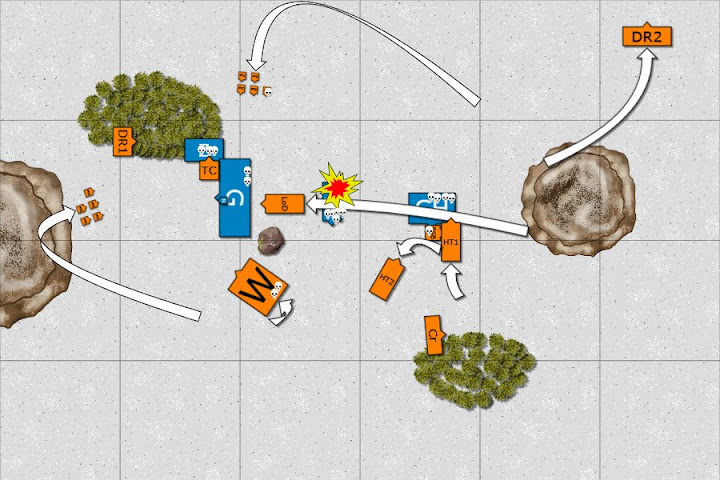
The western mournfang charge my dark riders, who elect to flee. Their flight causes panic checks for the dragon and a hydra, and the hydra fails. The mournfang decide not to redirect into the dragon (it’d be a long charge anyway) I’m assuming so that the dragon is free for the ironblaster. Otherwise the orcre battleline advances as a solid mass.
The slaughtermaster inflicts one wound on the ironguts with Grut’s Sickle. I didn't record what the winds were this phase, but my dispel dice were powerless to stop a Doom on my fleeing hydra and a long range Spirit Leech on my sorceress. No wounds are inflicted, but apparently it still counts as a hit and I lose a wizard level along with Mindrazor thanks to Greedy Fist.
The ironblaster takes aim at the dragon and puts four wounds on her; I make the reverse ward save for the lord.
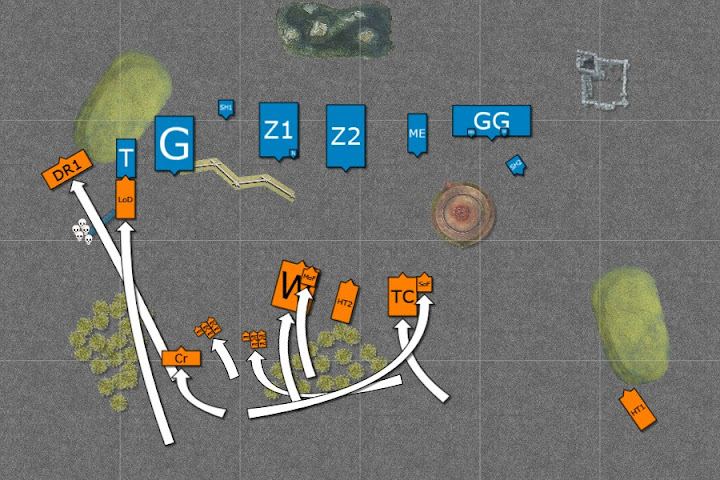
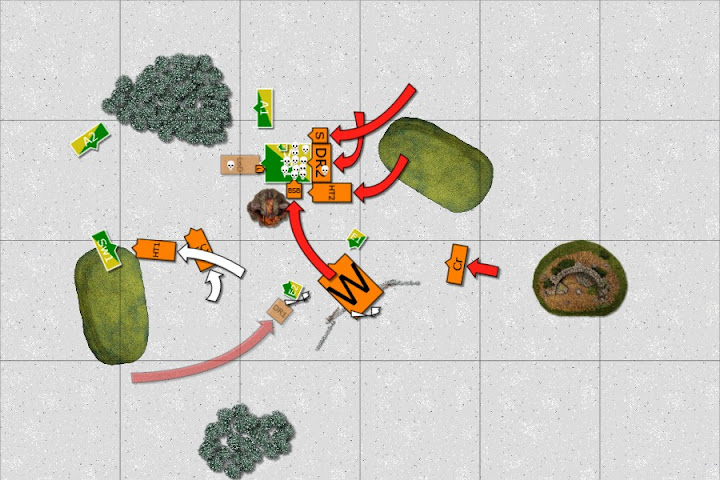
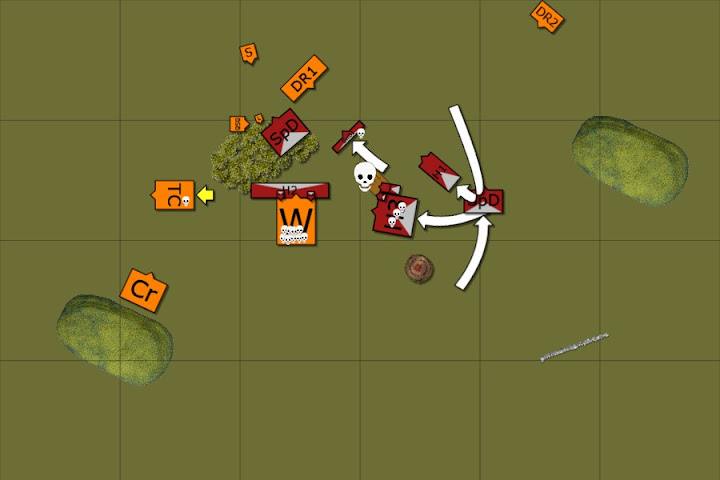
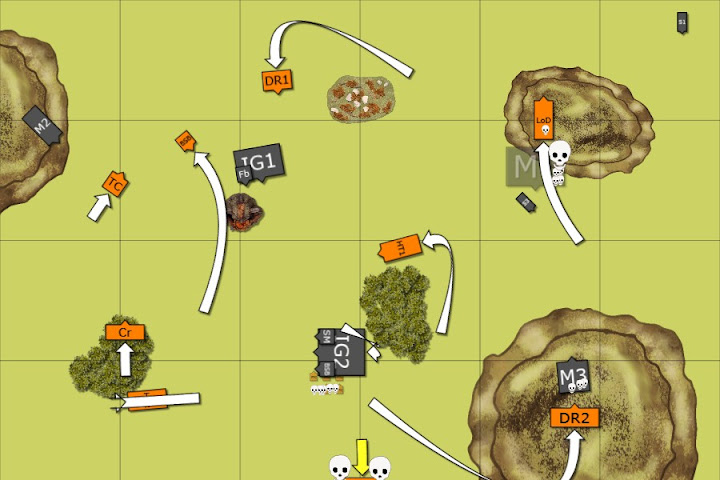
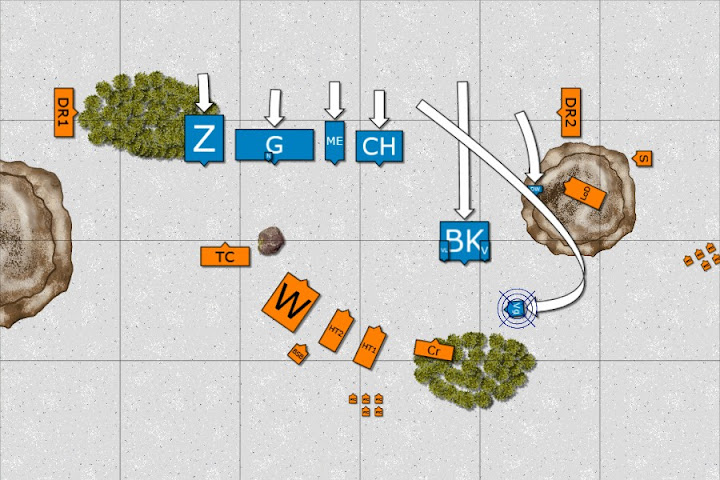
 Tiger turn 2:
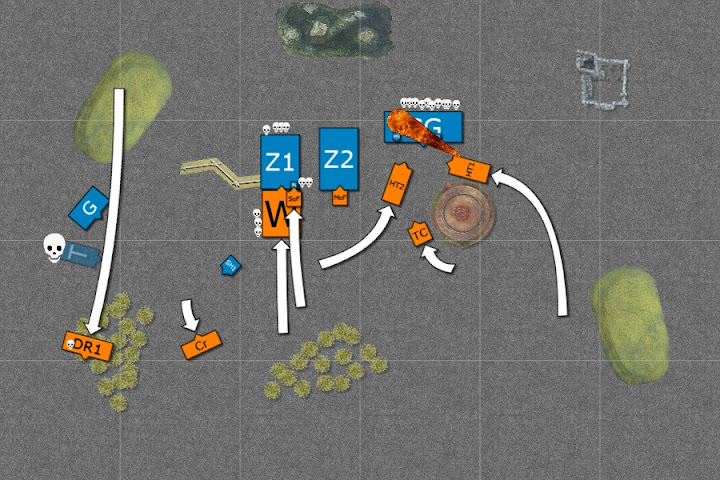
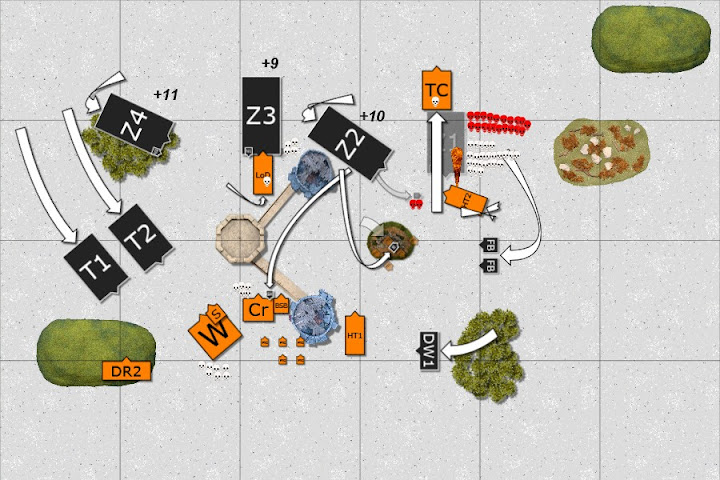
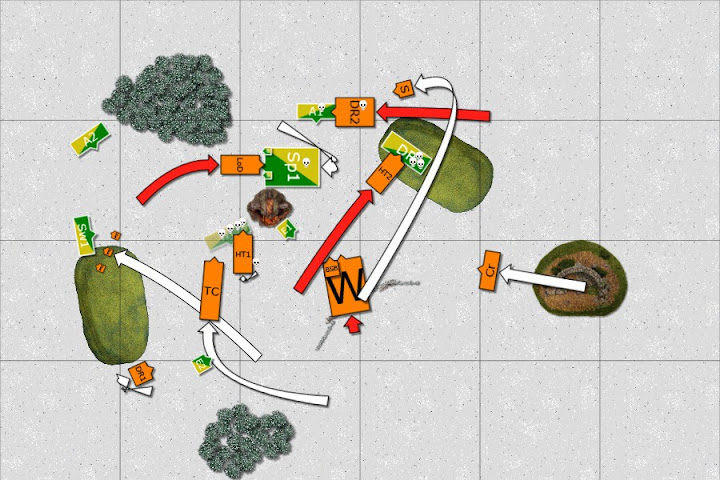
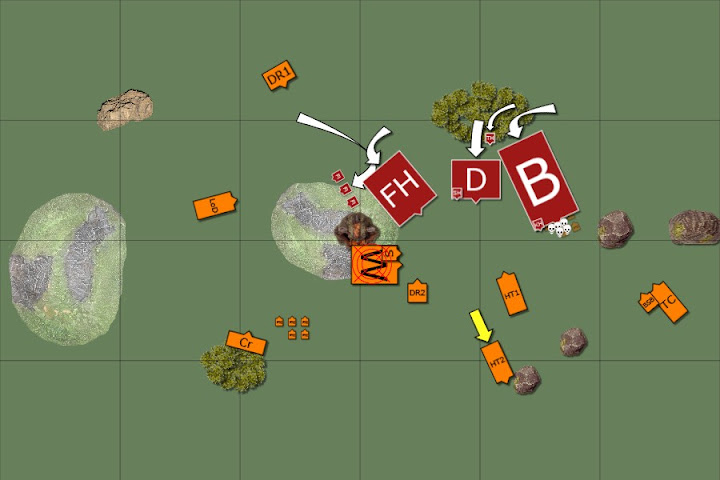
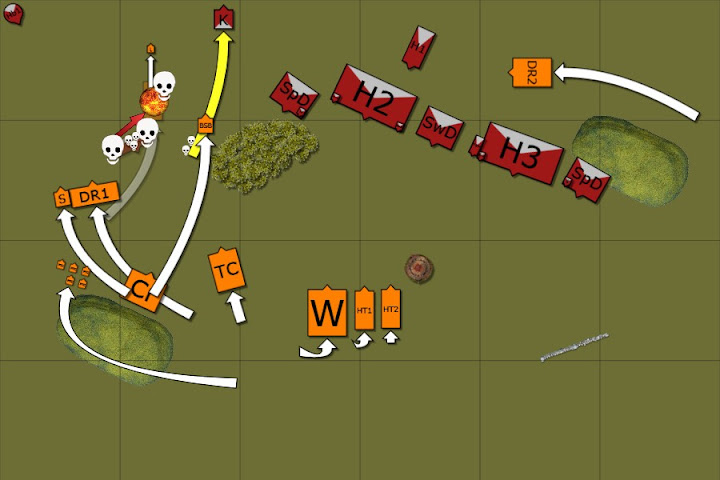
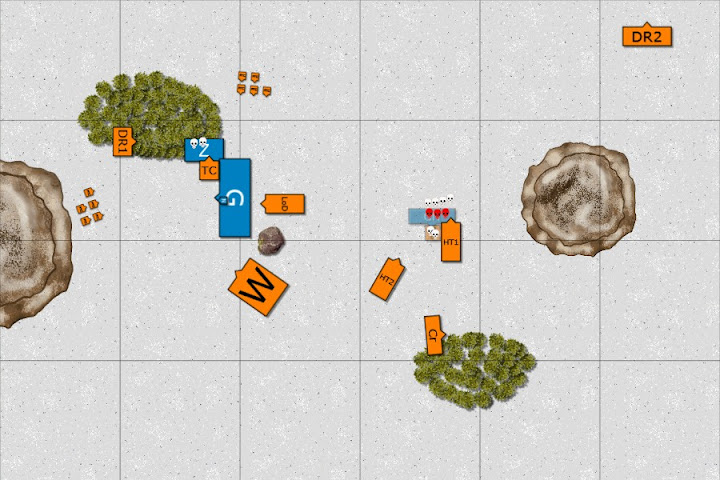
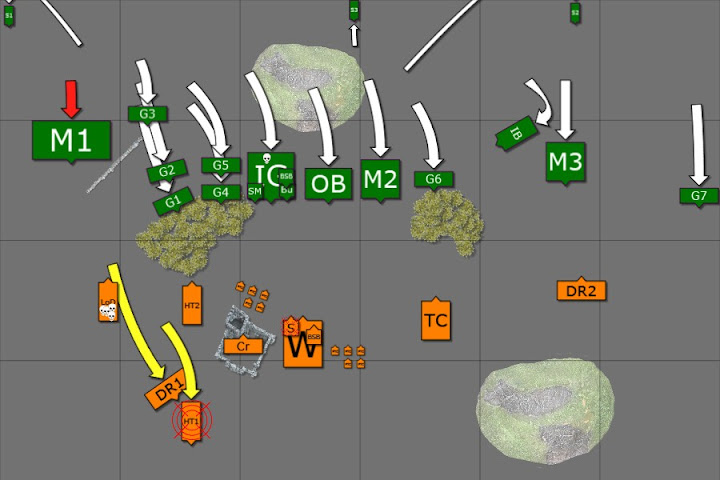
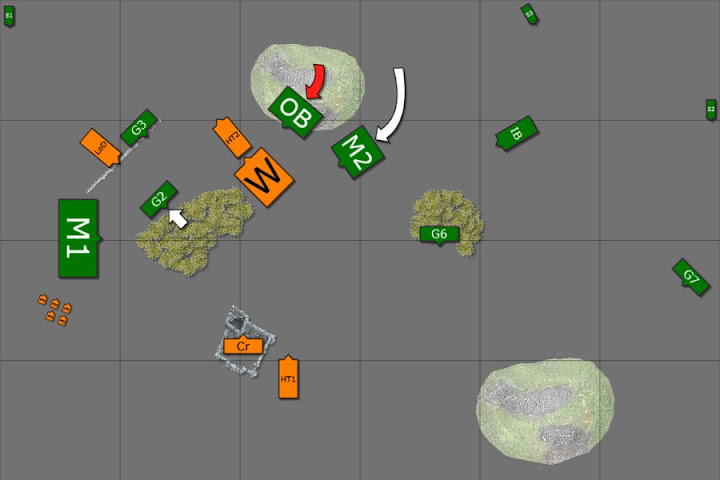
At this point, I would love nothing more than to hit the flank of the ironguts with the dragon, but their flank is protected by gnoblars, who in turn have their flank protected by more gnoblars. With two wounds remaining on the dragon, I don’t relish taking on the mournfang, but she has a decent chance at survival and a good chance at breaking them, so I declare the charge; after some consideration, the mournfang hold. The dark riders charge the flank of the ironblaster – I’m hoping to tie it up for a turn, but with luck I may be able to break it in combat. I declare the knights against the bulls who hold. I declare the BSB into the bulls as well and they flee 10”, which is just outside of the range of the harpies. The knights redirect into the unit of two mournfang who hold. I hem and haw at this point, knowing that if the BSB follows suit they’ll flee, but I’m unsure if the knights can go in alone. I decide to charge, the mournfang do flee, again ending outside of the range of the harpies. Later doing the math, the knights likely would have been fine and more importantly a failed charge puts them in a very dangerous position. The hydra doesn’t really want to go into the ironguts alone, so begins to start clearing up some gnoblars.
The dragon needs to roll only 5+ swiftstride to get into the mournfang and the dice come up with a trio of 2s. The fleeing hydra fails to rally because of the Doom and Darkness but flees only 3” giving me another shot next turn. The dark riders do rally and move up screening the dragon from the mournfang, making sure that an overrun will sail past the dragon.
Magic is 5v5 and the butcher uses the Hellheart, needing to roll a 4+ for the sorceress to be in range, but he rolls a 1. My opponent elects to use the game reroll and comes up with another 1. I know I need more power dice to get anything through, so I start with 2 dice on Power of Darkness, but it’s dispelled with 2 dice. At this point, the odds are low of getting anything off successfully, so I throw the last three successfully dispelling Doom and Darkness.
In shooting, the dark riders get only one wound on the large mournfang unit which they save and the crossbows put two on the ironguts, which they do not. In combat, the other unit of dark riders cannot wound the ironblaster, lose two of their own, and the combat’s a tie. The hydra mows through gnoblars and overruns into the unit behind.
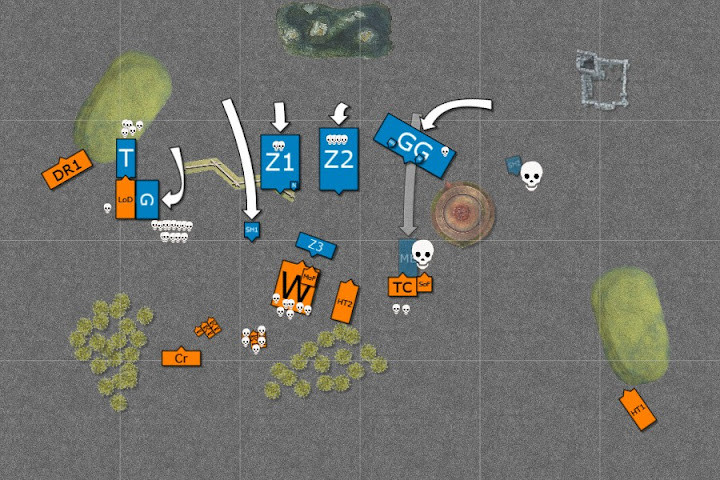
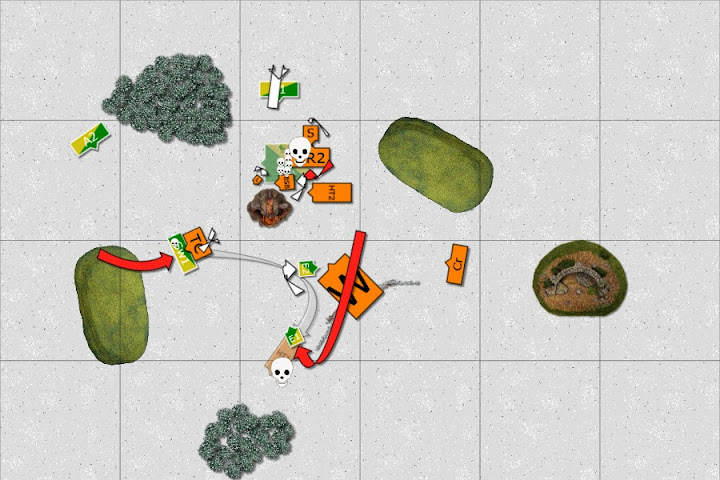
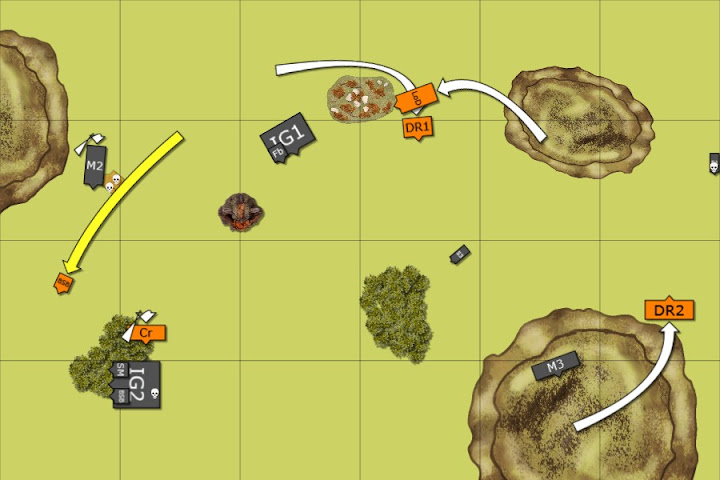
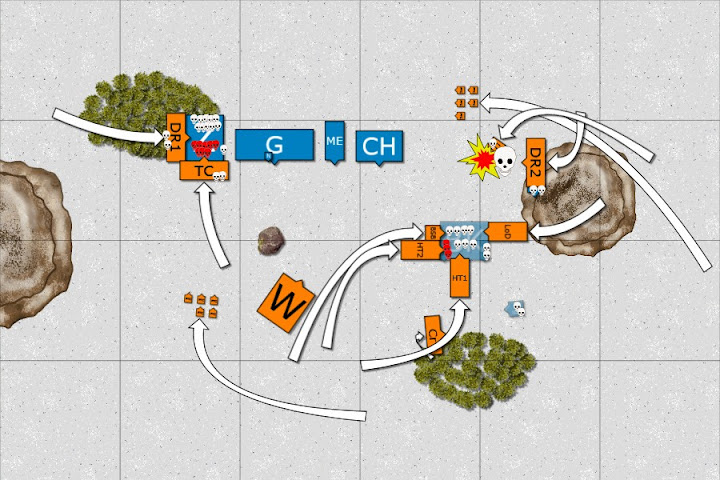
 Orcres turn 2:
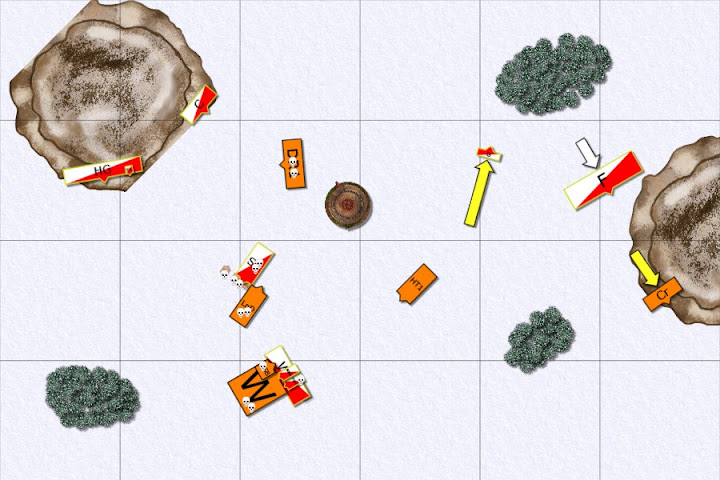
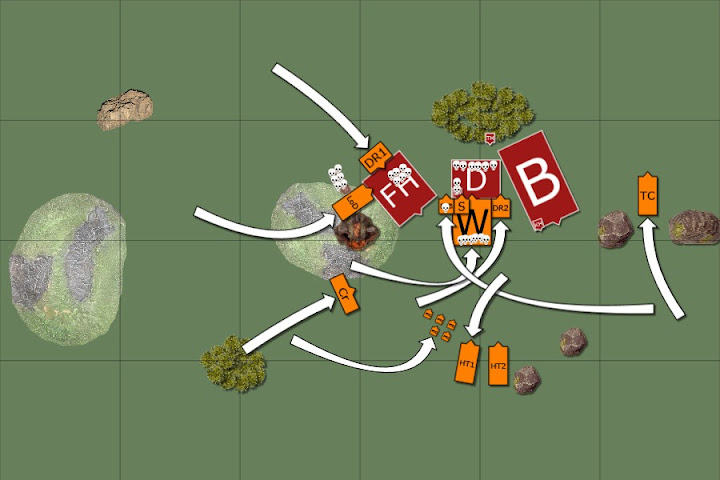
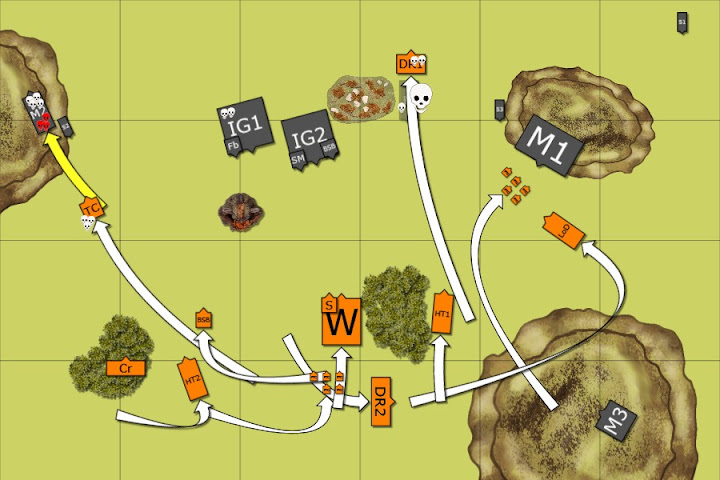
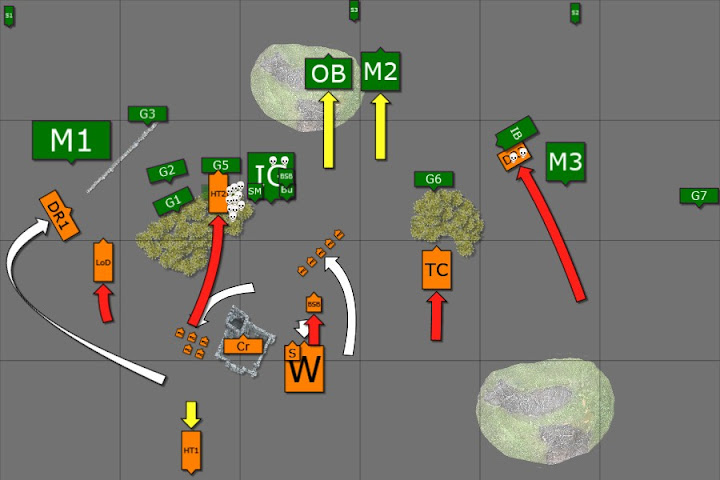
The four mournfang charge the dark riders and the two mournfang charge the flank of the knights. Both the bulls and the fleeing mournfang rally. The ironguts move up to the harpies and the gnoblars shuffle around.
Magic is 6v3 and Grut’s Sickle is used again. Two dice are used to Spirit Leech my sorceress again and though no wounds are caused, I lose my last magic level (now as a level 0, I can channel and use arcane items, but cannot cast). Two dice are used to Doom and Darkness my dragon and I reluctantly let it go. Finally, two dice are used to Fate my BSB; I save the scroll, mistaking Fate for Caress and thinking I have a decent shot at surviving it. I still throw my three dispel dice at it, but as he’s +6 to cast and I’m now +0 I am nowhere near close enough. He only rolls 6 subtracting my toughness of three leaves 3 hits, all of which wound and my BSB croaks. I pass the panic check with the crorssbows, but fail with the harpies and the spearmen.
The dark riders again fail to wound the ironblaster, losing one, and we’re tied again. The mournfang obliterate the dark riders with impact hits and overrun just barely out of sight of the dragon. Then on the panic check I roll a 3 and 5, which now fails due to Doom and Darkness. I consider letting it go but realize that if I flee, the mournfang would be able to set up a charge if I rally. I use my game reroll to reroll the 5 and roll low enough to pass. On the other side, the mournfang only kill one knight with the impact hits, but take out two more with attacks. The last knight with the flag dies where he stands when he fails the break check and the mournfang overrun coming into contact with the fleeing harpies, destroying them and giving him a free reform. The hydra kills all the gnoblars, but my opponent had cleverly moved another gnoblar unit 1” away from the hydra’s center, limiting my reform options to turning around. I thought that I could use the gap between the gnoblars to wheel and get into contact with the flank of the ironguts, but after patiently walking me through the proposed reform and charge I agreed with my opponent that the charge would not be possible. With reform options limited, I elected to overrun so that I could get some room to maneuver.
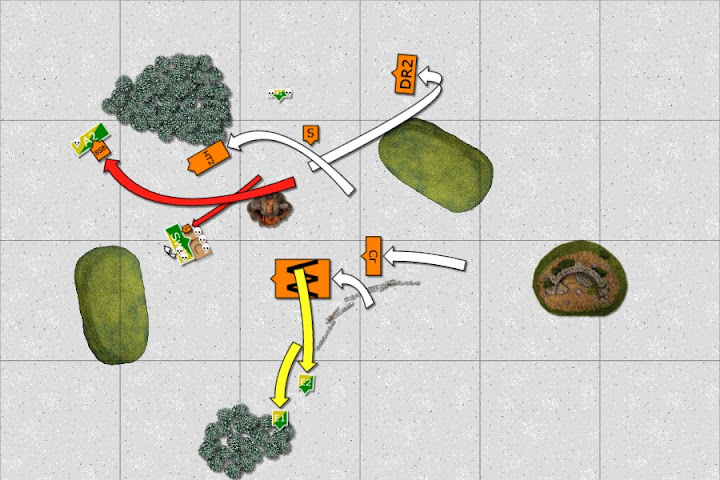
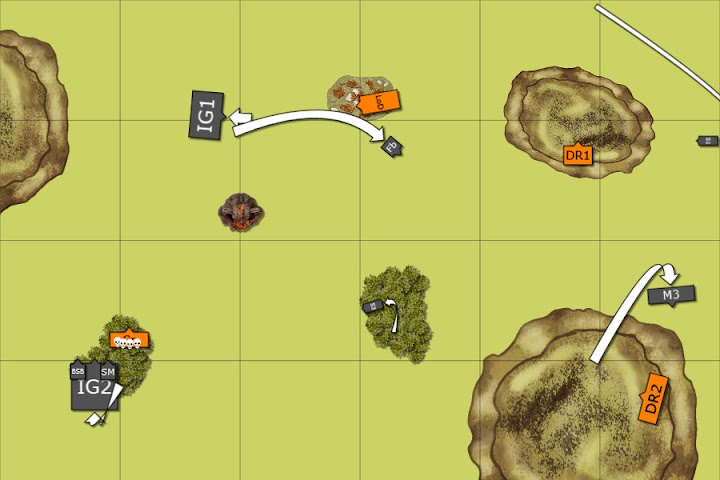
 Tiger turn 3:
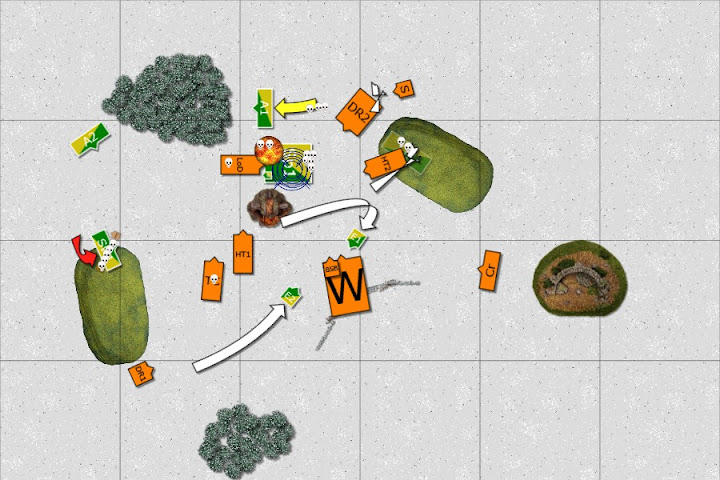
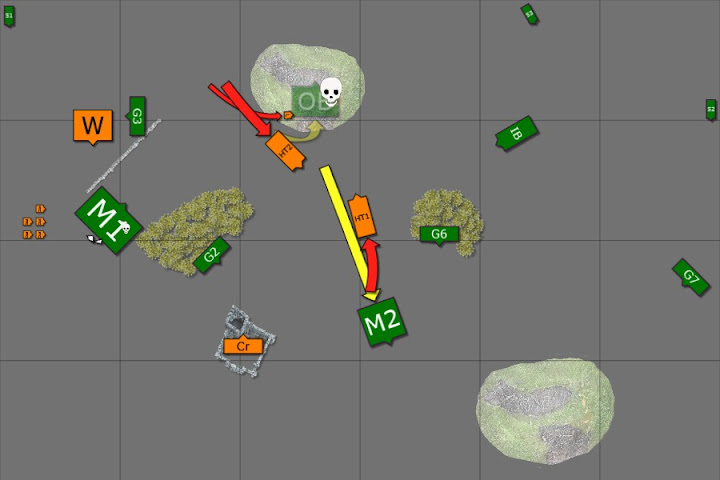
Although it doesn’t look like it, the dragon can see the forward gnoblar unit and charges. The flee roll is low enough for me to catch and I elect to not redirect looking for the free reform a catch will give me. Once I actually contact them however, the same unit of gnoblars that stopped the hydra also limits the dragon! (Shame on me for not checking on this before) The spears and hydra both thankfully rally. I swing the hydra around to charge the ironguts later.
I roll high for the winds of magic but can’t use the dice for anything but dispelling the Doom and Darkness.
The crossbows get three wounds on the mournfang, but they are all saved by armor.
Again I can’t wound the ironblaster, this turn I don’t lose any in return, but the ironblaster resolutely stays put with a pair of 1s for the break test.
 Orcres turn 3:
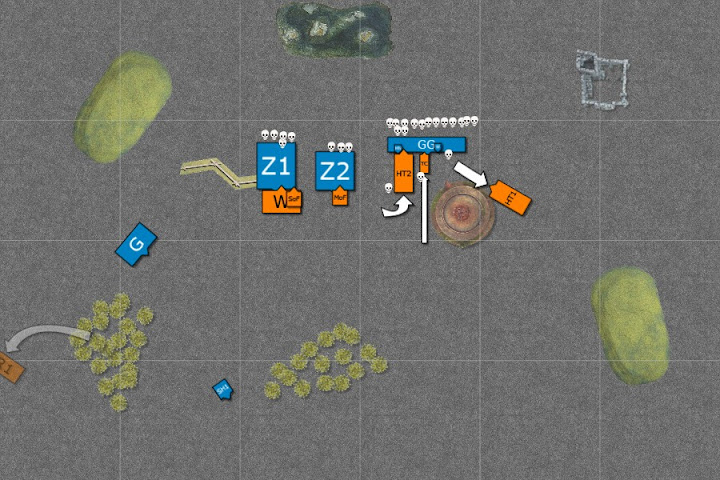
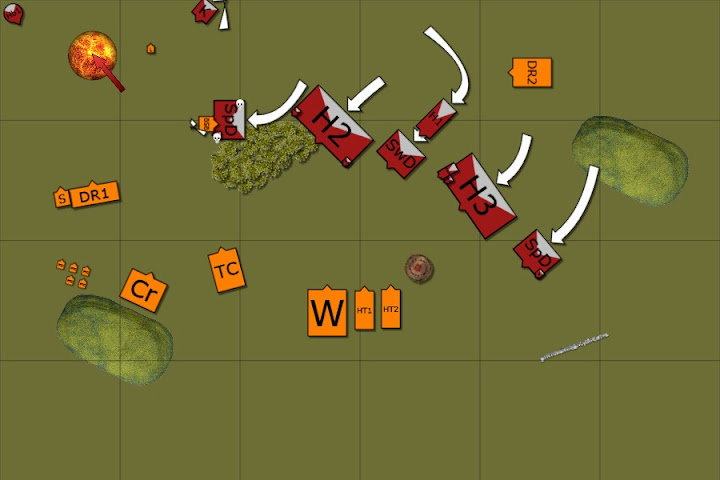
Two mournfang charge the spears looking to take out the sorceress. The four mournfang turn around, as do the ironguts, being careful to stay out of the dragon’s charge arc, but still able to see her. The bulls move up to flank the hydra should it charge the ironguts.
Magic is 5v4 and the Sickle is not used. All five dice go into Fate on the dragonlord, but I pull the scroll.
For the fourth round in a row my dark riders cannot wound T6! The last two are pummeled and the ironblaster is again free. I’m very happy with the ironblaster being held up for two whole turns, but at the time it was a bit frustrating to not roll even a single 6 over the course of more than a dozen hits. Against the spears the mournfang cause four kills on impact. The elves sneak one wound past the armor and the sorceress puts on another, killing one orcre. The remaining mournfang throws all attacks at the sorceress, but only gets two wounds, leaving her alive to prevent stomps. We count up combat resolution and I lose by one but pass on steadfast. I’m considering charges in the next turn when I remember the Warbanner in the spears and my opponent graciously agrees to go back and recalculate, where I’m up by a musician. He fails his ld6 test and runs; I chase but fail to catch him. Halfway through turn 4 he remembers that the last mournfang was a standard (this unit was just bases) and thus I couldn’t pursue. He declined to go back though since we had already finished Tiger turn four combat.
 Tiger turn 4:
I was going to charge the hydra in regardless, but with the result of the previous combat, I’m now able to support it with a rear charge from the spears. The dragon repositions out of line of sight from the mournfang, using the wall as cover from the ironblaster.
Shooting is again ineffective.
My sorceress challenges just to try and prevent one the characters hurting the hydra and his BSB accepts. The sorceress and mount cause only one wound but is wounded once in return and dies. The spears add one or two wounds, but the hydra’s breath is good for 11 hits and six wounds. All the attacks go on the ironguts since I want as little retaliation as possible. His mages cannot wound the hydra. He needs insane courage to hold and fails to get it. I chase with both and run him down.
 Orcres turn 4:
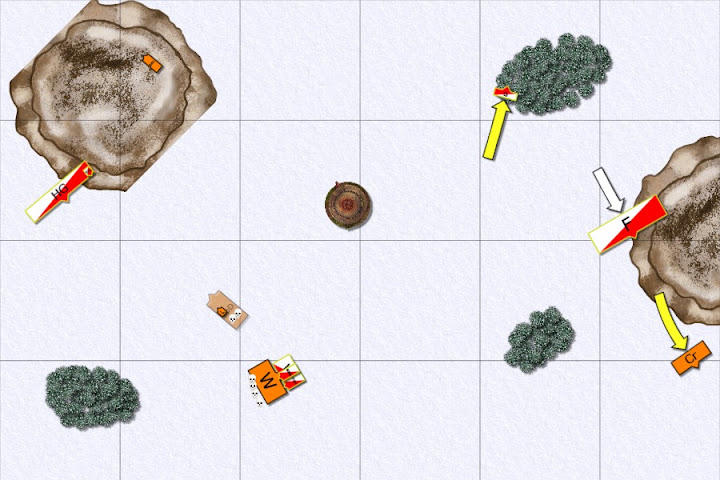
The bulls charge the spearmen and I have little choice but to hold. They need a something low (5+?) and only roll a 4 failing the charge.
The ironblaster takes aim but the shot lands short of the wall, bouncing into and destroying it.
 Tiger turn 5:
I reposition trying to hide the dragon behind the hydra maintaining decent charge options, but later realize I did a very poor job of it. The spears march forward and do a big wheel so that the bulls are in their front arc with their rear protected from mournfang by the gnoblars. The last hydra advances.
Once more I try to pick off some mournfang but the crossbow bolts cannot get past the armor.
 Orcres turn 5:
The bulls charge the spears and I hold. The mornfang join and I was going to hold until I learn that they are in the flank; I don’t think I can hold up to that so I flee bouncing through the gnoblars losing a few. The gnoblars and mournfang reform for their eventual rally.
The ironblaster hits the dragon and takes off the last two wounds; I make the reverse ward save for the lord.
 Tigers turn 6:
The northern hydra and dismounted lord charge the bulls and redirect into the mournfang who both flee. The mournfang bounce through the southern hydra. The southern hydra charges the bulls, pushing them back into the lord’s range and he catches them. The warriors rally and I face the mournfang exposing their flank to the gnoblars.
The crossbowmen loose another volley on the mournfang and one wound finally goes through.
 Orcres turn 6:
The mournfang and gnoblars charge the spearmen and kill them to an elf. The ironblaster takes one more shot at the lord, but I again make the reverse ward save.
Postgame:
I had earned about 1650 VPs and my opponent earned about 1320 with would translate to a 12-8 victory. If the rules were different and you could get points for killing the dragon separately then it would be an almost perfect tie. Neither of us obtained the major objective, indeed I didn't even really try as I knew I'd have to take out three sabretusks safely hid in the backfield. As both my knights and spears died, the orcres did get the minor objective and I did not.
Overall, I think there were several mistakes and a bit of good and bad luck on both sides, making a very close game. Let's go my mistakes over it turn by turn:
Deployment: I'm not sure if I made any big errors here. I suppose the western dark riders did not need to be in charge range of the mournfang to begin with, risking the two panic checks and the subsequent rally.
Turn 1: I'm using the spears as a bunker for both the sorceress and BSB, which is fine if there's a lot of BS shooting around, but here there was not and being aggressive with the spears could have really changed things. I probably would have kept the sorceress near the wizard's tower (because I'm foolish), but it may have been smarter to try and fly her into the backfield, where if the death mage wanted to target her, he'd have to turn around. Failing the cast was unfortunate, but that's odds and I'd do it again.
Turn 2: Sending the BSB into the mournfang was a sucker's move and I went for it. I should have just elected to fail the charge or better yet go into the ironguts with the hydra; if the hydra can take out some or most of the ironguts, the BSB should be able to hold for a while pinning the unit in place. Even without the BSB, I should have sent the hydra in; he'd likely die, but probably not the first round and take out 3-4 ironguts with him. Mistaking the two death spells was stupid, but by unwittingly saving the scroll, the dragonlord survived the next magic phase. At the end of turn two I was ready to throw in the towel since a quarter of my army was dead, another quarter was fleeing, and the rest did not look to be in a position to turn things around; at this point I had killed two units of gnoblars and two ironguts. I did stick it out and look for advantages, but my attitude needs work.
Turn 3: I shouldn't have charged the dragon at all, simply repositioning; 1-2 unit of gnoblars was not worth it and unlikely to be able to block a charge to the ironguts. I also really need to remember that warbanner.
Turn 4: Surprisingly few mistakes in this round. Hiding the dragon behind the wall was good, but I was still in the front arc of the death mage, which would have been really bad had he held (with a stubborn crown or insane courage). Perhaps the best thing would have been right in front of the bulls and in the flank of the ironguts, safe from death, but accepting that the dragon would likely die to the ironblaster.
Turn 5: Ensuring that the mournfang were in the spear's front would have been good, and I should have either picked to use the hydra as cannon cover or have good charge options - instead I tried for both and didn't do either very well.
Turn 6: S3 isn't going to do anything to mournfang, so I should have reformed the spears to face the gnoblars; in the end it wouldn't have made a difference, but the extra few kills could have theoretically had the dice been different; or the gnoblars may not have charged at all, which may have been just as good.
List changes
I was impressed by death magic and am considering changing the sorceress to this lore. I am deathly afraid of a double ironblaster ogre list and if I'm lucky enough to roll purple sun it could change the game. Spirit Leech might be nice for unit champion sniping in prep for a dragon charge. I'm enamored with the idea of smoke and mirroring with the BSB, but it's so situational that it's not a great reason to pick a lore. I like the range of Miasma, but I'm finding the sorceress staying near the front lines anyway (which may be a habit I should break...). Any opinions on lore options?
I'm also considering dropping two spearmen to add musicians to the dark riders. Two times this game the riders were in a tie combat and the musician would have tipped it. That said, I feel the spearmen are already pretty low on numbers for their role and hesitate to drop two more. Do any of you feel that the musicians would be worth losing two more spearmen?